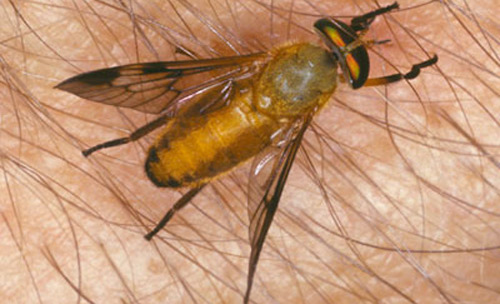
In the heat of the summer biting flies become very active during the day. Deer flies, horse flies, and especially yellow flies inflict a fierce bite on people and other animals. All three species are in the Tabanidae family, commonly referred to as tabanids. Like mosquitoes, female flies of these species require mammalian blood in order to gain the enzymes necessary to lay eggs.
The tabanids lie in wait under bushes and in trees until a host is sensed. The keen eyes of the flies are able to see their prey’s movement, but mammals also create scents and carbon dioxide, making them very easy to locate. The attacks begin at sunrise, lasts about three hours, fades through the heat of the day, and peaks again about two hours before sunset, lasting until the sun goes down.
Tabanids use their mandibles to cut through the skin like scissors, causing blood to flow. Anticoagulants in the fly saliva are pumped into the wound to keep the fluid coming while the insect sponges it up with its labella.
While blood loss and disease transmission are concerns, for most, the disturbing part of the attack is the painful bite! Many people experience other adverse effects that extend the agony.
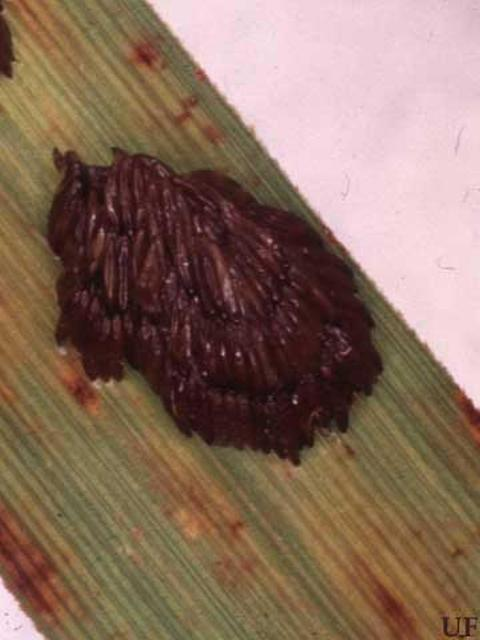
So, what can you do? The use of insecticides is generally considered ineffective and/or economically unfeasible. Habitat manipulation is an important component to reducing populations. Tabanid eggs are laid in layers on vertical surfaces, especially on aquatic vegetation. Secretions from the adult fly protect the eggs from water damage. When the maggots hatch in 5 to 7 days they must remain in moist areas to survive.
Over the next few months, larvae feed on organic matter, crustaceans, earthworm, and insect larvae (including their own species), steadily growing larger. Once fully grown, the larvae move close to the soil surface to pupate. Within 2 days the process is complete. They will remain in the pupal stage for 2 to 3 weeks before emerging as an adult fly.
So, reducing breeding habitat in areas where people and animals spend their time is a possible management technique.
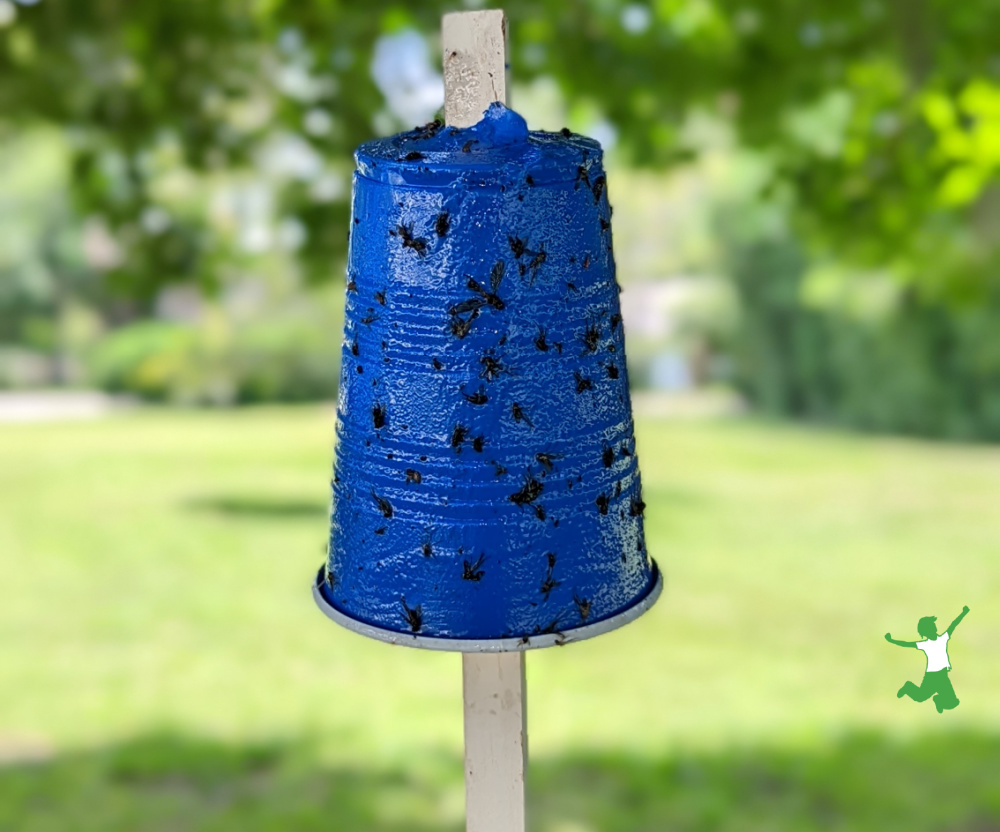
For those times when you want to be at these sites, a trap may help. Research has shown that blue cylinders (open side toward the ground) coated with sticky material and attached to slow-moving objects are effective at reducing the abundance of these flies.
So, get out the Tanglefoot™, spread it on a blue plastic cup, and hang it from a branch that’s moving with the wind. How about attaching one to the boat, tractor, or lawn mower?
If your personal image is less important than the pain of the bites, you may even consider putting the cup on your hat.
National Pollinator Week (June 19-25, 2023) is an annual celebration in support of pollinator health that was initiated and is managed by Pollinator Partnership. It is a time to raise awareness for pollinators and spread the word about what we can do to protect them. It marks a necessary step toward addressing the urgent issue of declining pollinator populations. Bees, birds, butterflies, bats, beetles, moths, wasps, and flies provide valuable ecosystem services.
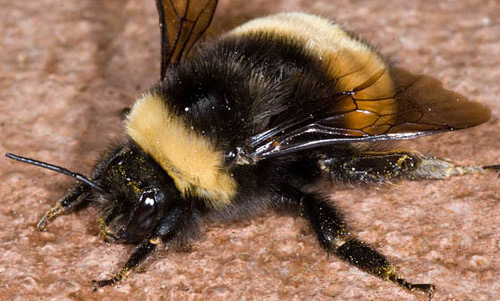
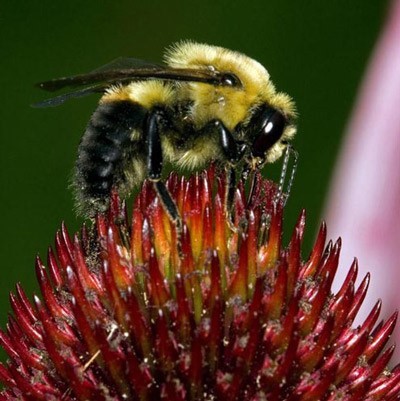
One of these important insects is the bumblebee. The American bumblebee has declined by 89% in relative abundance and continues to decline. This is due to many factors, including habitat loss, pesticides, climate change, and disease. In the past 20 years, it has completely disappeared from eight states and has become very rare in many others. Over 250 species of bumble bees occur throughout the world, but only five occur in Florida: common eastern (Bombus impatiens), the most common in the panhandle, two-spotted (B. bimaculatus), brown-belted (B. griseocollis), American (B. pennsylvanicus) and southern plains (B. fraternus). The yellow-banded bumble bee (B. terricola) has not been seen in Florida since 1962. Bumble bees are less common in South Florida and are never seen in the Keys. These are beneficial insects that pollinate many native and ornamental plants.
Bumble bees are robust and hairy, and females have hairy pollen baskets on their hind legs. They are usually distinguishable by the color of bands on their bodies. Because they are medium to large in size (around ½” long), bumble bees are easy to identify. There are few other bees as large as bumble bees. Bumblebees have stingers, but they do not typically sting unless they are provoked or defending their colony. Unlike honey bees, the bumblebee’s stinger is not barbed, so it is capable of stinging repeatedly. A good key for bumble bee identification can be found at www.edis.ifas.ufl.edu/in207.
Bumble bees are more tolerant of cooler weather than other bees due to their large body size, thick hair and their ability to generate internal heat by vibrating their flight muscles. This allows them to emerge early in spring and remain in our gardens throughout fall. Bumble bees are generalists and visit a wide variety of plants for nectar and pollen. For nectar, they choose flowers that accommodate their species’ tongue length.
Most bumble bees are ground-nesters and often use existing cavities such as abandoned rodent burrows. They may also use leaf litter, wood piles or tree cavities as nest sites. They nest in colonies of 25 to 400. Most will die at the end of the summer, leaving only a few mated queens, which hibernate through winter and emerge in spring to form a new colony. In the span of a year, there may be several generations of workers and males serving a single queen.
Bumble bee populations have been in decline for several decades because of habitat loss, pesticides and diseases. Pollinators are dying because their food and homes are disappearing, diseases have increased, and rising temperatures and natural disasters are affecting their ability to survive – all of which are related to climate change. At the same time, the conservation of pollinators and their habitats can help combat climate change by supporting healthy ecosystems, air, soil, water, and plants. Combined, these results make planet earth a safer place for us to live. These are big problems and the efforts that are made around North America and globally during Pollinator Week can help provide real solutions for the pollinators we all love.
The great thing about Pollinator Week is that you can celebrate and get involved any way you like! Popular events include planting for pollinators, hosting garden tours, participating in online bee and butterfly ID workshops, and so much more. Additional information can be found at www.pollinator.org/pollinator-week or by contacting Pollinator Partnership at info@pollinator.org. Utilize these resources to help you celebrate and promote your involvement.
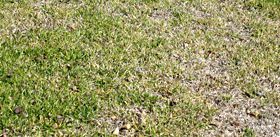
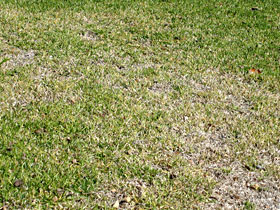
Does your yard have patches of dead grass or areas that look thin and weak? The last two summers of heavy rain and the stress of December’s freezing weather have contributed to widespread outbreaks of Take-All Root Rot, a soil-inhabiting fungus Gaeumannomyces graminis var. graminis that causes yellow grass patches ranging in diameter from a few inches to more than 15 feet. The symptoms first appear in the spring, but disease can persist all summer and survive the winter. Over time the entire area dies as the root system rots away.
The pathogen is naturally present on warm-season turfgrass roots. High rainfall and stressed turfgrass trigger the disease. Because the roots are affected, they are not able to efficiently obtain water or nutrients from the soil, nor are they able to store the products of photosynthesis, which result in the loss of color in the leaves. By the time the leaf symptoms appear, the pathogen has been active on the roots for several weeks, probably longer; potentially years. If the turfgrass is not stressed, leaf symptoms may never be observed. To confirm the presence of TARR, submit a sample to the UF Pathology Lab.
This disease is very difficult to control once the above-ground symptoms are observed. Measures that prevent or alleviate stress are the best methods for controlling the disease. Any stress (environmental or man-made) placed on the turf weakens it, making it more susceptible to disease. Remember, that every maintenance practice, fertilizer application, and chemical (especially herbicide), application has an impact on turfgrass health.
Cultural practices that impact the level of stress experienced by a lawn include: proper turfgrass species selection; mowing at the correct height; irrigation timing, frequency and volume; fertilizer nitrogen and potassium sources and application quantities; thatch accumulation; and soil compaction issues. The selection of turfgrass species should be based on existing soil pH, sunlight exposure, use of the area and planned maintenance level.
Mower blades must be sharp to avoid tearing of the leaves. Additionally, turfgrasses that are cut below their optimum height become stressed and more susceptible to diseases, especially root rots. When any disease occurs, raise the cutting height. Scalping the grass damages the growing point. Raising the cutting height increases the green plant tissue available for photosynthesis, resulting in more energy for turfgrass growth and subsequent recovery from disease.
The amount of water and the timing of its application can prevent or contribute to disease development. Most fungal pathogens that cause leaf diseases require free water (rainfall, irrigation, dew) on the leaf to initiate the infection process. Irrigating every day for a few minutes is not beneficial for the turfgrass because it does not provide enough water to the root zone, but it is beneficial for turfgrass pathogens. It is always best to irrigate when dew is already present, usually between 2 and 8 a.m., and then only apply enough water to wet the root zone of the turfgrass. If an area of the lawn has an active fungus, washing or blowing off the mower following use will reduce the spread of the disease to unaffected areas.
Excessively high nitrogen fertility contributes to turfgrass diseases. The minimum amount required for the grass species should be applied. Potassium (K) is an important component in the prevention of diseases, because it prevents plant stress. Application of equal amounts of nitrogen and potassium is recommended for turfgrass health. When turfgrass roots are damaged from disease, it is beneficial to apply nutrients in a liquid solution. However, nitrate-nitrogen increases the severity of diseases, so its use should be avoided when possible. Ammonium-containing fertilizers are the preferred nitrogen sources. Heavy liming has also been linked to increases in Take-All Root Rot. Since most turfgrasses can tolerate a range of pH, maintaining soil at 5.5 to 6.0 can suppress the development of the pathogen. When the disease is active, frequent foliar applications of small amounts of nutrients is necessary to keep the turfgrass from declining.
Additional maintenance practices that need to be addressed are thatch removal and reduction of soil compaction. Excessive thatch often causes the mower tires to sink, which can result in scalping and reducing the amount of leaf tissue capable of photosynthesizing. Thatch and compacted soil prevent proper drainage, resulting in areas remaining excessively wet, depriving root systems of oxygen.
Since recovery of Take-All damaged turfgrass is often poor, complete renovation of the lawn may be necessary. Removal of all diseased tissue is advised. As a native, soil-inhabiting pathogen, Take-All-Root-Rot cannot be eliminated. But, suppression of the organism through physical removal followed by proper cultivation of the new sod is critical to the establishment of a new lawn. Turfgrass management practices, not chemicals, offer the best control of the disease.
It is acceptable to use fungicides on a preventative basis while rooting in the sod. Azoxystrobin, fenarimol, myclobutanil, propiconazole, pyraclostrobin, thiophate methyl, and triadimefon are all fungicides that can be utilized to prevent disease development while having to excessively irrigate newly laid sod. Ideally, the turf area should be mowed and irrigated prior to a fungicide application. Unless the product needs to be watered in, do not irrigate for at least 24 hours after a chemical treatment. Do not mow for at least 24 hours, to avoid removal of the product attached to the leaf blades.
Now that we have added another major stress with the recent heavy rain, it will be very important to continue monitoring the turf and being cautious about the cultural practices being used. Take-All Root Rot is likely to flourish. Do not encourage its development.
If the damaged areas are small, it may be possible to encourage turfgrass runners to grow back into the space. Application of 50/50 blends of sphagnum moss and course white sand can be used to top-dress the damage areas. Add no more than 1-inch of the mixture per application. After the stolons have crept into the voids and received a mowing, more top-dressing can be applied. Repeat until the grass stops growing in the fall. Fungicides applied in the spring and fall will help to keep the Gaeumannomyces graminis var. graminis suppressed.
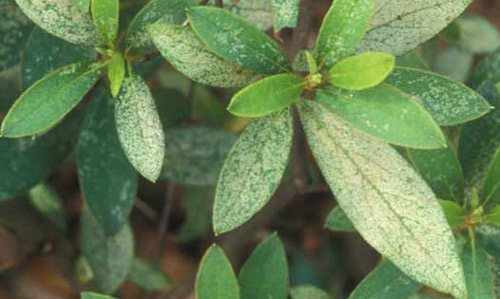
While the azalea blooms are beautiful, it’s hard to remember what the leaves looked like last summer. But, if you look carefully, you may see some off-colored, bleached out leaves. Those are from a piercing-sucking insect. Its azalea lace bug, Stephanitis pyrioides. They overwinter as eggs on the underside of infested leaves or in the leaf litter or mulch under the shrub. Eggs hatch in late March and early April. The insect then passes through five nymphal instars before becoming an adult. It takes approximately one month for the insect to complete development from egg to adult and there are at least four generations per year. Valuable plants that are susceptible to lace bug damage should be inspected in the early spring for the presence of overwintering lace bug adults, eggs and newly hatched nymphs. Inspect these plants every two weeks during the growing season for developing lace bug infestations.
Damage caused by azalea lace bug, Stephanitis pyrioides (Scott), feeding. Photograph by James. L. Castner, University of Florida.
Both adults and nymphs have piercing-sucking mouthparts and remove sap as they feed from the underside of the leaf. Lace bug damage to the foliage detracts greatly from the plants’ beauty, reduces the plants’ ability to produce food, decreases plant vigor and causes the plant to be more susceptible to damage by other insects, diseases or unfavorable weather conditions. The azalea can become almost silver or bleached in appearance from the feeding lace bug damage.
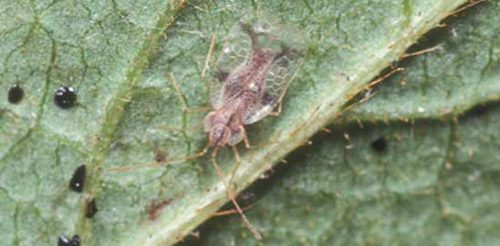
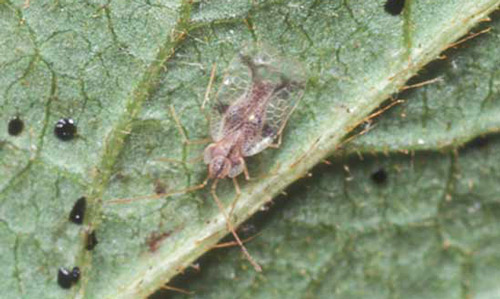
Adult azalea lace bug, Stephanitis pyrioides (Scott). Photograph by Jamba Gyeltshen, University of Florida.
However, lace bugs often go undetected until the infested plants show severe damage sometime into the summer. By then several generations of lace bugs have been weakening the plant. Inspecting early in the spring and simply washing them off the underside of the leaves can help to avoid damage later and the need for pesticides.
Adult lace bugs are flattened and rectangular in shape measuring 1/8 to 1/4 inch long. The area behind the head and the wing covers form a broadened, lace-like body covering. The wings are light amber to transparent in color. Lace bugs leave behind spiny black spots of frass (excrement).
Lace bug nymphs are flat and oval in shape with spines projecting from their bodies in all directions. A lace bug nymph goes through five growth stages (instars) before becoming an adult. At each stage the nymph sheds its skin (molts) and these old skins often remain attached to the lower surface of infested leaves.
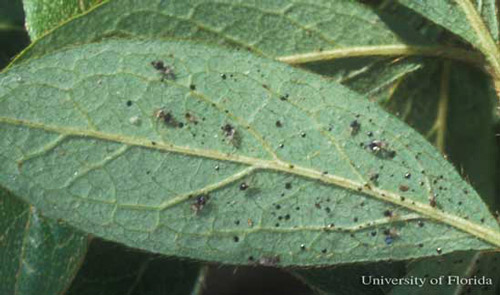
Azalea leaf with azalea lace bugs, Stephanitis pyrioides (Scott), and excrement spots. Photograph by James. L. Castner, University of Florida.
Azalea lace bug eggs are football-shaped and are transparent to cream colored. Lace bug eggs are found on the lower leaf surface, usually alongside or inserted into a leaf vein. Adult females secrete a varnish-like substance over the eggs that hardens into a scab-like protective covering. Other plant species, such as lantana and sycamore, may have similar symptoms. But, realize that lace bugs are host specific. They feed on their favorite plant and won’t go to another plant species. However, the life cycle is similar. Be sure to clean up all the damaged leaves. That’s where the eggs will remain for the winter. Start next spring egg-free.
January to February is the ideal time to plant trees. During dormancy, all the energy in a tree is in the root system. They will establish very quickly. In the spring, they will be ready to grow leaves. Planting and establishing trees is all about managing air and moisture in the soil. The exception is palms. They are not technically trees and should only be planted in the late spring and summer. Three of the most common causes of poor plant establishment or tree death are planting too deep, under watering, and over watering. If appropriate trees are planted at the right depth and they are irrigated properly, the trees will thrive for years to come. As simple as this sounds, problems often arise that lead to poor establishment or plant failure.
Following ten critical steps can ensure proper tree planting:
1. Look up for wires and lights. Make sure that the tree species’ mature size will not interfere with any utility lines.
2. Find the topmost root and treat root defects. After removing the pot from the tree, remove all excess soil on the top of the root ball, until a root that is similar in diameter to the lower branches is located. That is the topmost root. Look for any roots that encircle the rootball, particularly close to the trunk. Remove any roots that will strangle the trunk. Cut all encircling roots at the point they turn to encourage root branching. Then, rough up or shave off all the roots on the perimeter of the rootball. If the tree is balled and burlapped, use a metal skewer to locate the depth of the topmost root.
Remove an inch or more for extremely rootbound trees.
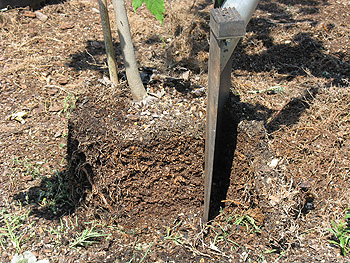
3. Dig shallow and wide hole. Using the corrected rootball as a gauge, dig the hole slightly less shallow that the rootball. Loosen the top six inches of soil around the entire rootball.
4. Carefully place tree in hole. Lower the tree into the hole slowly.
5. Position top root 1-2 inches above landscape soil. Make sure that the rootball is above the surrounding soil grade. If balled and burlapped, the nylon straps, metal pins, burlap on top of the rootball, and wire basket above the grade will need to be removed.
6. Straighten tree. Check the tree from two directions at 90% angles from each other.
7. Add and firm backfill soil. Tamp soil with fingers, not feet. Do not stomp on the soil. It will compact the soil and reduce the oxygen to the roots.
8. Add mulch. Apply a 2–3-inch layer of natural mulch out to the perimeter of the trees branches, or beyond if possible. However, there should be 1 inch or less mulch on top of the rootball. Do not allow mulch to touch the trunk.
9. Stake and prune if needed. If there is a strong steady wind, staking is necessary. Otherwise, don’t stake. Make sure to do all structural pruning is done at planting time. Establish a central leader and remove crossing branches. But do not remove the lower branches. Just reduce the length. The tree needs to bring food to the lower portion of the trunk to increase the diameter.
10. Water the tree. Don’t walk away until the tree has been watered. Apply at least ½ gallon. The tree will need to be watered twice a week for 20-30 weeks. The larger the tree, the more water needed at each event. However, if the water doesn’t perk in within a few minutes, reduce the amount being applied. Overwatering can be as harmful as underwatering.