by Gary Knox | Apr 23, 2020
Article by Dr. Gary Knox, Professor of Environmental Horticulture at the UF/IFAS NFREC Quincy
Introduction
Rhizomatous begonias are a large group of Begonia species, hybrids and selections characterized by large, sometimes-colorful leaves arising from thick rhizomes that grow along the soil surface. White or pink flower clusters that appear in late winter and spring are an extra bonus with these plants. Some types can be used in north Florida as herbaceous perennials that add bold leaf texture and color as well as flowers to shady gardens.
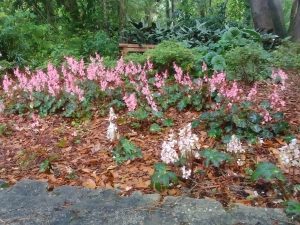
Begonia mass planting
Common rhizomatous begonias such as Begonia nelumbiifolia, ‘Erythrophylla’ (“Beefsteak”), and ‘Ricinifolia’ have long been grown outdoors in south and central Florida gardens as herbaceous perennials. North of these areas, rhizomatous begonias were considered cold sensitive and thus used strictly as pot-grown plants grown indoors or protected over winter. Nonetheless, north Florida trials testing the performance of outdoor, in-ground plantings started in Tallahassee and Gainesville as long ago as the late 1980s and early 1990s. With the proven success of some rhizomatous begonias in north Florida, interest in these plants increased rapidly in the early 2000s. Since then, savvy north Florida gardeners have been delighted by the possibility of using rhizomatous begonias as interesting herbaceous perennials for the shade garden. While temperatures below freezing can damage or kill leaves, these plants will usually produce new leaves from the rhizomes once warmer temperatures return in spring.
Plant Description Under North Florida Conditions
Leaves of rhizomatous begonias are this plant’s most distinctive feature and are why this group is so appealing to gardeners. Leaves often are large, from a few inches wide to almost 3 ft. in diameter (as reported for the cultivar ‘Freddie’ under the right conditions). Leaf shape may be rounded, star-shaped or irregularly edged, and leaf colors include burgundy, red, bronze, chartreuse, silver, and various shades of green including one so dark as to be almost black. Many types have leaves displaying patterns of one or more colors and some have silver or red markings. Undersides of leaves are often burgundy-colored, and leaf stems (petioles) also may exhibit colors other than or in addition to green. Leaves may be smooth, textured, or fuzzy-appearing due to large numbers of sometimes conspicuous hairs. Some types have leaves with an interesting three-dimensional spiral located on top of the leaf where the leaf blade attaches to the stem.

Begonia ‘Big Mac’ foliage
Rhizomatous begonia rhizomes are thickened, fleshy stems 1 to 2 in. or more in diameter that grow, branch and spread horizontally at or just below the soil surface, often in the mulch or leaf duff. Adventitious roots develop along the rhizome, and dormant buds embedded in the horizontal stem can be stimulated to grow new leaves after damage, stress or when divided. With age, as rhizomes grow outward, the oldest part of the rhizome will stop producing leaves and eventually die.
The rhizomes contain water and food reserves that allow this type of begonia to survive environmental stresses like drought as well as leaf loss or damage from cold temperatures. Shoots and roots can grow from the rhizome even if leaves and roots are killed or damaged.
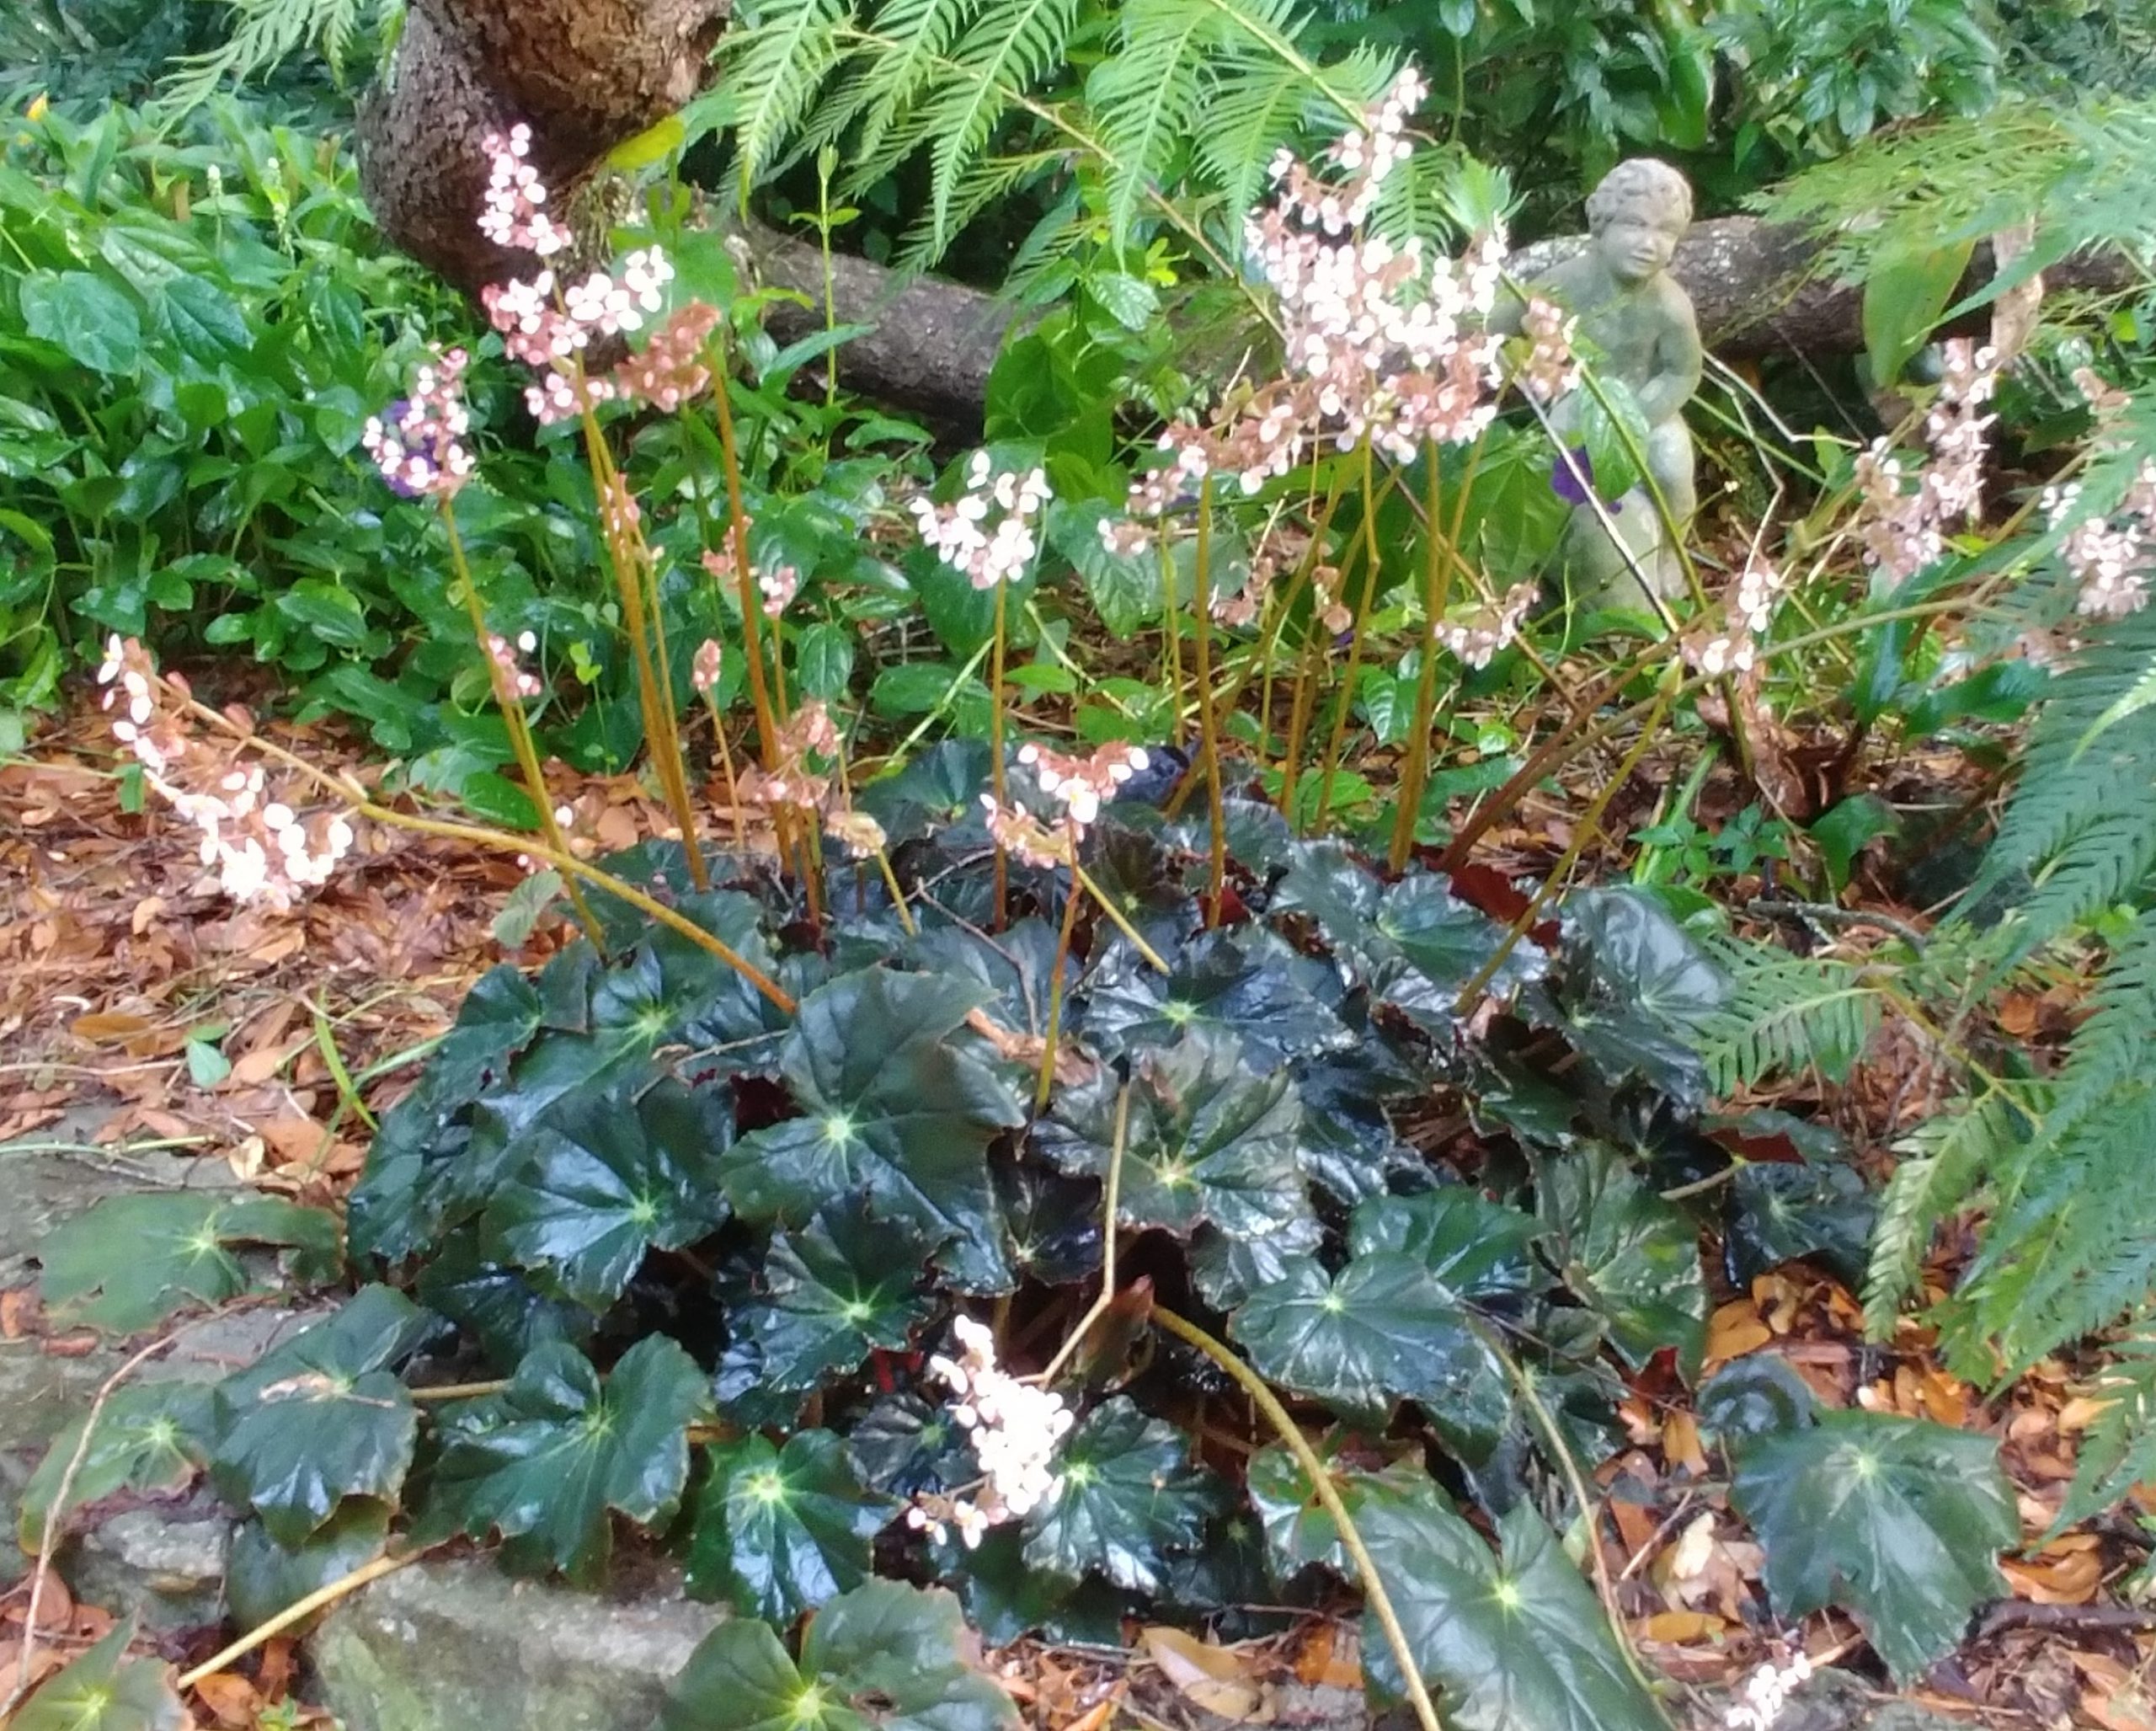
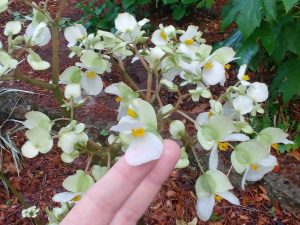
Flowers occur in late winter to spring, depending on the species, cultivar and weather, and are quite showy on some selections. Flowers typically are white to various shades of pink and occur in a cluster (technically called a cyme) held above the foliage, in some cases dramatically high above the foliage. Individual flowers may range in size from 3/8-inch to over 2 inches at their widest point and a flower cluster may contain a few to over 120 individual flowers, depending on selection and growing conditions. A mature rhizomatous begonia may have an extended period of flowering, providing weeks of color. This long floral display results from large numbers of flowers developing sequentially on an individual flower cluster such that new flowers are still forming long after the first flowers have opened. Furthermore, multiple flower clusters appear over an extended time period. Flowers occasionally are pollinated and form winged seed capsules, though seed production and viability are variable. After flowering, the leaves remain a point of interest in the garden due to their size, lush appearance, interesting shapes and colorful patterns.
Cultural Requirements, Use and Maintenance
Rhizomatous begonias grow best in light shade or indirect light but can tolerate morning sun. Plants thrive in rich, organic, well-drained soil that is moist but not wet. A layer of organic mulch or leaf litter often is enough to provide basic conditions for growth in most soils if they are well-drained. Accordingly, organic mulches or leaf litter should be applied regularly around plants. Fertilizer stimulates growth but decomposing organic mulches can provide adequate nutrients, except perhaps with poor or sandy soils.
Newly planted begonias should be watered regularly. After establishment, most rhizomatous begonias benefit from regular watering but only require irrigation during periods of drought or extended dry weather.
An individual plant makes an attractive specimen plant in a container or in the garden. With time, a rhizomatous begonia can spread and, in the garden, develop into a patch. Alternatively, planting large numbers of the same rhizomatous begonia can create a very dramatic garden border, mass planting, or groundcover, especially in spring when all plants are flowering. To achieve this effect more rapidly and with smaller numbers of plants, tips of rhizomes can be pruned to stimulate rhizome branching and result in a denser plant or patch. Rhizome tip pruning should be done after plants finish flowering. Plants can be divided and moved easily since only the rhizome is needed to establish a new plant, but this should occur after flowering and early in the growing season so plants have long enough to establish before cold weather.
For aesthetic purposes, dead or damaged leaves may be removed as needed but especially after frosts and hard freezes. Similarly, leaves that overwinter often become “ratty” in appearance with time and may be removed without affecting plant growth.
Potential Problems
Rhizomatous begonias have few pests or other problems. Mealy bugs can occasionally infest plants. As with other large-leaved plants, wind or physical contact can tear and damage leaves. In north Florida, winter frosts and freezes can damage and disfigure leaves or kill leaves entirely, causing them to lose structural integrity and collapse, appearing mushy. Foliage may be protected during cold weather by frost cloth, sheets or other typical cold protection strategies, though heavy coverings could themselves damage leaves.
Rhizomes themselves usually survive cold weather because they are insulated from low temperatures by being half-buried in the ground and/or being covered by mulch. Adding mulch regularly to rhizomatous begonia plants will provide increased freeze-protection. Also, their typical planting location under tree canopies protects plants from a radiation freeze. Soil drainage is a more important factor for rhizomes since wet soil conditions could lead to rot, particularly in winter.
Common Types and their Descriptions Under North Florida Conditions
With hundreds of species and thousands of cultivars and hybrids, rhizomatous begonias can be overwhelming. Many rhizomatous begonias look alike and even experts have difficulty distinguishing species and cultivars. Many grown in north Florida have their origins in Mexico, Central and South America, though the Begonia Family is huge and species are found nearly world-wide.
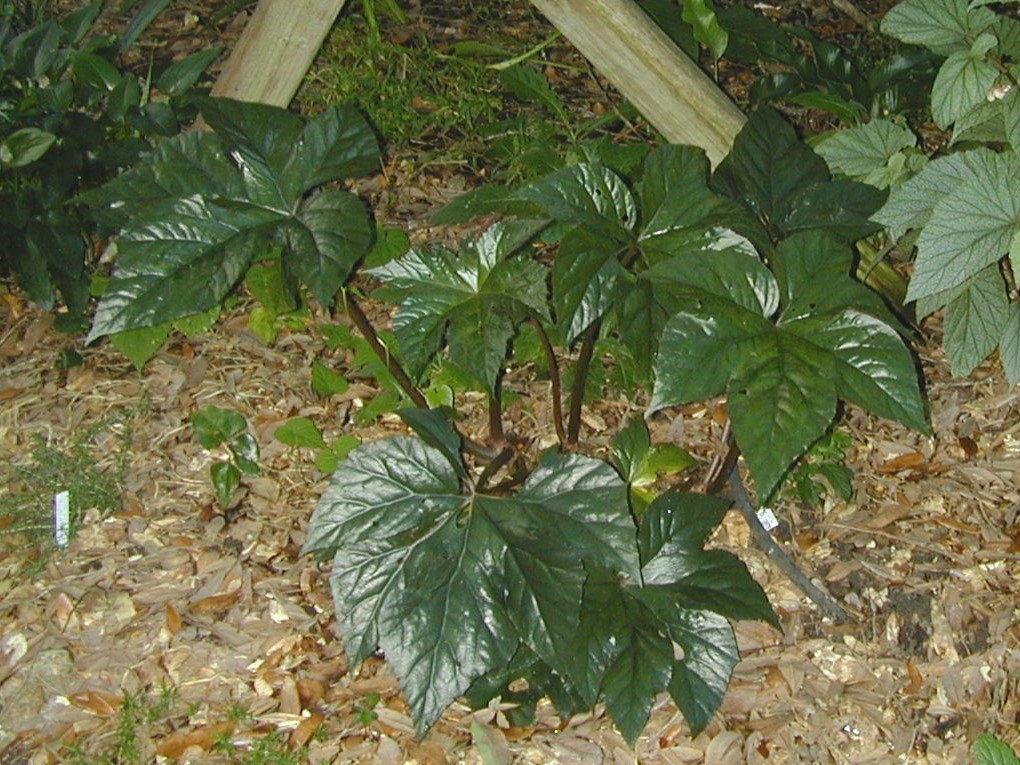
Begonia heracleifolia
Technically rhizomatous begonias include Rex begonias, a group derived from Asian native, Begonia rex, and known for their especially colorful leaves. However, most Rex begonias do not grow well in Florida’s heat, high rainfall and high humidity, and so these begonias are excluded here.
Begonias listed below represent types that have proven resilient and usually cold hardy in north Florida USDA Cold Hardiness Zone 8b.
Species:
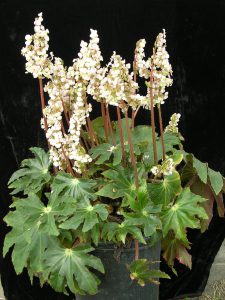
Begonia heracleifolia: The species boasts star-shaped leaves up to 6 in. across on stiff, hairy, thick leaf stems (petioles) up to 5 in. long. Each of the pointed leaf lobes is edged in dark green and has a chartreuse stripe along the central midrib, adding contrast. Spectacular sprays of pale pink flowers appear in late winter in clusters measuring 3 ½ in. by 4 ½ in. on 6-in. flower stalks (pedicels). Each cluster contains about 30 or more flowers, each about 1 in. across. As the season goes on, foliage gets showier and showier. It often dies down after winter freezes but re-emerges in late spring.
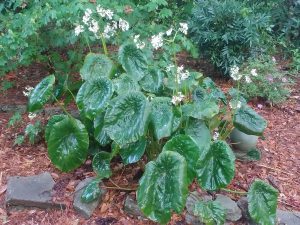
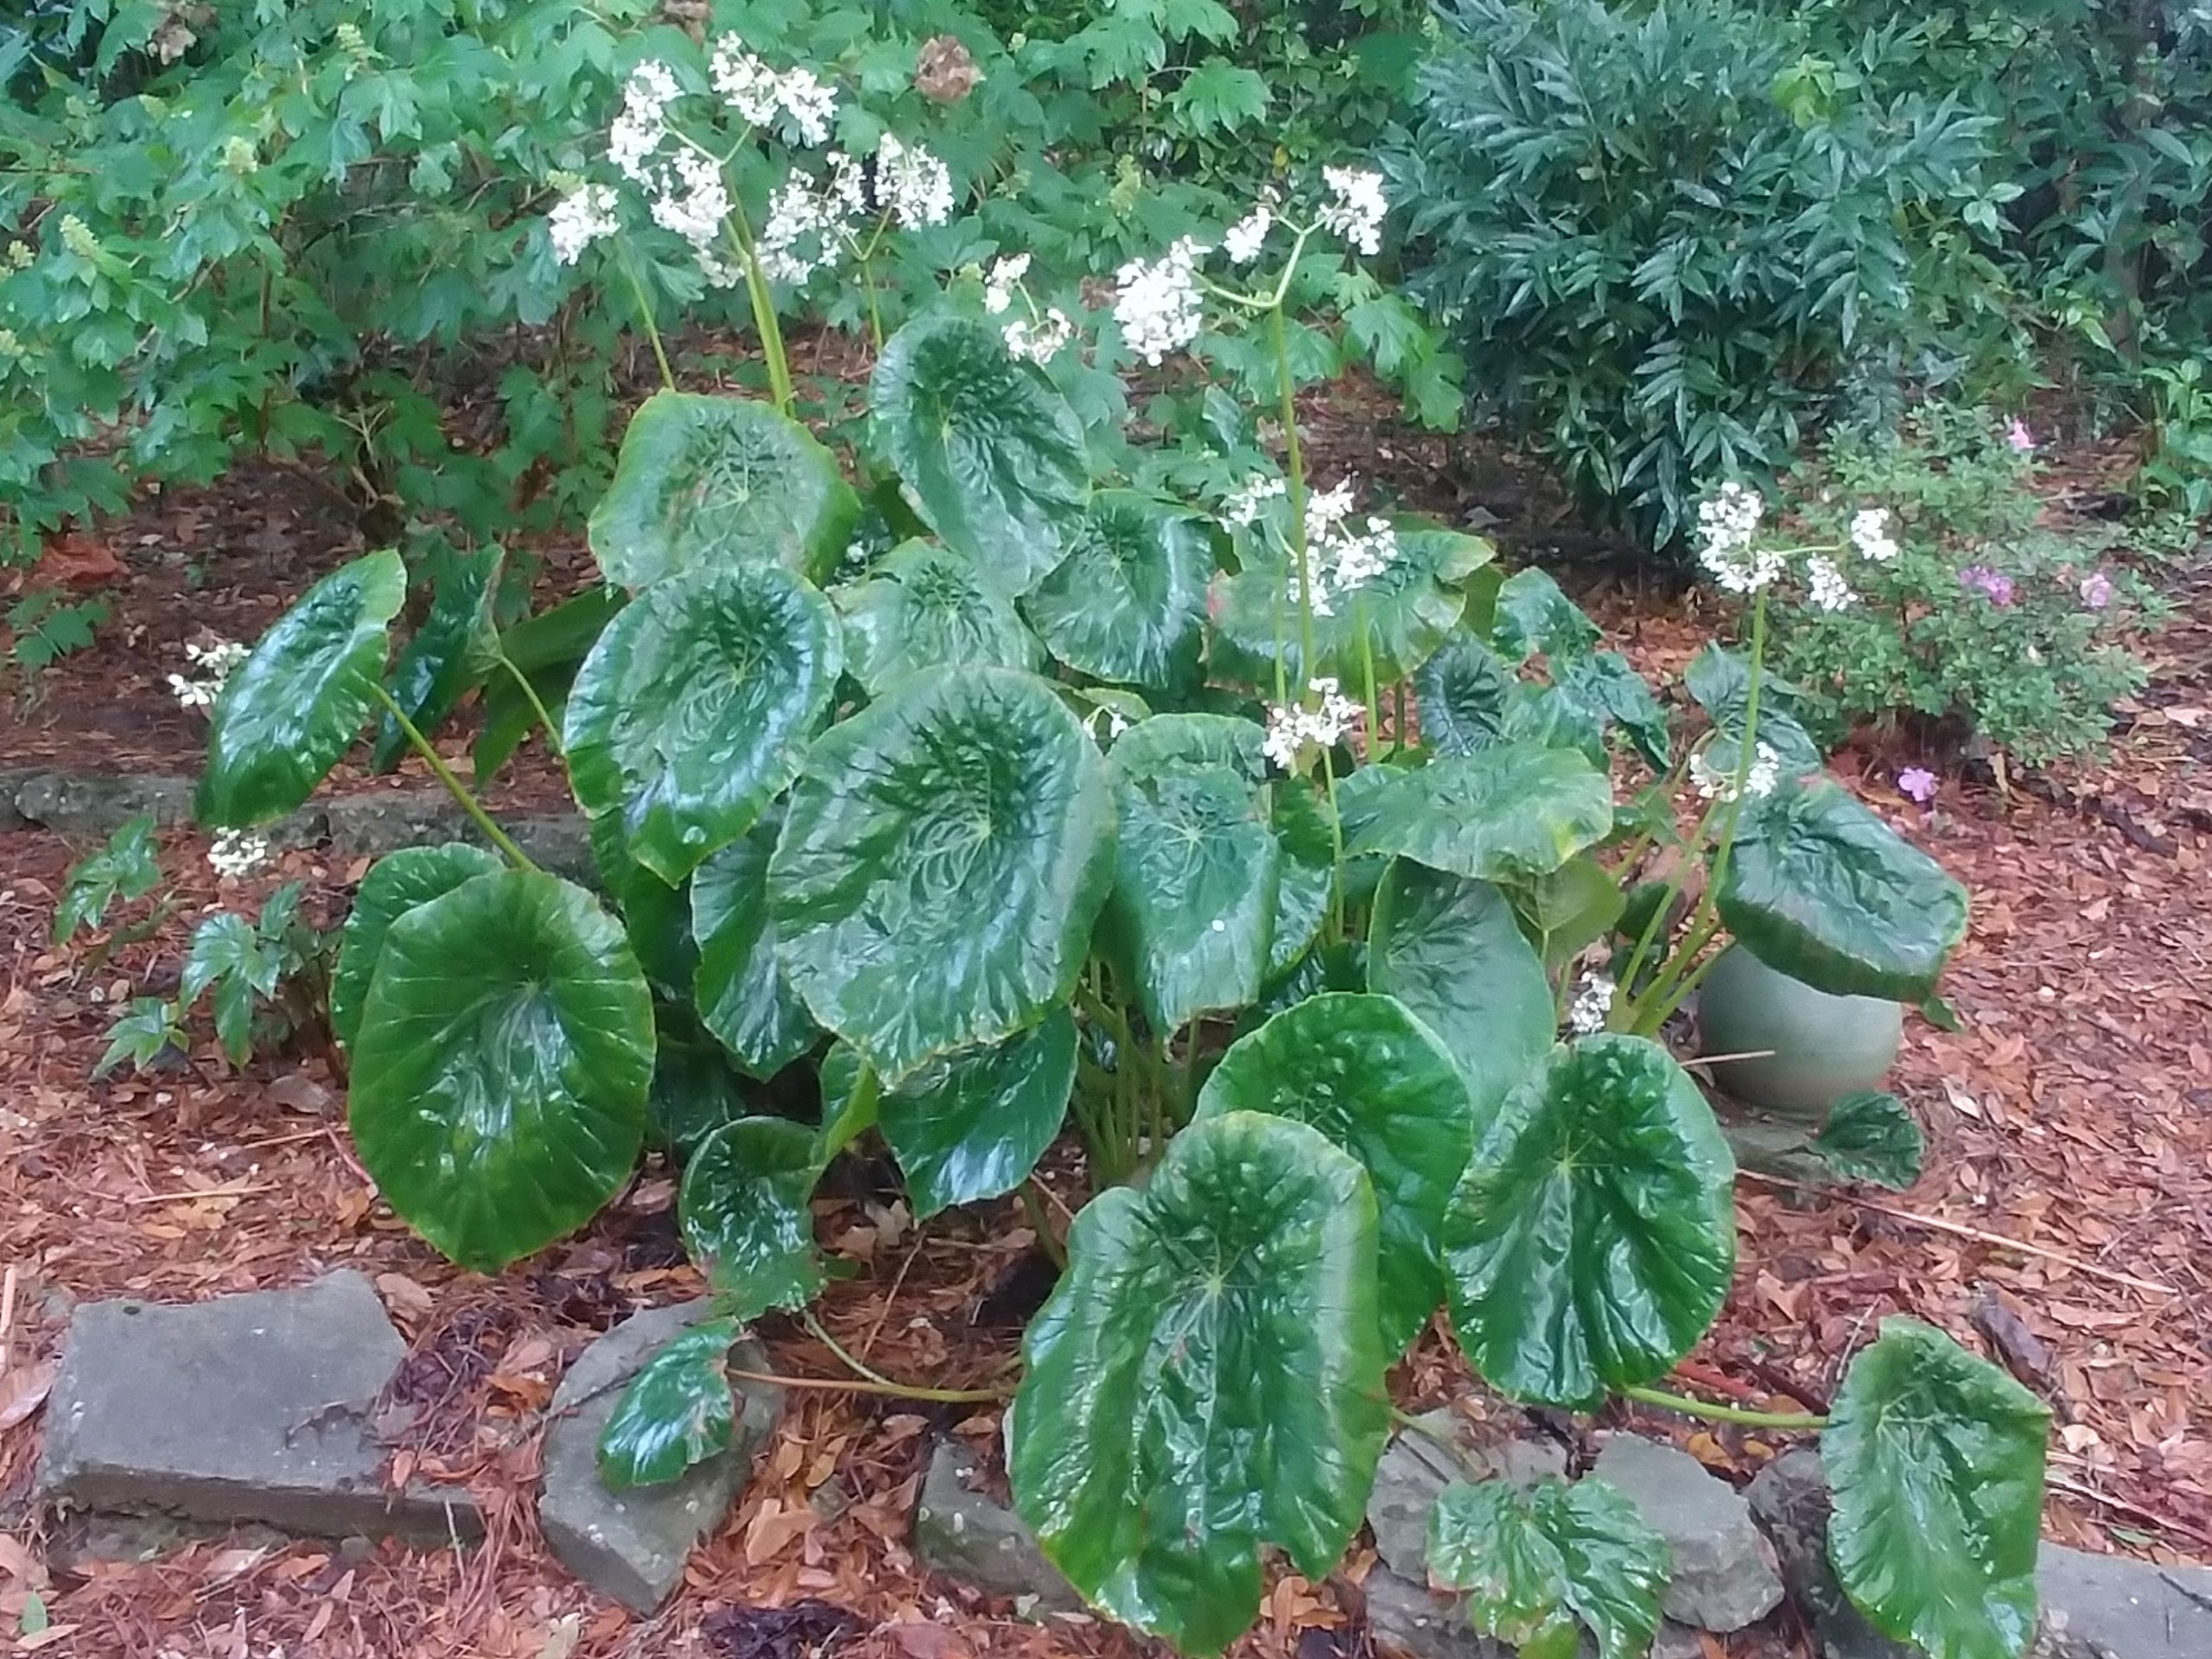
Begonia nelumbiifolia
- nelumbiifolia: This cold hardy begonia is known for its exceptionally large, water lotus-shaped leaves, creating a stunning specimen. Individual leaves can grow as large as 18 in. by 14 in. on leaf stems as long as 36 in. but 12 in. by 9 in. leaves are more typical. As temperatures warm, new developing foliage continues to get bigger, growing into very large leaves by fall. There also is a form in which the medium green leaves have red veining. White flowers are displayed above the foliage in mid to late spring in airy clusters measuring 7 ½ in. to more than 12 in. across on stems up to 48 in. tall. Clusters may contain as many as an astounding 120 flowers, each about ¾ in. across at its widest point.
2. popenoei: Huge rounded leaves with red veins and undersides make this a specimen plant which can grow to 3 ½ ft. tall and wide. Hardy with protection, it throws up tall stalks with clusters of white flowers in late winter.
Cultivars:
“Beefsteak”: This catch-all name refers to the original beefsteak begonia, ‘Erythrophylla’, as well as many derivatives that look similar. Beefsteak begonias characteristically have rounded leaves with a glossy green to bronze top surface and reddish undersides. Leaves range in size from 4 to 7 in. in diameter, and flower clusters are on stems up to 18 in. tall. ‘Erythrophylla’ was developed in 1847 and is considered a tough, vigorous plant, hence the common name, “beefsteak”. Given the long history and vigor, ‘Erythrophylla’ and derivative beefsteak begonias have long been shared as pass-along plants, world-wide as potted plants and later as an in-ground Florida garden plant. One type has ruddy, evergreen leaves and long-lasting, bold pink flower clusters. The scalloped 4-in leaves are on short 5 ½ in. reddish leaf stems but are most notable for remaining undamaged by temperatures down to the mid 20s °F, long after all other begonias’ leaves have turned to mush. Mid spring finds this plant topped by numerous clusters of dark pink flowers, with the display lasting 6 weeks or more. Individual clusters are about 8 in. by 5 in. on flower stems about 12 in. tall. Each cluster contains about 20 flowers each about ¾ in. wide at its widest point.
Begonia ‘Big Mac’ in flower
‘Big Mac’: This is a large, vigorous plant with enormous star-shaped leaves having reddish undertones and red leaf stems. The plant grows about 3 ft. tall and 2 ft. wide. Individual leaves may grow up to 18 in. wide on 16-in. leaf stems but typical leaves on younger plants are 10 in. to 12 in. wide. Individual white flowers are an amazing 2 in. wide at their widest point in clusters measuring 7 in. by 12 in. and containing about 75 flowers. Cold winters will knock it to the ground, but this begonia re-emerges again in late spring. This plant was hybridized in 1982 by Paul P. Lowe in Lake Park, Florida.
‘Joe Hayden’: This begonia features dramatic, dark, lobed leaves with burgundy undersides. Leaves are up to 8 in. long supported by leaf stems up to 9 in. long. In spring, the plant is topped by light pink flowers held high above the foliage. Each cluster measures about 5 in. by 7 in. on flower stems up to 26 in. tall. Each cluster contains more than 100 individual flowers, each about ¾ in. across at its widest point. This selection was hybridized in California in 1953 by Rudolf Ziesenhenne, but many similar selections have been made and are often confused with ‘Joe Hayden’.

Begonia ‘Joe Hayden’
Many other cultivars are common, but other cold hardy types suitable for north Florida include ‘Caribbean King’, ‘Caribbean Queen’, ‘Washington State’ and the catch-all ‘Ricinifolia’ types (with large, castor bean-shaped leaves). New breeding by scientists and enthusiasts promises to deliver many more types of rhizomatous begonias with increased foliage cold hardiness and an expanded range of foliage types and colors. A major Texas nursery introduced a series of rhizomatous begonia hybrids marketed as Crown Jewel Begonia™. The series currently features five patent-pending cultivars that are promoted as landscape plants for Zone 8. Additional breeding work is ongoing in north Florida.
Availability and Propagation
Rhizomatous begonias are available from Internet/mail order nurseries, some American Begonia Society members, other gardening groups, and plant societies. The introduction of trademarked rhizomatous begonias like Crown Jewel Begonia™ show promise for wider availability of rhizomatous begonias from nurseries.
Rhizomatous begonias are easily propagated by division, separation of rhizomes, or by rhizome pieces. When planting, place the rhizome or pieces (as small as 2 in. long) horizontally and half buried in a new in-ground location or in a container with potting soil. As with other begonia species, leaves may be used for propagation, though this method usually takes longer to achieve a size suitable for planting in the garden. Plants can be grown from seeds but production time is similarly long.
References:
American Begonia Society. (2020) https://www.begonias.org/index.htm. Accessed 15 April 2020.
Ginori, Julian, Heqiang Huo, and Caroline R. Warwick. (2020) A Beginner’s Guide to Begonias: Classification and Diversity, ENH1317. Environmental Horticulture Department, UF/IFAS Extension. January 2020. https://edis.ifas.ufl.edu/ep581.
Lowe, Paul. (1991) Growing Rhizomatous Begonias in the Ground in Southern Florida. Begonian 58:89. May/June 1991. https://www.begonias.org/Articles/Vol58/GrowingRhizomatousBegoniasFlorida.htm.
Schoellhorn, R. (2020) Personal communication, Alachua, FL.
Sharp, Peter G. (2011) Down to Earth – with begonias. 111 pp. http://ibegonias.filemakerstudio.com.au/PeterSharp/DownToEarthWithBegonias.pdf.
The International Database of the BEGONIACEAE. (2020) http://ibegonias.filemakerstudio.com.au/index.php?-link=Home. Accessed 16 April 2020.
UF/IFAS Gardening Solutions. (2019) Begonias. http://gardeningsolutions.ifas.ufl.edu/plants/ornamentals/begonias.html.
Watkins, Sue. (2020) Personal communication, Tallahassee, FL.
by Daniel J. Leonard | Jan 23, 2020
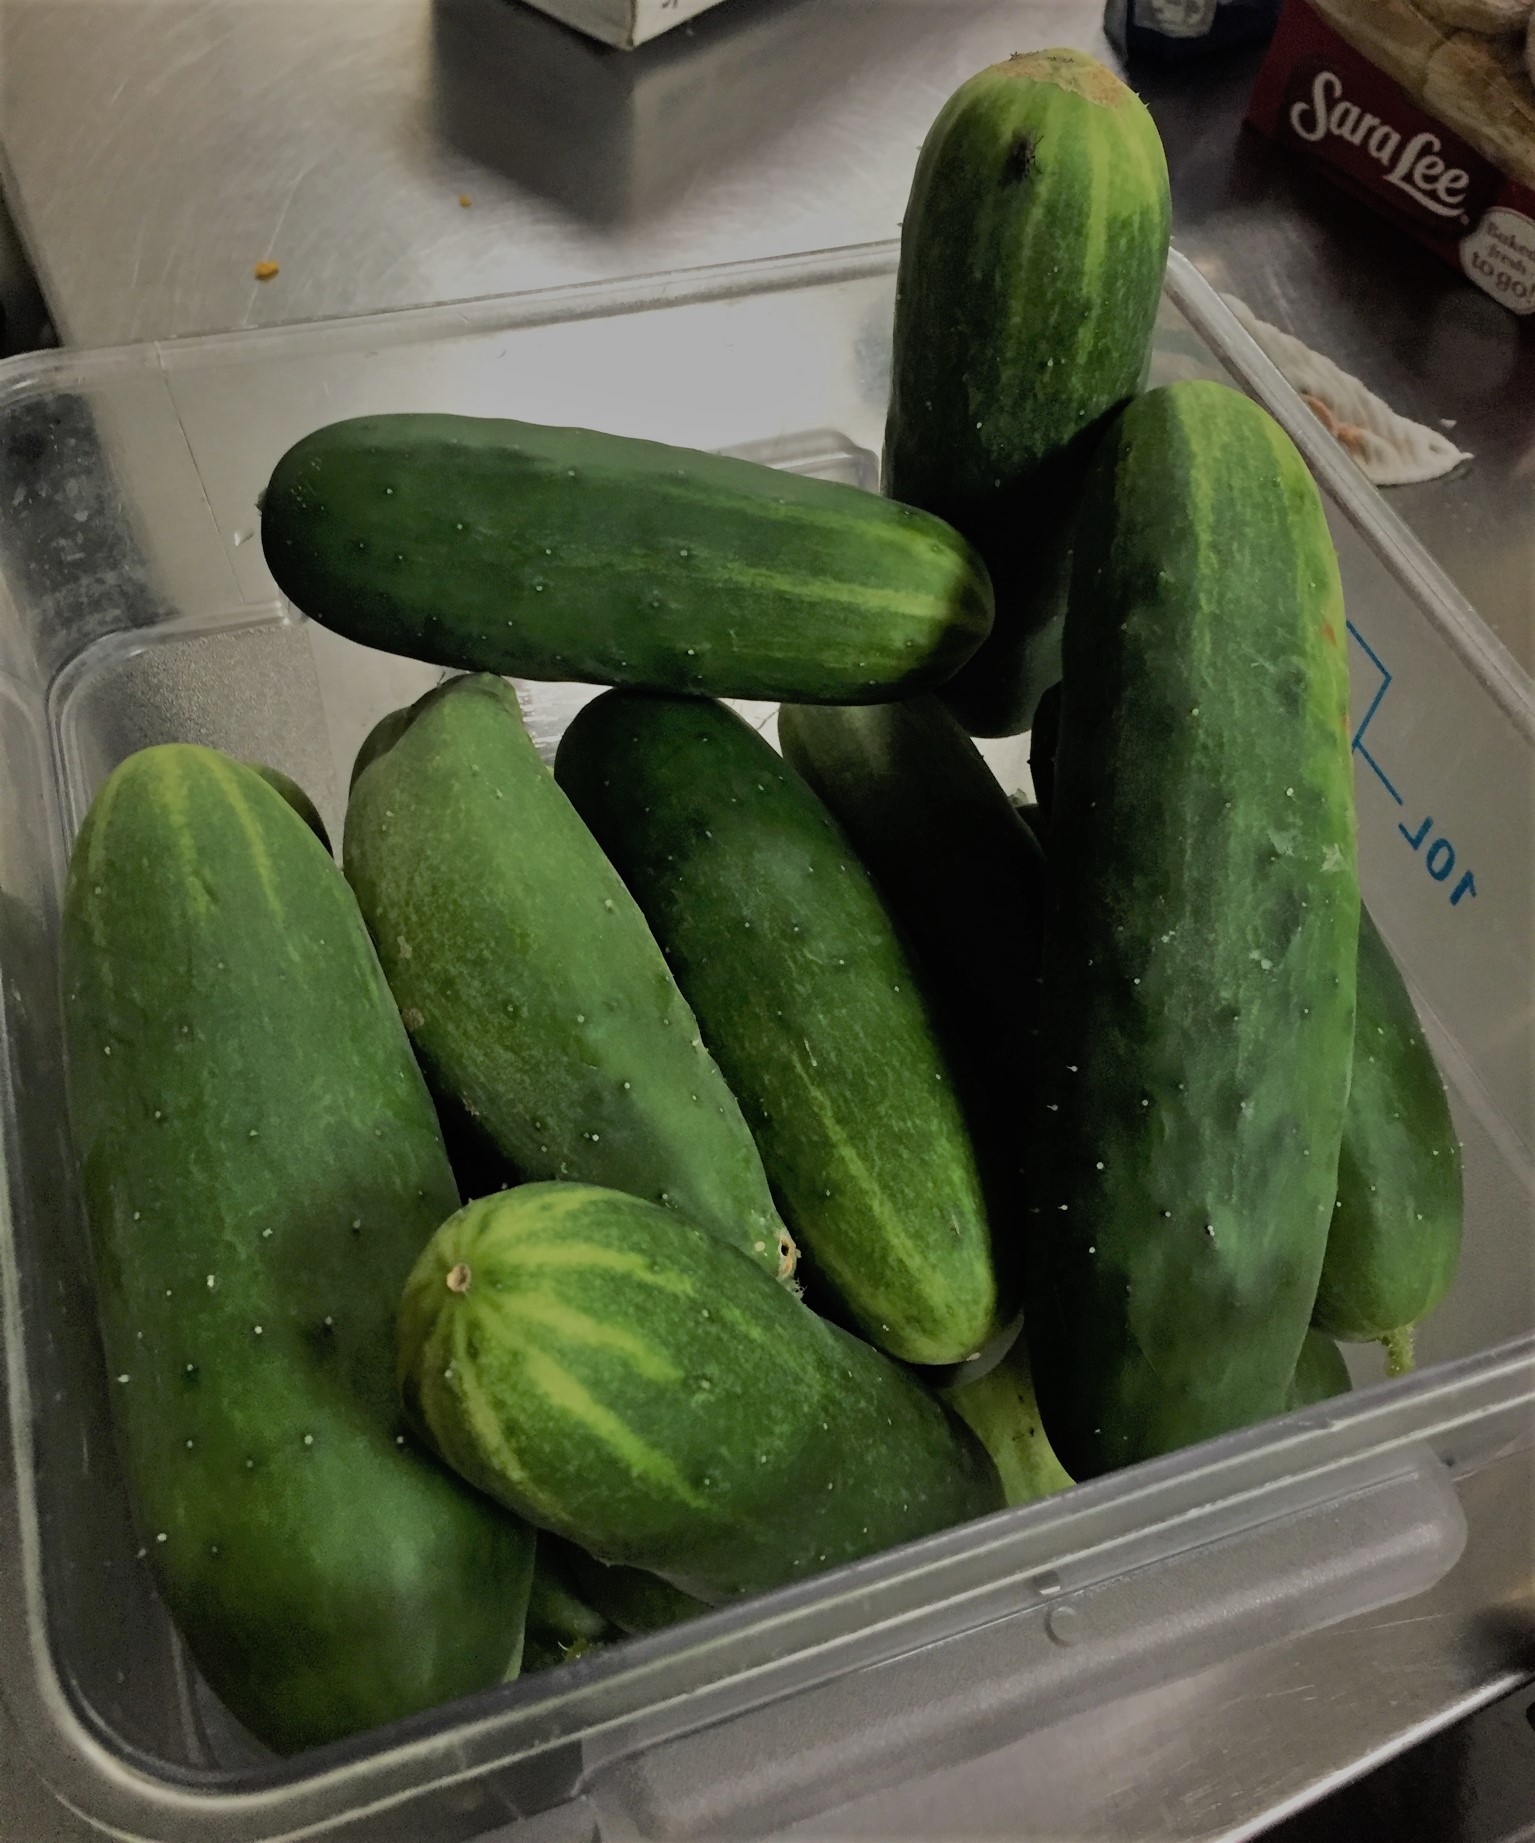
Cruciferous vegetables, mostly cool-season annuals in the Brassicaceae (formerly Cruciferae) family, are part of a healthy diet, prized for their high fiber content and unique sulfur-containing compounds known as glucosinolates. This vegetable family includes things many of us love (or love to hate) like Brussels sprouts, cabbage, cauliflower, collards, kale, mustard, turnips, bok choy, and Chinese cabbage. They’re also commonly grown in Panhandle gardens. However, as anyone who has grown these species knows, some are easier than others. For example, kale and radish are among the easiest of all plants to grow. But get beyond the basics and folks often run into difficulty with species like broccoli and cabbage. The high rainfall/humidity and frequent warm spells experienced here during the growing season often lead to serious pathogen problems, dooming my garden in years past. However, this winter, thanks to a couple of new cultivars, ‘Capture’ Cabbage and ‘Burgundy’ Sprouting Broccoli, I’ve enjoyed a plentiful supply of tasty crucifers!
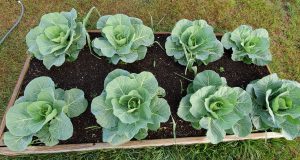
4’x 8′ raised bed planted with ‘Capture’ on 24″ centers.
‘Capture’ Cabbage, developed by Bejo Seeds of California as a mid-season “white” fresh market cabbage for the South, has been an outstanding performer in my garden this year. Touted as highly resistant to Black Rot and Fusarium Yellows (by far the two most devastating pathogens of Cabbage), I had to try it for myself. I planted seeds 24” apart in my standard 4’ wide x 8’ long x 12” deep raised beds filled with mushroom compost and aged pine bark. Seedlings were fertilized once about three weeks after germination with a general purpose 10-10-10 fertilizer. The plants that developed have been extremely vigorous (I’m glad I paid attention to plant spacing guidelines on the seed packet!) and have not shown ANY evidence of disease, even through an unusually warm and wet winter that would have hammered older susceptible varieties. My plants have begun to develop heads and should be ready for harvest and the kitchen in just a couple more weeks! If you’ve had problems getting a cabbage from germination to head formation and harvest without serious disease pressure, give ‘Capture’ a try next fall!
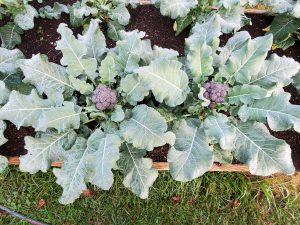
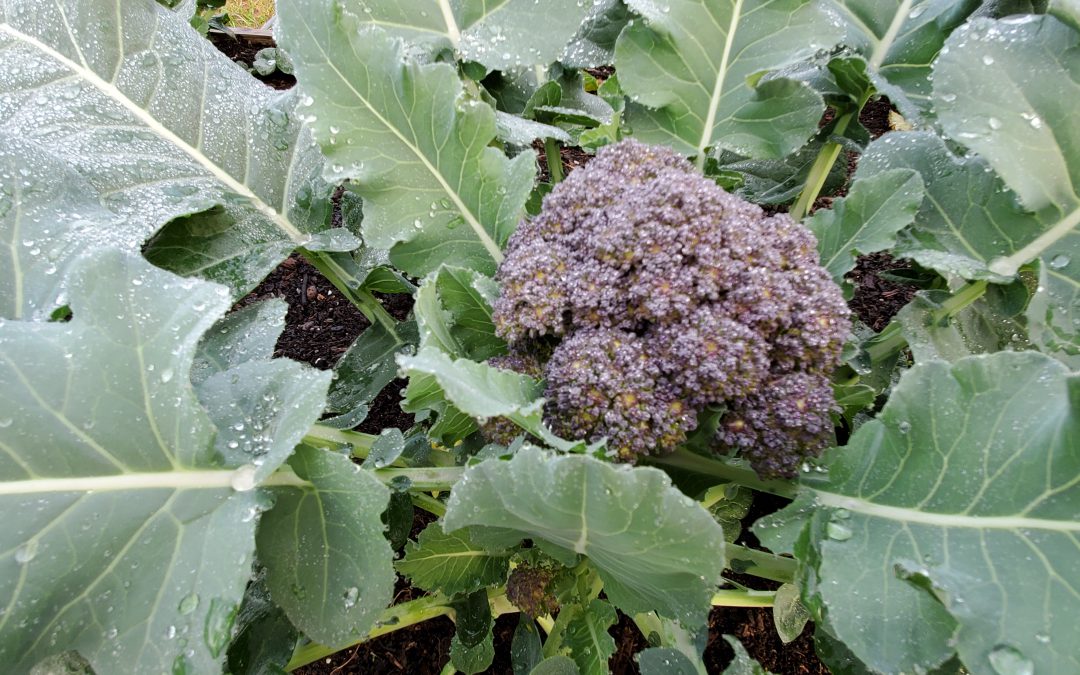
‘Burgundy’ Broccoli in the author’s raised bed garden.
‘Burgundy’ Broccoli, developed by Elsom Seeds in the United Kingdom, is a unique variety sure to turn heads in your garden. True to its name, the prolific florets are a deep, purple color. Though the central “head” on ‘Burgundy’ is quite small, that’s not the primary feature anyway. Considered a “sprouting” broccoli, this cultivar puts out an abundance of side shoots that make ‘Burgundy’ sort of a cut-and-come-again broccoli, allowing for a long harvest window. Another advantage from a disease avoidance perspective is the short maturity time (the time from planting seeds to having harvestable shoots) of around 40 days! For perspective, a “regular” heading broccoli has a maturity of around 60 day, lots more time for problems to happen. In the same growing conditions described above for cabbage, ‘Burgundy’ performed amazingly well for me, growing strong, healthy stalks, large, unblemished leaves and an abundance of purple shoots with a nice flavor profile!
If you want to enjoy homegrown broccoli and cabbage but disease pressures have made your previous efforts unproductive, give ‘Capture’ Cabbage and ‘Burgundy’ Broccoli a try! These two selections have made it easier than ever to enjoy unique, homegrown, healthy cruciferous veggies. Keep these and other quality, disease-resistant cultivars in mind when planning your winter garden in 2020!
by Matt Lollar | Sep 7, 2019
A couple weeks ago, I was on a site visit to check out some issues on Canary Island Date Palms. The account manager on the property requested a site visit because he thought the palms were infested with scale insects. He noticed the issue on a number of the properties he manages and he was concerned it was an epidemic. From a distance, lower fronds were yellowing from the outside in and the tips were necrotic. These are signs of potassium deficiency with possible magnesium deficiency mixed in.
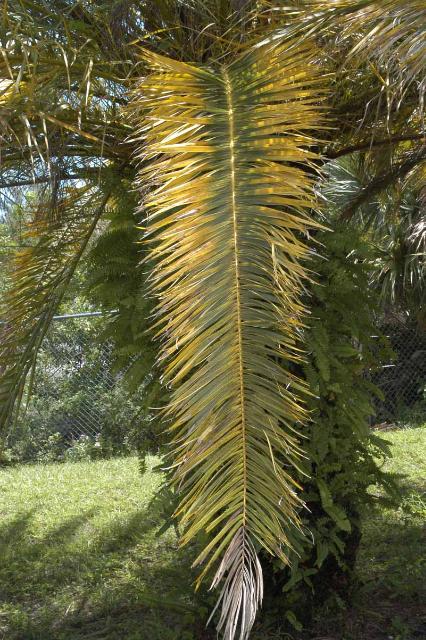
Transitional leaf showing potassium deficiency (tip) and magnesium deficiency (base) symptoms. Photo Credit: T.K. Broschat, University of Florida/IFAS Extension
Nutrient deficiencies are slow to correct in palm trees. It’s much easier to prevent deficiencies from occurring by using a palm fertilizer that has the analysis 8N-2P2O5-12K2O+4Mg with micronutrients. Even if the palms are part of a landscape which includes turf and other plants that require additional nitrogen, it is best to use a palm fertilizer with the analysis previously listed over a radius at least 25 feet out from the palms. However, poor nutrition wasn’t the only problem with these palms.
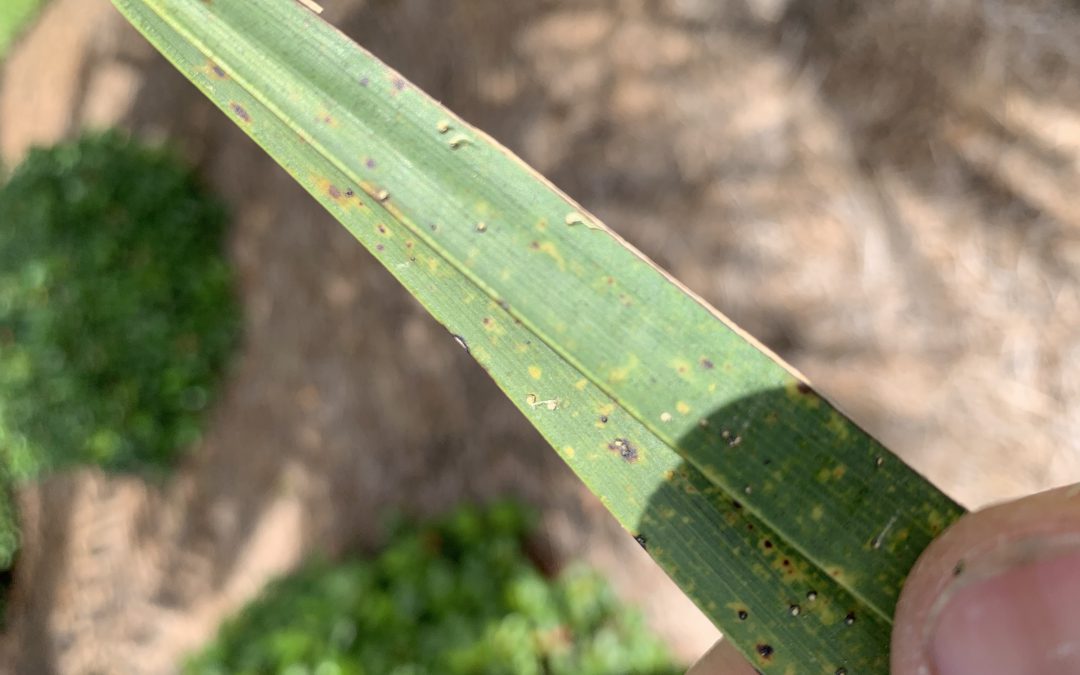
Upon closer look, the leaflets were speckled with little bumps. Each bump had a little white tail. These are the fruiting structures of graphiola leaf spot also known as false smut.

Graphiola leaf spot (false smut) on a Canary Island Date Palm. Photo Credit: Matt Lollar, University of Florida/IFAS Extension – Santa Rosa County
Graphiola leaf spot is a fungal leaf disease caused by Graphiola phoenicis. Canary Island Date Palms are especially susceptible to this disease. Graphiola leaf spot is primarily an aesthetic issue and doesn’t cause much harm to the palms infected. In fact, the nutrient deficiencies observed in these palms are much more detrimental to their health.
Graphiola leaf spot affects the lower fronds first. If the diseased, lower fronds are not showing signs of nutrient deficiencies then they can be pruned off and removed from the site. All naturally fallen fronds should be removed from the site to reduce the likelihood of fungal spores being splashed onto the healthy, living fronds. A fungicide containing copper can be applied to help prevent the spread of the disease, but it will not cure the infected fronds. Palms can be a beautiful addition to the landscape and most diseases and abiotic disorders can be managed and prevented with proper pruning, correct fertilizer rates, and precise irrigation.
by Ray Bodrey | Aug 22, 2019
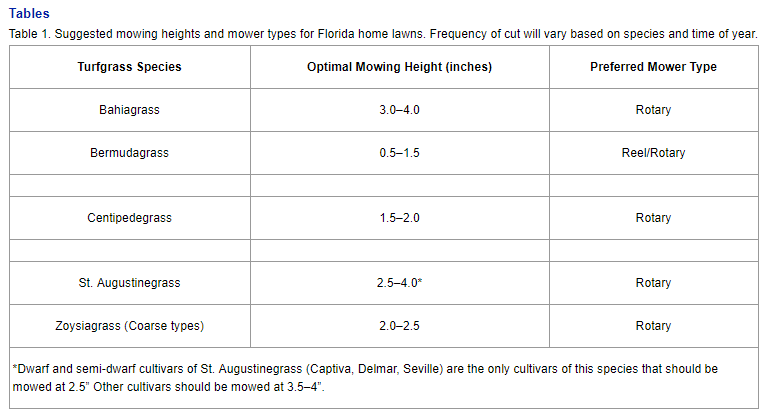
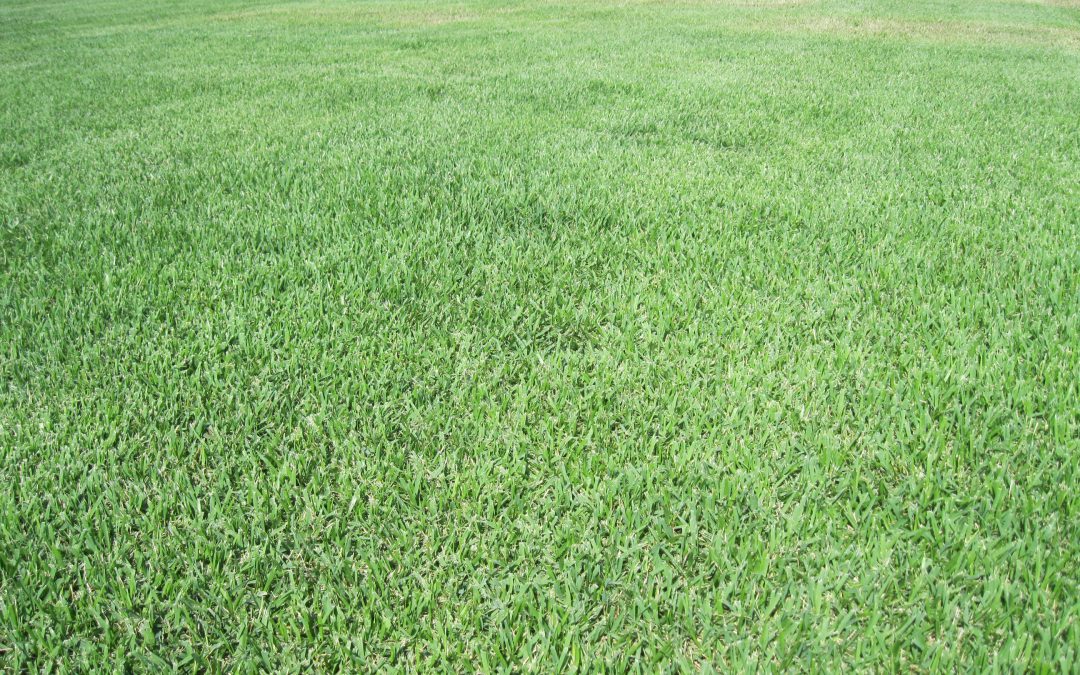
Seldom do we find the answer to a problem as being easy. More often, a difficult and complicated answer is what’s needed. However, the solution to a healthy lawn rebound may be found simply by adjusting your mower height and mowing schedule.
Mowing strategy is an important variable that keeps a lawn healthy and flourishing, no matter the species or cultivar of grass. Mowing too high can lead to an undesirable look and cause unwanted thatch buildup, which can create a favorable environment for pests and diseases. Mowing too low can weaken the root system causing thinning, which allows space for weeds to invade. Another problem with mowing too low is that it affects nutritional needs. Lawn grasses generate food for themselves through a process called photosynthesis. A healthy leaf surface area is needed to effectively accomplish this. If the lawn is mowed too low, then leaf surface area is lost. The grass can literally starve itself.
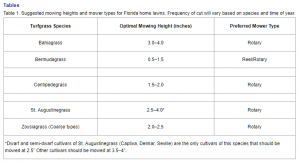
Table: Suggested mowing height for lawn grasses. Frequency of cut will vary based on species and time of year. Credit: L. E. Trenholm, J. B. Unruh & J. L. Cisar, UF/IFAS Extensio
Not all lawn grasses should be mowed at the same height, as show in the table above. Fine textured grasses like Bermuda and Zoysia matrella can be cut significantly lower than coarse textured grasses, such as Bahia or St. Augustine. Not sure of the type of lawn grass you have? Visit this site https://edis.ifas.ufl.edu/topic_book_florida_lawn_handbook_3rd_ed to review the Florida Lawn Handbook or contact your local county extension office for questions.
Mowing schedule is the other side of the coin. How often to mow ultimately depends on how fast your grass grows. By nature, Bermuda will grow quickly and Zoysia is somewhat slower growing. Regardless, summer months are when warm-season lawn grasses grow more rapidly. Historically, lawn grasses begin a dormant-slow growth stage in October and continues through March. Fertilizer schedule also plays a role in grass growth rate. So how often do you need to mow? This rate is best determined by the amount of growth since the last cutting, rather than the number of days which have elapsed. You should mow often enough so that no more than 1/4 to 1/3 of the total leaf surface is removed at any given mowing. In other words, leave twice as much leaf surface as you cut off. Remember, incremental adjustments should be made to your current practices. Never drastically change the height of the grass. If the lawn has been allowed to grow too long, you should gradually lower the mowing height on successive cuttings.
What are some other helpful tips? Always use a well-adjusted mower with a sharpened blade. You may find it easier replace your blade each year or every 2 years than periodic resharpening. Dull mower blades do a tremendous amount of damage with uneven cuts. This will cause gashes and splits in the leaf where fungal and bacterial pathogens can thrive. Never mow grass when it’s wet, either. Dry grass cuts are cleaner cuts and won’t clog the mower deck. If you have built up thatch, it’s a good idea to attach a bag to your mower that will catch clippings. These clippings will be great additions to your compost pile or to use as natural mulch. If no thatch problems exist, mowing without a bag will distribute clippings throughout the lawn, and the clippings will decompose into nutrients for the root system.
With proper mowing strategies, along with fertilizing & watering, your lawn grass can bounce back. For more information contact your local county extension office.
Information for this article provided by the UF/IFAS Extension EDIS Publication, “Mowing Your Florida Lawn”, by L. E. Trenholm, J. B. Unruh & J. L. Cisar: https://edis.ifas.ufl.edu/pdffiles/LH/LH02800.pdf
UF/IFAS Extension is an Equal Opportunity Institution.