by Daniel J. Leonard | Jul 20, 2018
Too often, would be gardeners travel to exotic locales, become intoxicated with the beautiful floral display of Plumeria, Jatropha, Bird of Paradise and Bougainvillea, and come home with visions of homemade leis picked from the garden dancing in their heads. As anyone who has attempted to grow any of the aforementioned plants in the Panhandle will tell you though, fulfilling those visions in the landscape are easier said than done! However, not all is lost for the gardener wanting to bring the tropics home. A tropical feel in the landscape can be achieved, you just have to look beyond the aforementioned flowering plants that will have long since succumbed to winter frost by the time they mature and begin flowering and instead to tropical foliage plants that can be enjoyed for a season and easily (cheaply too!) replaced the following spring. Of all the tropical foliage options available for Panhandle landscapes, my favorite is the Ti Plant, sometimes called Hawaiian Ti.
Ti Plant foliage
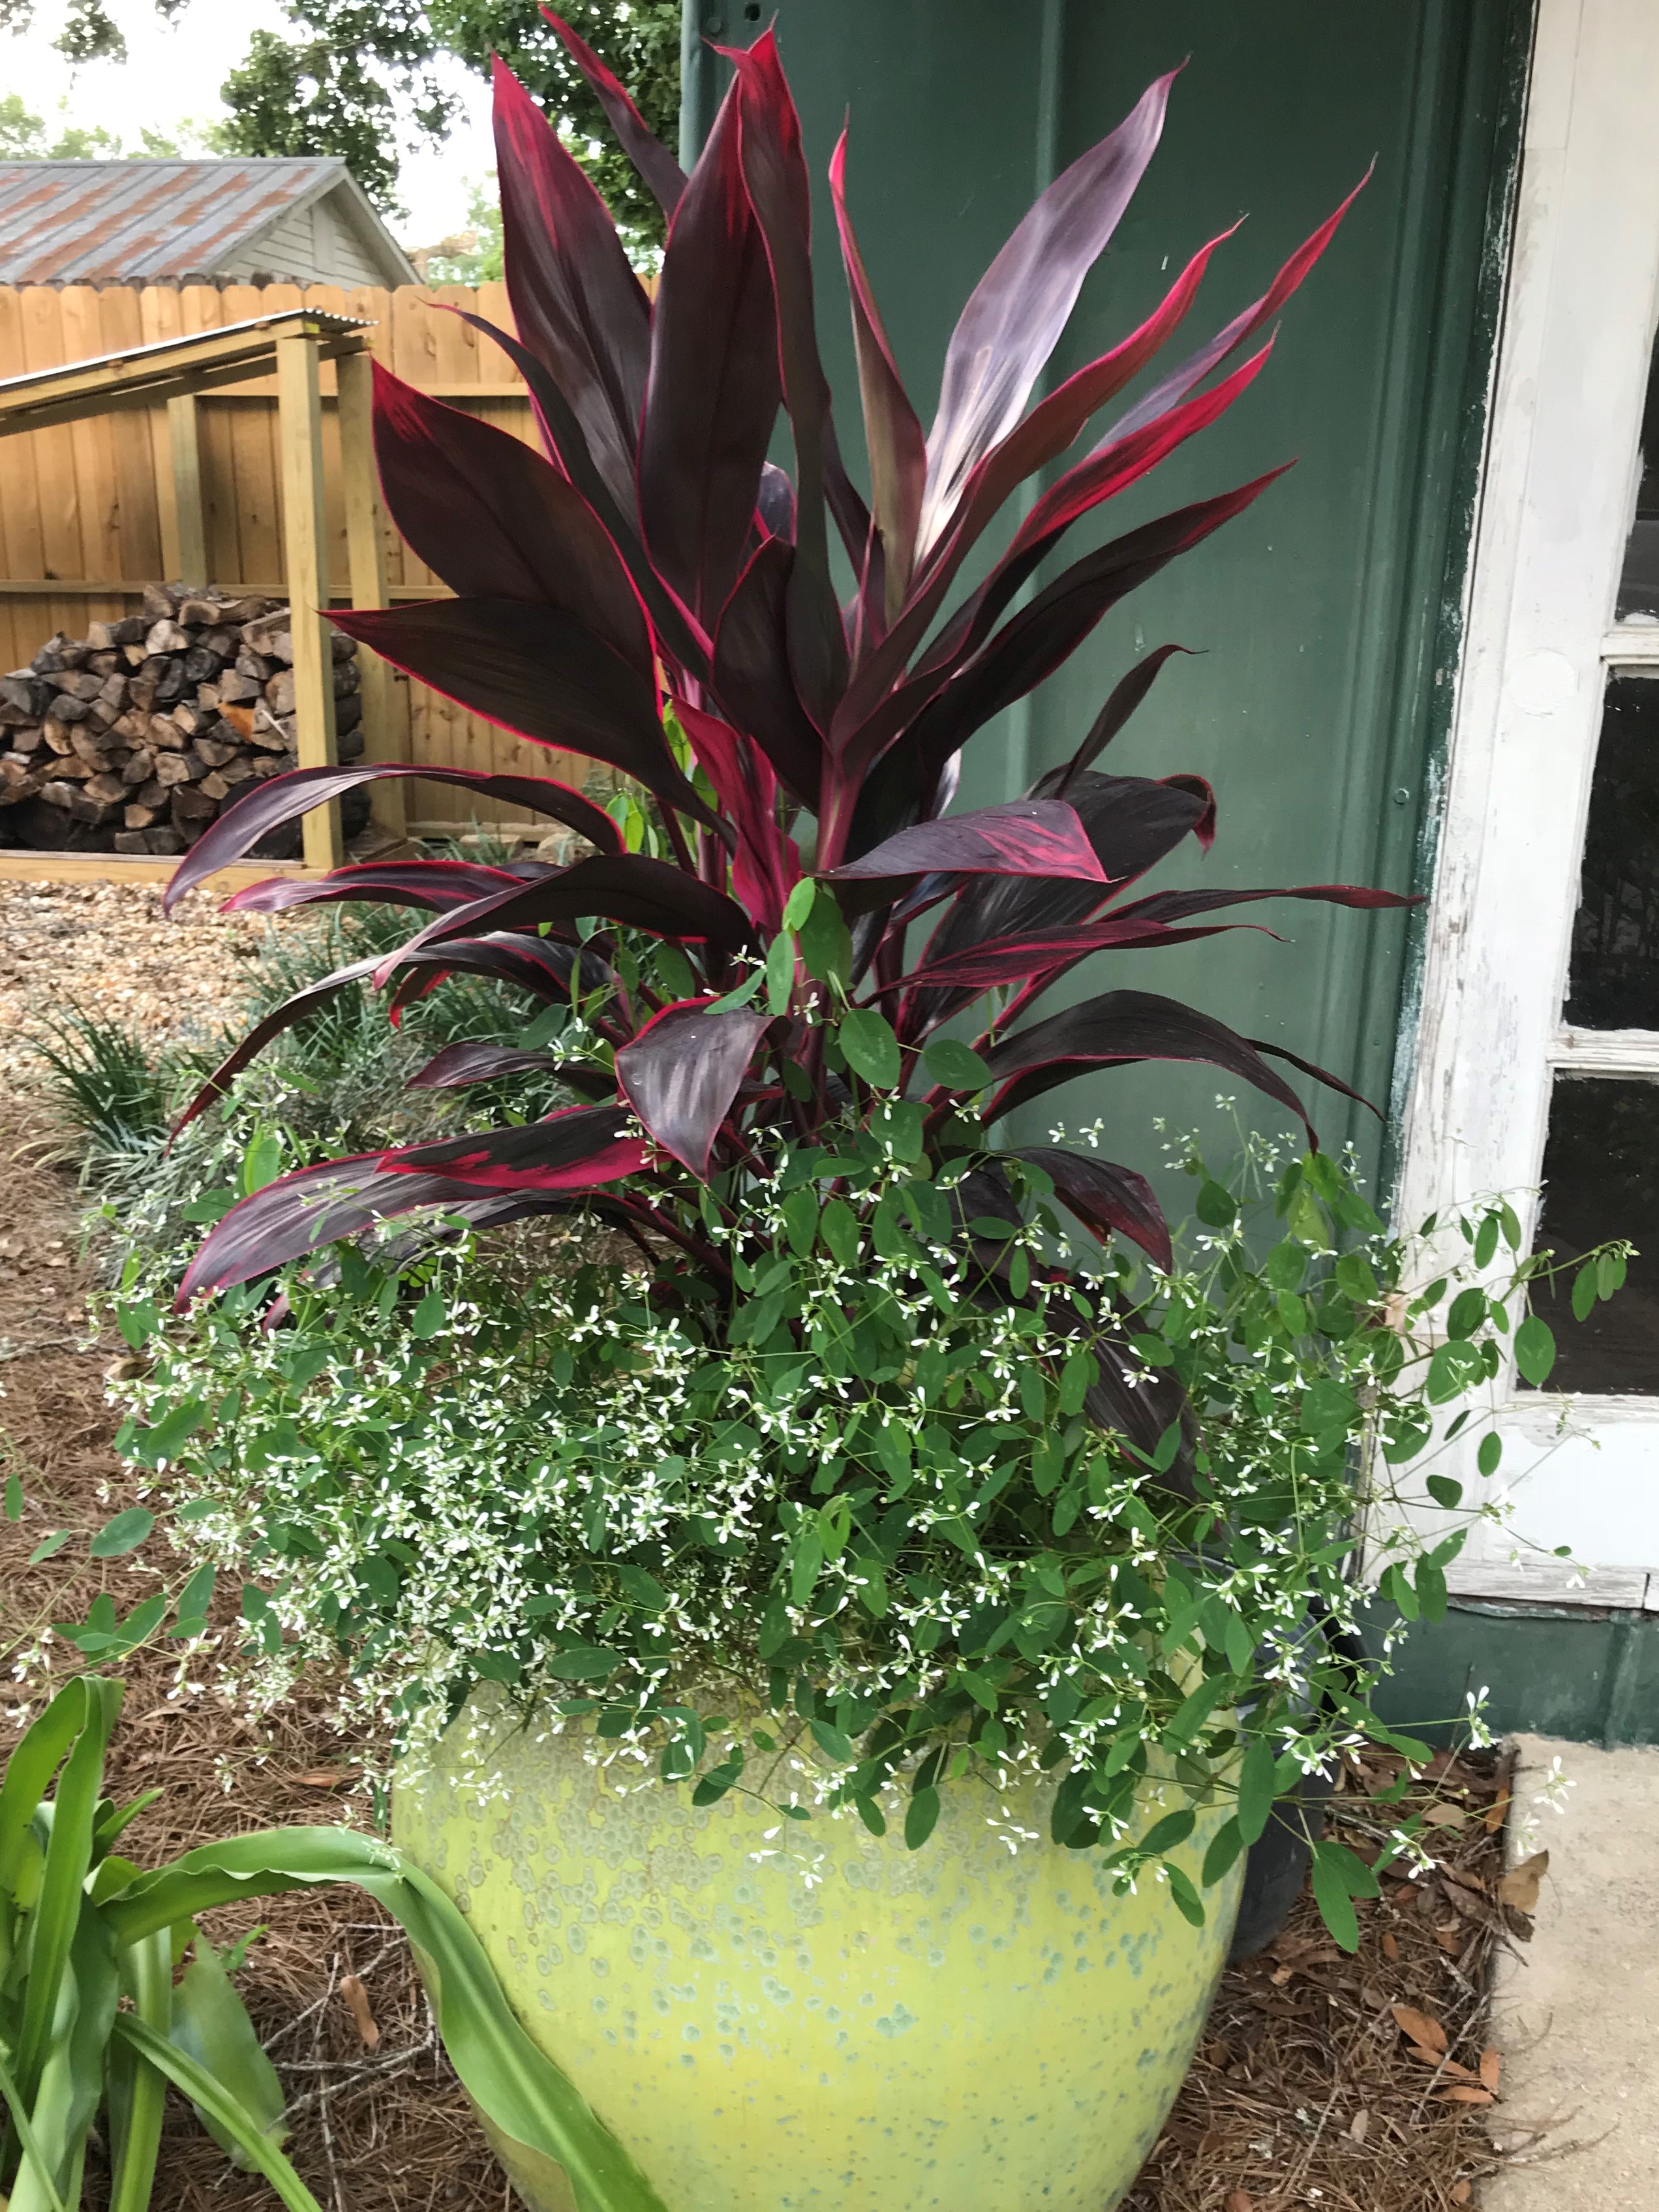
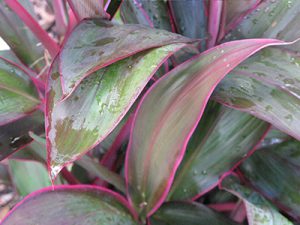
Even if you have never heard of Ti, you have probably seen it. The strap like, 12-18” long, purple and pink striped leaves are hard to miss and add an unmistakable tropical flair in the landscape! Ti Plants grow generally in single, unbranched stalks, though most commercial growers combine several plants into a single pot to give a bushy, multi trunked appearance that looks more appealing on a retail nursery bench. These plants will easily reach 4-6’ in height in a single warm season, providing a powerful punch of pink/purple all summer long. In addition to its considerable attractiveness, Ti boasts a cosmopolitan constitution, as it will grow in sun or shade, outside or inside. Of course, some cultural do’s apply to Ti broadly, regardless of where it is grown, as well as a few don’ts.
In general, Ti will be more colorful in brighter light. Though it grows well in shade, its leaves tend to lose their luster and fade to a dull purple in full shade. Similarly, though it will survive in full, all day sun, Ti’s foliage tends to bleach a bit in these conditions and can turn a whitish gray. It is best to shoot for somewhere in the middle for the most vivid foliage color. If growing indoors, give Ti as much light as you can. If growing outdoors, full sun through midafternoon is appropriate, as is bright shade throughout the day. Be sure to give Ti plants consistent moisture, as they will readily wilt down under prolonged drought conditions. As with watering, Ti prefers a consistently fertile soil and will appreciate a topdressing of a complete, slow release fertilizer (made by Osmocote, Harrell’s and others) at planting, with a follow up application 60-90 days later (possibly more frequently depending on temperature and frequency of watering).

Ti plant in a mixed container – Photo Courtesy Daniel Leonard
Though Ti performs well planted in the ground in Northwest Florida as an annual specimen to brighten a border (think of it like a supersized Coleus), it really gets to shine in large, mixed containers. Ti’s upright growth habit and traffic stopping color make it the perfect thriller in the widely used “thriller, filler, spiller” container design. Because Ti can grow quite large relative to other common container plants, a large 20-45 gallon container is necessary to facilitate optimum root growth and plant development. If a smaller container is chosen, water management will become an issue as the Ti plant’s root mass will quickly crowd the container. I prefer glazed ceramic or concrete containers as these are often painted in bright colors that complement Ti’s foliage, do not allow as much air exchange as terra cotta planters (soil in terra cotta containers dry very quickly in hot, dry weather), and are heavy enough that tall Ti plants won’t cause them to blow over in windy conditions. Mix smaller, mounding filler plants and trailing spiller plants under and around Ti in containers. For a striking contrast in color, choose companion plants in white, yellow, orange or chartreuse (remember, plants don’t have to flower to be colorful, vivid foliage plants like coleus or caladium work too!).
Regardless of how you use Ti Plant, you’ll find it to be one of the most high value color plants in the landscape. Plant one today and happy gardening!
by Molly Jameson | Jun 21, 2018
Mrs. Henry C. Mills in 1966 with her African violets at the North Florida Fair
flower show. Photo by Dan Stainer/State Archives of Florida.
Growing up, as soon as I entered the fair gates, I always headed straight for the rides. If I was lucky, I was able to get an unlimited pass strapped around my wrist and didn’t need to worry about rationing any tickets. Although I usually didn’t remember the names of particular rides – they were clear in my imagination. The spaceship, the circular mini roller coaster, the alien arms… and of course, the Ferris wheel. It wasn’t until I was about a dozen rides in – and starting to feel a little queasy – that the fun houses and win-a-goldfish-by-throwing-a-ring or shoot-a-basketball-for-a-giant-stuffed-tiger games drew my attention. After that, I was ready for funnel cake. Maybe even a corn dog and an assortment of fried cheese, pickles, and the like. Inevitably, I would eat too much and be out of commission for any more rides I was hoping to squeeze in – or squeeze into! This is when I might finally make my rounds through one or two of the giant warehouse-looking buildings that lined the way to the exits, where I knew there was at least a llama or a goat to be fed at the petting zoo.

Instead of simply attending the North Florida Fair this year, submit your garden’s best for competition. Photo by North Florida Fair.
But when I started volunteering at the Leon County Animal Shelter as part of the 4-H Pet Partners at age 12, I was introduced to these buildings in a whole new light. We were assigned the task of creating papier-mâché cats and dogs to display at the fair to help build awareness of pet overpopulation. I remember my dog well – he was beagle-like, with long droopy paper ears and stiff pointy legs that I struggled to keep balanced. The day we went to set up our display, my adrenaline soared, as I knew our creations were to be judged and ribbons to be bestowed. Ever since, I no longer view the fair buildings as a last stop – rather, I relish my stroll through each of them, as they contain so many handmade treasures, many of which are adorned with blue rosettes of triumph.
The tradition of displaying and competing for the best quality handiworks at the fair goes all the way back to the Middle Ages and Renaissance, where merchants sold and traded agricultural goods that had been grown over the summer and freshly harvested in the fall. Naturally, competitions arose during these times, as they strove for the finest products.
Today, fairs reflect the personality of an area, and nearly universally include judges who inspect home grown fruits and vegetables, flowers, preserved foods, and baked goods entered into competition by the community. The North Florida Fair awards about $80,000 in cash prizes to citizens who create and grow various items. Anyone living within the 24 counties that comprise North Florida – from the Suwannee, west to the Alabama line – is eligible to enter as many of the exhibit categories as they would like.

A youth showcasing his prize winning chicken at the North Florida Fair. Photo by Aly Donovan.
The exhibits are arranged into various departments, such as Home Agriculture, Capital City Garden Club Flower Show, Poultry, Baked Goods, and Fine Arts and Crafts. Within each department, there are various classes that are split into certain age divisions (i.e., youth only) or experience levels (i.e., amateur vs. professional). Under the Home Agriculture department there are 42 classes, including 13 classes covering fresh vegetables. The Capital City Garden Club Flower Show department has 13 classes, including annuals, perennials, hanging baskets, fruiting shrubs, trees, and vines, succulents, and much more. If you would like to submit something you’ve grown, now is the time to begin planning, as this year’s fair is set for November 8-18.
All of the details for each department and class can be found on the North Florida Fair website (http://northfloridafair.com/), under the Exhibitors tab. Pay close attention to the application and submittal deadlines for each specific category, as most items are due for judging the week prior to the fair opening.
So, let nostalgia win you over as you prepare your home-grown vegetables and flowers for submittal to the North Florida Fair. You might just earn a blue ribbon to be displayed for all fair attendees to admire, either as they walk off a full stomach in preparation for more rides, on their way to the exits, or just as they get started creating their own fond fair memories.

by Sheila Dunning | Nov 13, 2017
University of Minnesota Extension
Julie Weisenhorn
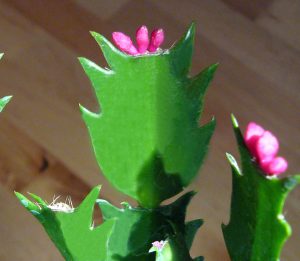
Is your grandmother’s pass along Christmas cactus blooming really early? Do the leaf segments have “teeth” along the edges? Are the “stringy things” sticking out of the flowers yellow in color?
Well, I hate to tell you this, but that is not a Christmas cactus, (Schlumbergera bridgesii). It is a Thanksgiving cactus, (Schlumbergera truncata). You can tell the Thanksgiving cactus apart from the Christmas cactus by the shape of the leaves and flower anthers. The leaves, botanically referred to as phylloclades, are serrated on the Thanksgiving cactus. Additionally, the pollen-bearing anthers in Thanksgiving cactus flowers are yellow. Christmas cactus have smooth-edged leaves and pinkish-purple anthers.
Both of these species are native to the coastal mountains of south-eastern Brazil, where they are found growing in trees or on rocks. Therefore, the preferred potting media for Thanksgiving and Christmas cacti should contain about 40% perlite to ensure good drainage and aeration.
To care for your Thanksgiving cactus, allow the soil to dry out when it is not blooming. As flower buds develop, the soil should be moist to the touch. However, overwatering can kill the plant. Additionally, provide plenty of indirect light and temperatures of 60-65 degrees F.
Want to get last year’s plant to bloom again? Beginning in mid-September, it will need 12-14 hours of total darkness along with cool (60-65 degrees F) nighttime temperatures for 3-4 weeks. To achieve the light control the cactus can be placed in a closet or covered with a large brown paper bag overnight. Once buds start to form, fertilizer can be applied to encourage growth and blooms. However, flower buds will fall off with any significant changes in temperature (below 50 degrees F), light or watering.
Now, if your “Christmas cactus” doesn’t set flowers until spring, it is probably an Easter cactus, a totally different species (Rhipsalidopsis gaetner). The leaf margins of Easter cactus have small bristles and are more three-dimensional with a thick ridge on one side. Additionally, the flower are more star-shaped than the other two cacti. All three cacti species have flowers that come in a range of colors including variations of red, pink, peach, purple, orange or white.
by Matt Lollar | Aug 1, 2017
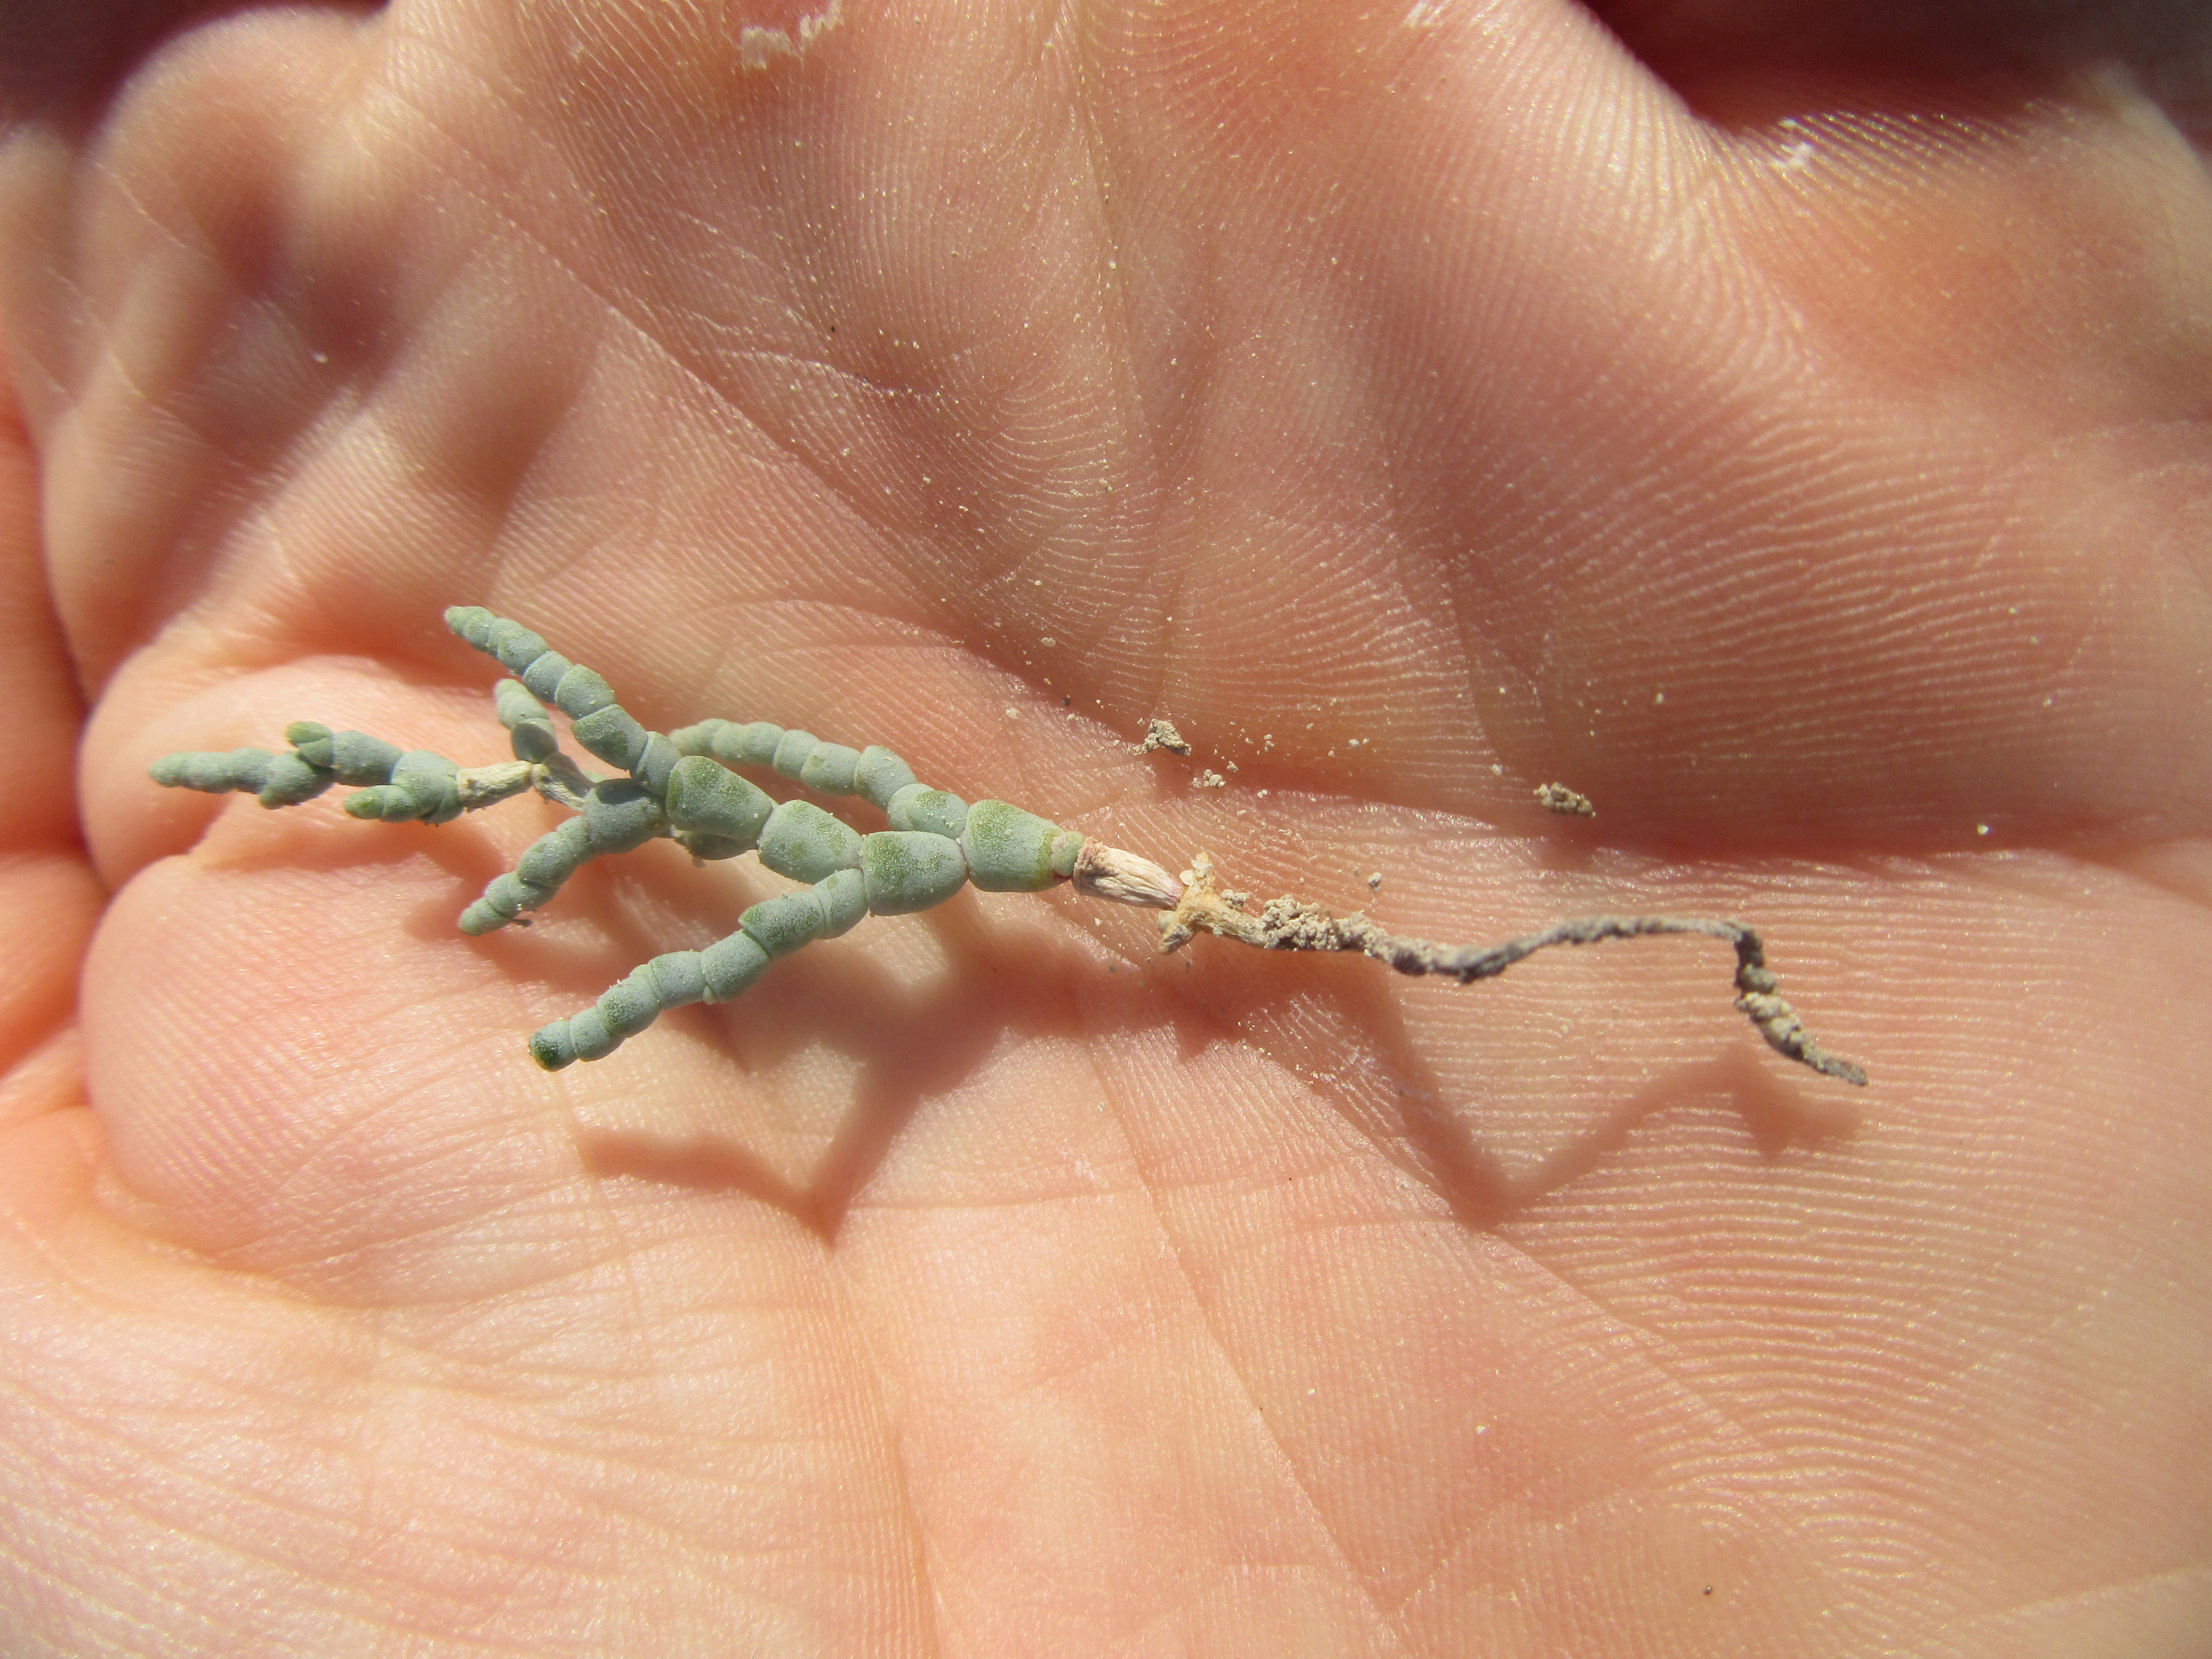
I encountered pickleweed (Salicornia sp.) on a recent trip to Utah. I first noticed the plant growing in the bank of a pond at a salt factory. A sample was pulled for further investigation and it was determined to be some type of pickleweed. Pickleweed also happens to be a common name for a plant that grows here in Florida. The scientific name of the pickleweed found in Florida is Batis maritima. This article will focus on the pickleweed found in Utah.
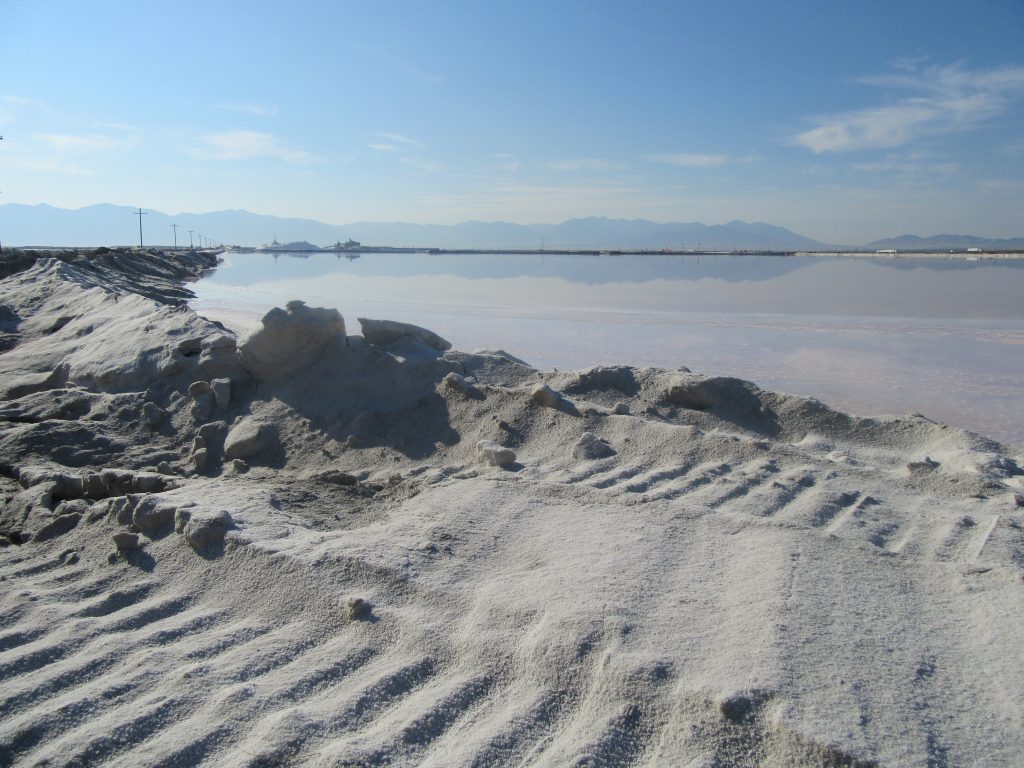
A salt factory in Utah. Photo Credit: University of Florida/IFAS Extension.

A pickleweed pulled out of a pile of salt. Photo Credit: University of Florida/IFAS Extension.
As you might have guessed, pickleweed is a salt loving (halophylic) plant. It is a member of the plant family Amaranthaceae (previously Chenopodiaceae), which also includes Russian thistle (Salsola iberica) a.k.a. tumbleweed. You won’t be happy to know that Russian thistle has found its way to our beautiful Florida beaches and is spreading. At first look, pickleweed seems to have no leaves, but its central stem is surrounded by succulent, salt storing leaf tissue. It is often spoken of as the “cactus” of the Great Salt Lake since it has no visible leaves and only a smooth green stem.
Pickleweed can be found growing in both coastal and interior portions of the United States. The variety growing around the Great Salt Lake is different from the coastal varieties due to its adaptation to this extremely salty environment. The Great Salt Lake has a salt content of about 30% whereas the Gulf of Mexico has a salt content of around 3%.
Pickleweed can also be found growing in the western landscape adjacent to the Great Salt Lake. These areas contain an interesting type of soil made up of ooids. Ooids are brine shrimp feces coated with layers of aragonite (a form of calcium carbonate CaCO3). Ooids can also be found on the east coast of Florida.
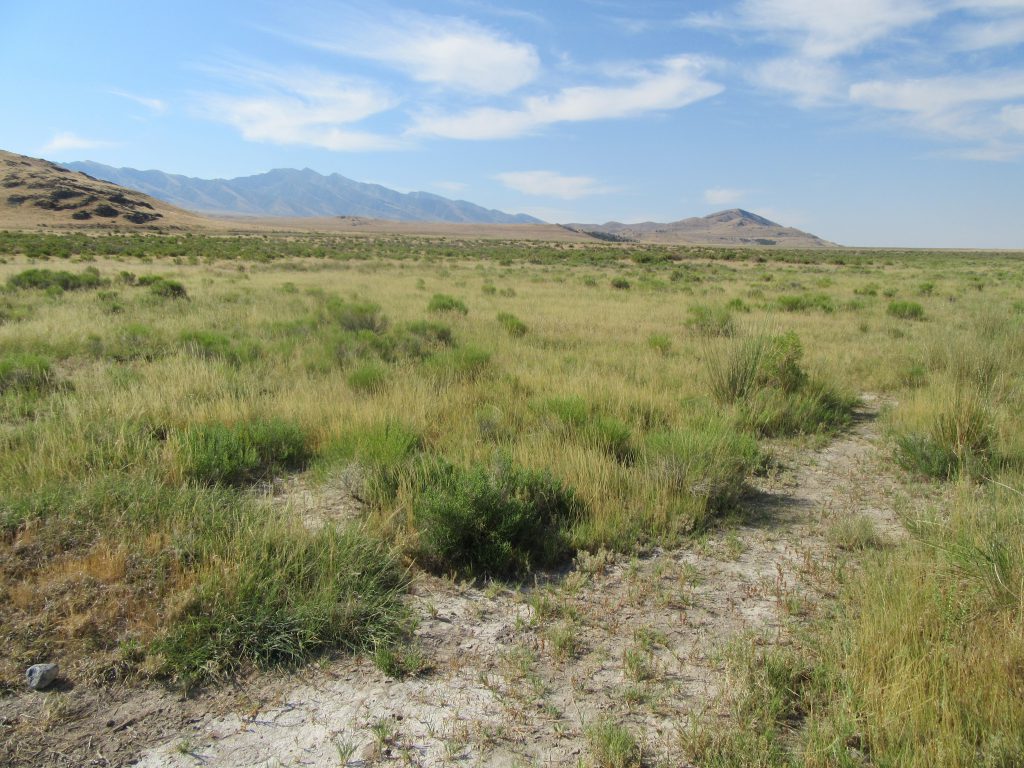
Pickleweed and other plant species growing in the Utah landscape near Timpie Springs. Photo Credit: University of Florida/IFAS Extension.
Although you probably won’t find pickleweed (Salicornia sp.) growing in a typical Florida Panhandle landscape, you might want to give it a try in your container garden or kitchen window. As you can see in the pictures, this plant likes to be neglected. It is difficult to grow at home. It needs a good amount of nitrogen and water. And it may benefit from periodic additions of table salt (sodium chloride). It needs to be in an area that receives 6 to 8 hours of sunlight per day. Seed and cuttings will be hard to come by. You will most likely have to take a trip to Utah to find a source.
Interestingly enough, some cultures use this plant as a vegetable/herb. You will need to conduct some more research if you wish to cook with pickleweed and remember to lay off the salt!
by Julie McConnell | Jan 17, 2017
Winter flowers and small leaves with serrated edges lead to identification as Camellia sasanqua. Photo: J_McConnell, UF/IFAS
A common diagnostic service offered at your local UF/IFAS Extension office is plant identification. Whether you need a persistent weed identified so you can implement a management program or you need to identify an ornamental plant and get care recommendations, we can help!
In the past, we were reliant on people to bring a sample to the office or schedule a site visit, neither of which is very practical in today’s busy world. With the recent widespread availability of digital photography, even the least technology savvy person can usually email photos themselves or they have a friend or family member who can assist.
If you need to send pictures to a volunteer or extension agent it’s important that you are able to capture the features that are key to proper identification. Here are some guidelines you can use to ensure you gather the information we need to help you.
Entire plant – seeing the size, shape, and growth habit (upright, trailing, vining, etc.) is a great place to begin. This will help us eliminate whole categories of plants and know where to start.
Stems/trunks – to many observers stems all look the same, but to someone familiar with plant anatomy telltale features such as raised lenticels, thorns, wings, or exfoliating bark can be very useful. Even if it doesn’t look unique to you, please be sure to send a picture of stems and the trunk.
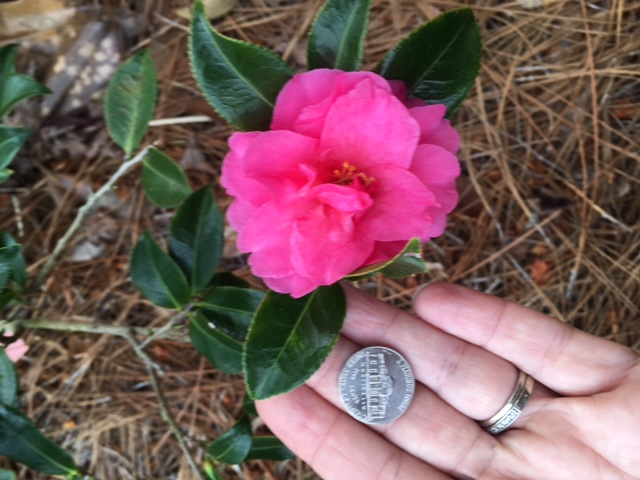
Leaves – leaf color, size and shape is important, but also how the leaves are attached to the stem is a critical identification feature. There are many plants that have ½ inch long dark green leaves, but the way they are arranged, leaf margin (edges), and vein patterns are all used to confirm identification. Take several leaf photos including at least one with some type of item for scale such as a small ruler or a common object like a coin or ballpoint pen; this helps us determine size. Take a picture that shows how leaves are attached to stems – being able to see if leaves are in pairs, staggered, or whorled around a stem is also important. Flip the leaf over and take a picture of the underside, some plants have distinctive veins or hairs on the bottom surface that may not be visible in a picture taken from above.
Flowers – if flowers are present, include overall picture so the viewer can see where it is located within the plant canopy along with a picture close enough to show structure.
Fruit – fruit are also good identification pictures and these should accompany something for scale to help estimate size.
Any additional information you are able to provide can help – if the plant is not flowering but you remember that it has white, fragrant flowers in June, make sure to include that in your description.
Learning what plants you have in your landscape will help you use your time and resources more efficiently in caring for you yard. Contact your local UF/IFAS Extension office to find out who to send requests for plant id.

by Matt Lollar | Dec 22, 2016
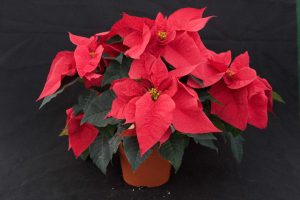
A beautiful poinsettia plant. Photo Credit: Tyler Jones, University of Florida
It’s Christmastime and time to pull your poinsettias out of the closet. Oh, you don’t have poinsettias left over from Christmas’ past? Well, if you follow some simple steps then you may be enjoying this year’s crop for years to come. But first, let’s go over a few fun poinsettia facts.
Poinsettia Facts
- The distinctive, colorful part of the poinsettia is not its flower but its petal-like leaves, botanically known as bracts. Bract color varies from red to pink, white, marble, orange, and even purple.
- The poinsettia is native to Mexico. The poinsettia got it’s name from the botanist and U.S. Ambassador to Mexico, Joel Poinsett, who introduced the plant to the U.S. in 1825.
- Contrary to popular belief, poinsettias are not poisonous to people or pets, however their milky sap can cause an allergic reaction in some individuals.
Care
With proper care, your poinsettias may stay colorful for many months. Poinsettias can retain their color until March if they are not exposed to freezing temperatures.
- Location. Poinsettias grow best in well-lit areas, but direct sun or hot lights can dry out the plants. They need at least 6 hours of indirect sunlight each day.
- Temperature. Keep your poinsettias away from drafts and chilly air. Room temperatures of 65 to 70 degrees Fahrenheit are best.
- Watering. Water your poinsettia when the surface of the soil is dry to the touch. Place a saucer under the pot, and drain the saucer if water starts to collect in it. Keep the soil from getting soggy. Too much water can kill a poinsettia.
- Humidity. Gently spray the plants with a mist sprayer or place them on gravel trays. Slightly humid air will help prolong color and life span.
- Fertilization. Lightly fertilize the plants every 4 to 6 weeks. High levels of fertilizer will reduce the quality of the plant.
- Storage/Recycling. When the leaves and bracts begin to fall off (usually in April), cut the plant back and give it sun, water, and fertilizer regularly. Starting in October, place the plant in complete darkness for 14 hours each day and in bright light the rest of the day. In December, your plant will begin to develop those beautiful, colorful bracts again.
Cut Flowers
Poinsettias may be used as cut flowers, but the stems must be treated right away. The milky sap must thicken inside the stems to prevent the plants from wilting.
Immediately after cutting, dunk the cut ends of the stems in almost boiling water for about one minute and then immediately place them in cool water. Keep the flowers away from the steam to prevent them from being damaged. Another method is singeing the cut ends of the stems with a flame for a few seconds and then placing the stems in cool water.
After the stems have been treated and placed in water, store the poinsettias in a cool place for at least eighteen to twenty-four hours before they are used in arrangements. Cut several more stems than you need, because not all flowers/bracts will survive.