by Beth Bolles | Jun 23, 2014
In our area of Florida, soils will vary in the amount of nutrients they hold. In general, we think of our soils as nutrient poor because sand is often the highest component. Sandy soils have large pore spaces and the particles themselves do not ‘attract’ many of our nutrients. Therefore needed plant nutrients can leave a sandy soil quickly, especially when rainfall or irrigation is prevalent.
There are areas along the Panhandle that do have more quality soils that have the ability to retain some nutrients. Also, frequent fertilizer or lime applications in home landscapes can create soils with abundance of certain nutrients over time .
One nutrient that may become prevalent in routinely fertilized soils is phosphorus. We know that phosphorus is one of the big three nutrients needed by plants in order to grow and flourish. When we routinely apply phosphorus to garden beds or lawns, it can build up. Phosphorus is a nutrient that does not leave the soil as readily as other nutrients. It binds to other elements to hang around. If we keep adding phosphorus to the soil, even though there is plenty there, problems can occur. One negative impact is the potential for soils with phosphorus to wash away and pollute local water systems.
Phosphorus is absolutely necessary for plant growth. It is needed for the energy transfer which is involved in plant growth functions. Phosphorus is also important for flower and fruit formation, and root growth.

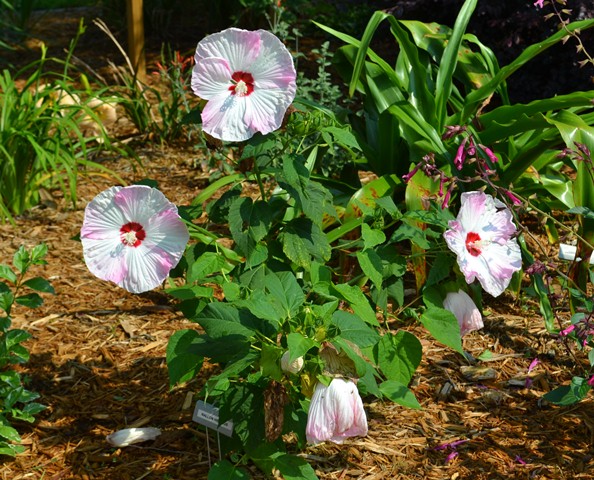
Flowering plants benefit from fertilizer but make sure your soil needs the nutrients before an application. Photo: Beth Bolles, UF IFAS Escambia Extension
There can be too much of a good thing. The key to remember, as with any nutrient, is make sure it is needed before applying it to your soil. Plant growth will not be improved beyond what is normal by adding more of any nutrient. Before you grab the bloom promoter or starter fertilizer with high phosphorus, run a soil test to accurately determine what is really needed in your soil.
by Sheila Dunning | Jun 17, 2014
 The old cliché is “April showers bring May flowers”, but April deluges create weak plants and yellow grass. You were following the UF/IFAS recommendations and waited until April 15th to fertilize. You followed the Urban Turf Rule and applied a low-phosphate fertilizer with slow-release nitrogen. Yet, your grass is yellow and the shrubs haven’t put on any new growth. What happened? The 18” + of rainfall that we experienced at the end of April flushed nearly everything out of the soil, including any fertilizer you applied. Nitrogen and potassium are highly leachable. Phosphorus is also depleted under saturated soil conditions.
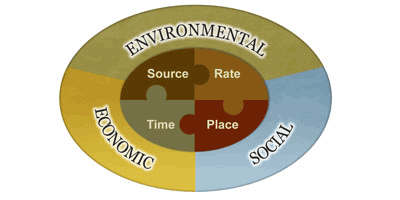
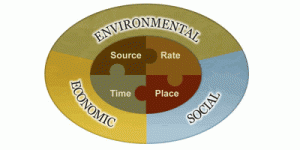
If you haven’t submitted a soil test since the storm, now is the time to do so. It’s time to apply a summer fertilizer, but it needs to address all the nutrient deficiencies created from the excess rain. Soil test kits can be obtained from your County Extension office. When you get the results from the University of Florida Lab, it is important to remember the 4 Rs when applying fertilizer. It needs to be the Right Source, applied at the Right Rate, at the Right Time, and over the Right Place.
Best Management Practices (BMPs) have been developed to allow individuals to make conscientious decisions regarding fertilizer selection that will reduce the risk of water contamination. The Right Source for a BMP-compliant fertilizer is one that contains a portion of slow-release (water insoluble) nitrogen with little to no phosphorus, and a potassium level similar to the nitrogen percentage (e.g. 15-0-15, that contains 5% coated nitrogen). However, a soil test is the only way to accurately identify the specific nutrients your landscape is lacking. Many soil tests indicate a need for phosphate and currently it is illegal to apply more than 0.25 pounds per 1,000 sq. ft. without a soil test verifying the need.
Next, the fertilizer must be applied at the Right Rate. In order to do that, you must know the square footage of your property and how much you can spread using the settings on your equipment. Individuals walk at varied speeds and the product recommended rates are based on 1,000 sq.ft. areas. For information on calibrating application equipment refer to  the publication, “How to Calibrate Your Fertilizer Spreader”. Using the 15-0-15 fertilizer mentioned earlier, the Right Rate for one application would be 3 pounds per 1,000 sq.ft.. That 35 pound bag is all that is needed for a nearly 12,000 sq.ft. yard (a large corner lot).
The Right Time for applying fertilizer is when the plants are actively growing and beginning to show nutrient deficiencies. Summer, when rainfall and irrigation is frequent, is often a typical application time. The Right Place is only on living plant areas. Be cautious to avoid getting fertilizer on the sidewalk, driveway and street. A deflector on your spreader is very helpful. Otherwise, be sure to sweep or blow the fertilizer back onto the grass or into the landscape beds. Avoid having fertilizer end up in any water body.
by Julie McConnell | May 3, 2014
The last week of April 2014 brought with it 10-22 inches of rain across the panhandle in a matter of days. Some areas had immediate flooding and standing water, while others may be in areas at risk of rising rivers and streams. As the water recedes, many people are wondering how all the water will affect their landscapes.
Only time will tell what the long term impact will be, but here are a few things to watch for and what you can do to try to moderate damage.
- Let soils dry out before driving vehicles or other equipment on grassy areas. Even if the water is not visible, if the soil is still saturated, driving lawn equipment or cars may cause ruts.
- Do not leave automatic irrigation systems running on established shrubs, trees, and lawns. If your system is set to run in the early morning hours, you may not think about it being on, check your systems and hold off on adding water until soils dry out and the plants need it.
- Watch for fungus symptoms and treat if needed. Wet plants and cool weather are ideal for some Brown Patch on lawns, be aware and monitor landscapes closely. If disease is suspected, contact your local county extension office for recommendation.
- When mowing, leave a longer leaf blade to compensate for root stress.
- Look at the base of trees and shrubs to make sure silt and sand have not buried the crown or root flare. Also look for erosion of root zone, these areas may need correction. “Salvaging Flood-Damaged Shrubs and Ornamentals.”
- Adjust fertilization as needed; if you recently applied fertilizer it has likely runoff or leached from the site. However, if you suspect fungal disease do not fertilize until disease is managed.
- Stress in turfgrass, for details read “Watch Turf for Flooding Stress”
- You may see new weeds (seeds or segments may have washed or blown into your yard)
- Tree and shrub decline or death read “We Had Plenty of Rain, Why are My Trees Dying?”
- Although this storm was not a hurricane, “Assessing Damage and Restoring Trees After a Hurricane” has helpful information for areas with wind damage
- Nutritional deficiency symptoms in palms may show up 4-5 months from now. “Nutrient Deficiencies of Landscape and Field-grown Palms in Florida.”
- Decreased availability and increased price of sod (flooded fields prevent harvest and increase inputs for disease, weed, and nutrition management)
- Scheduling changes or maintenance adjustments by landscape contractors. Turfgrass and ornamentals will likely need different maintenance applications than in years past to correct issues related to flooding and excess rain.
by Taylor Vandiver | Apr 29, 2014
Now that spring has finally sprung and summer is well on its way, you may find yourself taking a stroll through your landscape and assessing damage done by late cold spells. However, it may not be a frost problem that has your plants looking worse for the wear. They could be experiencing nutritional imbalances which affect overall plant health. Most cases involving nutrition issues in plants can be linked back to the soil. Therefore, if you suspect a problem I suggest testing your soil to ascertain pH and nutrient levels. You can obtain a soil test kit at your local UF IFAS Extension office. Another way to diagnose your plant damage is to visually catalog its symptoms. Symptoms of mobile nutrients, such as nitrogen and phosphorus, tend to reveal themselves on older leaves first. Whereas, immobile nutrient symptoms (i.e. boron and calcium) will show up on newer leaves. These flow charts can help to narrow down which essential element may be lacking in your plant’s diet.
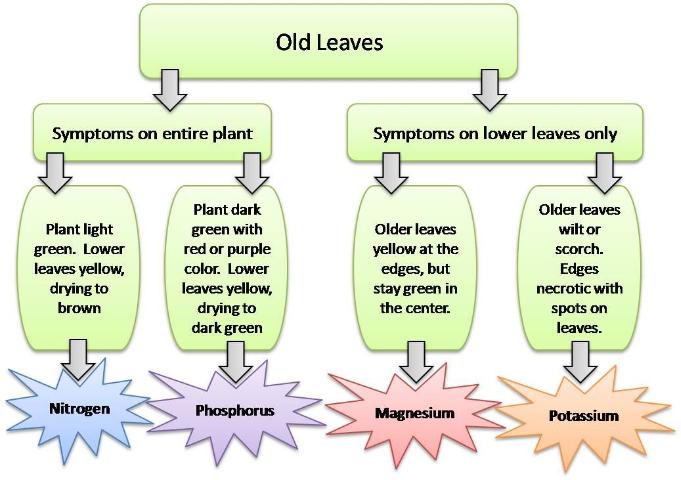
Mobile Nutrient Symptoms.
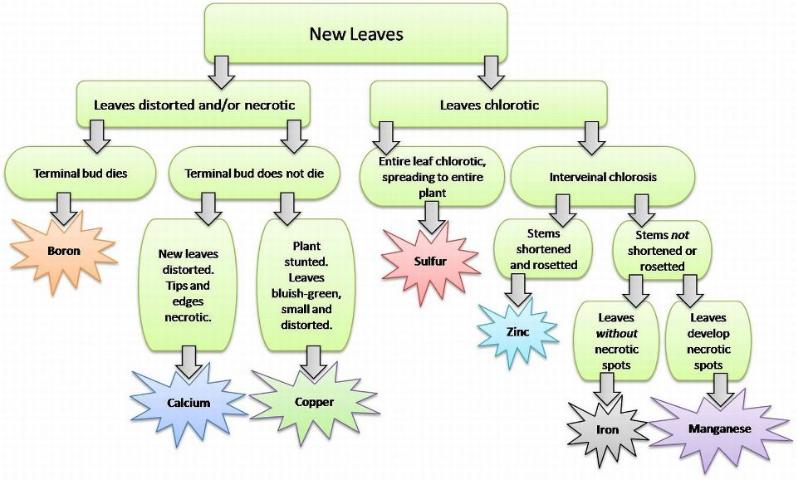
Immobile Nutrient Symptoms.
by Roy Carter | Nov 4, 2013
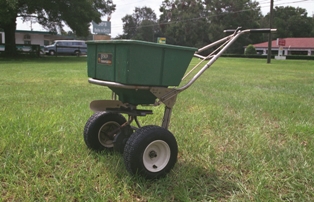
Fertilizer Spreader on lawn. Image Credit UF IFAS Extension FYN Program
Fertilizers are manufactured from a wide variety of materials to supply plant nutrients. Once these materials are mixed, it becomes difficult to distinguish the materials present. In the past, a few unscrupulous manufacturers have taken advantage of this to increase their profit. To protect consumers and legitimate manufacturers from such practices, The Florida legislature enacted the first fertilizer law in 1889 and has amended it many times since enactment. These laws regulate the manufacture and sale of fertilizer in the state.
The law requires that the manufacturer purchase and affix a label to each bag, package, container, or lot of fertilizer offered for sale in the state. The law requires that each label show specific information about the analysis and composition of the mixture or material.
Image Credit UF IFAS
The key information comes in the guaranteed analysis section of the label. It tells the home gardener the ratio by percentage of the primary plant nutrients. The number s are in the order of these primary nutrients; Nitrogen, Phosphorus and Potassium. For example an 8-8-8 fertilizer would be eight percent nitrogen compound, eight percent phosphorus compound and eight percent potassium compound.
There’s some other information in this section of the label that may seem even more complicated but it’s also important. The label explains how much chlorine the fertilizer can contain. Chlorine can reduce the quality of some vegetable and flowers.
It informs the buyer what materials the primary plant nutrients are derived from. This can assist in determining the quality of the fertilizer.
Probably the most difficult part of the label to read, certainly the hardest part to describe, is the information listed right after the total nitrogen figure in the guaranteed analysis section. In addition the total amount of nitrogen, the label gives the amount of each of several types of nitrogen present in the fertilizer. This information will seem confusing, but it also offers a glimpse into how the fertilizer will work in specific types of soil.
Terms such as nitrate nitrogen ammoniacal nitrogen, water-soluble organic nitrogen and/or urea nitrogen can be used by plants fairly quickly. These nitrogen forms in fertilizer are great for a vegetable garden. But nitrate and water-soluble organic nitrogen are rapidly leached out of the soil so they don’t last very long. Ammoniacal and water insoluble nitrogen will stay longer in sandy soils.
Fertilizer with a high percentage of natural organic nitrogen is used by the plants slowly over a fairly long period of time. This kind of slow release fertilizer would be good for lawns helping them stay green without causing spurts of extra fast growth.
This is a complicated subject, hard to fully explain in one article. This is the take home message: almost any fertilizer purchased in Florida is a good one if it has the ingredients required for plant health and if the price is fair in terms of the total amount of plant nutrients it contains.
For more information on Florida fertilizer label contact your local UF IFAS Extension office or read this publication on the Florida Fertilizer Label.
by Mary Salinas | Sep 23, 2013
Is the newest growth on your sago palm turning yellow, brown, frizzy looking and dying – is it a pest or disease or something else?

Photo credit: Mary Derrick
This sago palm is suffering from a classic case of manganese deficiency. When sago palms lack manganese, the newest leaves will develop yellow splotches or be entirely yellow. As the leaves die, they turn brown and take on a frizzled appearance. Sometimes the leaves or fruit may be smaller than normal. If left unchecked, the sago usually dies.
Manganese is a micronutrient required by all plants for normal, healthy growth and is most available for plant uptake when the soil pH is between 5.5 and 6.5. Soils in the Florida panhandle are often naturally low in manganese and then what available manganese is present can be unavailable for the plant to use if the pH of the soil is much above 6.5. Also, manganese tends to be leached from the soil when the pH is below 5.5. Soil pH and nutrient testing is useful to determine if soils are nutrient deficient. Contact your county Extension office for information on getting that done.
[notice]Before treating, rule out an infestation of Asian cycad scale. Click here for a UF IFAS Extension publication on this damaging insect. Be aware that both are common problems for sago palms and that your sago may be afflicted with both![/notice]
If this is happening to a sago palm, the good news is that it is easy to correct. Manganese sulfate is readily available at garden centers, feed &seed stores and independent nurseries. Just make sure to get manganese sulfate and don’t confuse it with magnesium sulfate (Epson salts). The amount of manganese sulfate necessary to correct this deficiency will vary with its size, soil type and pH. Sago palms in sandy, acidic soils require less manganese sulfate than those in high pH soils. One ounce is sufficient for a very small plant in sandy, acidic soil. A very large sago in a high pH soil may require about five pounds, however. Spread the product evenly over the root zone and water in with about a half inch of water.
The affected leaves cannot be cured but new growth should return to normal. If the new growth is still affected, an additional application of manganese sulfate may be needed. Once sago palms have suffered from a manganese deficiency, half the initial rate should be applied yearly to prevent the deficiency from re-occurring.
Even though sago palms are not true palms – they are cycads – their nutritional needs are very similar to palms. Most of the time they grow well without any supplemental fertilization, but if they do need fertilizing, use a 8-2-12-4 (the fourth number is magnesium) palm fertilizer with micronutrients and avoid using other fertilizer products in their root zones.
For more information on sago palms please see:
Cycas revoluta, Sago Palm


