by Danielle S. Williams | Apr 1, 2020
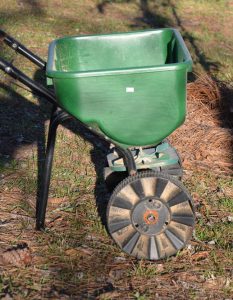
Fertilizer Spreader – Image Credit Les Harrison ,UF / IFAS Extension
Plants require nutrients to grow and they typically get them from the soil. Oftentimes, we apply fertilizer to help them along. Fertilizers provide specific nutrients for your plants and are available in a variety of different forms. When used correctly, fertilizers are a great tool that can help plants thrive. If used incorrectly, fertilizers can harm plants and also the environment.
Different plants have different nutrient requirements and in many cases, fertilizer may not be necessary so do your research before purchasing fertilizers. Sometimes, certain plants, like azaleas or blueberries, need a special formulation of fertilizer.
Think about having your soil tested to see what nutrients are already present in your soil. Contact your local Extension Office for sampling procedures.
Fertilizer Components
Most fertilizers used in the home landscape and garden are blends of several elements mixed together to create a specific formulation of plant nutrients.
Macronutrients
Macronutrients are nutrients required by plants in relatively large amounts for optimum growth. The three main nutrients contained in fertilizers are nitrogen (N), phosphorus (P), and potassium (K). Most folks are familiar with these because they are represented by three numbers that appear on the fertilizer bag. You may be familiar with the term ‘complete fertilizer’. This means the fertilizer with contain all three of the major plant nutrients – N, P and K. Other macronutrients include calcium (Ca), magnesium (Mg), and sulfur (S).
Micronutrients
Micronutrients are nutrients most plants need in small quantities. They are sometimes referred to as trace elements or minor elements. These nutrients include boron (B), chlorine (Cl), copper (Cu), iron (Fe), manganese (Mn), molybdenum (Mo), and zinc (Zn). They are often available in sufficient quantities in the soil, but are also present in many fertilizers. Micronutrients are also sold as individual nutrients.
Types of Fertilizer
Inorganic Fertilizers
Inorganic fertilizers are materials that are mined or synthesized from non-living materials. Many inorganic fertilizers contain nutrients that are immediately available to plants. Others are formulated to be released over a period of time.
Organic Fertilizers
Organic fertilizers are materials that are derived from plants and animals. One of the most common forms of organic fertilizers is manure. Organic matter incorporated into the soil before planting will help fertilize your vegetable plants, but you’ll need to add additional fertilizer after planting.
The quick availability of nutrients, especially nitrogen, is very important in vegetable growing. Therefore, you may want to supplement any organic fertilizer you apply with some inorganic fertilizer for quick feeding. It is a common practice for gardeners to use a combination of fertilizers and techniques in the garden.
Slow- or Controlled-Release Fertilizers
Slow- and Controlled-Release fertilizers provide nutrients to plant roots over an extended period of time. This allows you to fertilize less frequently and prevent nutrients from leaving your landscape and entering groundwater or waterways.
Understanding a Fertilizer Label
The fertilizer label includes a series of numbers that indicate the percentage of nitrogen, phosphorous, and potassium, by weight. The numbers will read something like 15-0-15 or 16-2-8. The first number represents the percentage of nitrogen in the bag, the second refers to phosphorus, and the third number is the amount of potassium. For example, a 50-pound bag of 16-2-8 is 16% nitrogen (8 pounds total); 2% phosphorus (1 pound total); and 8% potassium (4 pounds total). The remaining weight is usually comprised of inert ingredients.
Preventing Pollution
- Follow UF/IFAS Recommendations. Rates, application timings and formulas vary depending on the plant.
- Do not fertilize before a heavy rain. If rain is in the forecast for the next 24 hours, wait to apply fertilizer. Heavy rains can cause fertilizer to leach into groundwater.
- Keep fertilizer off hard surfaces. If fertilizer is spilled on a driveway or sidewalk, sweep it up and dispose of it. Fertilizers can wash into storm drains and nearby bodies of water.
For more information on fertilizers visit:
The Fertilizer Label
by Daniel J. Leonard | Jan 23, 2020
Cruciferous vegetables, mostly cool-season annuals in the Brassicaceae (formerly Cruciferae) family, are part of a healthy diet, prized for their high fiber content and unique sulfur-containing compounds known as glucosinolates. This vegetable family includes things many of us love (or love to hate) like Brussels sprouts, cabbage, cauliflower, collards, kale, mustard, turnips, bok choy, and Chinese cabbage. They’re also commonly grown in Panhandle gardens. However, as anyone who has grown these species knows, some are easier than others. For example, kale and radish are among the easiest of all plants to grow. But get beyond the basics and folks often run into difficulty with species like broccoli and cabbage. The high rainfall/humidity and frequent warm spells experienced here during the growing season often lead to serious pathogen problems, dooming my garden in years past. However, this winter, thanks to a couple of new cultivars, ‘Capture’ Cabbage and ‘Burgundy’ Sprouting Broccoli, I’ve enjoyed a plentiful supply of tasty crucifers!
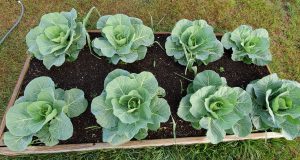
4’x 8′ raised bed planted with ‘Capture’ on 24″ centers.
‘Capture’ Cabbage, developed by Bejo Seeds of California as a mid-season “white” fresh market cabbage for the South, has been an outstanding performer in my garden this year. Touted as highly resistant to Black Rot and Fusarium Yellows (by far the two most devastating pathogens of Cabbage), I had to try it for myself. I planted seeds 24” apart in my standard 4’ wide x 8’ long x 12” deep raised beds filled with mushroom compost and aged pine bark. Seedlings were fertilized once about three weeks after germination with a general purpose 10-10-10 fertilizer. The plants that developed have been extremely vigorous (I’m glad I paid attention to plant spacing guidelines on the seed packet!) and have not shown ANY evidence of disease, even through an unusually warm and wet winter that would have hammered older susceptible varieties. My plants have begun to develop heads and should be ready for harvest and the kitchen in just a couple more weeks! If you’ve had problems getting a cabbage from germination to head formation and harvest without serious disease pressure, give ‘Capture’ a try next fall!
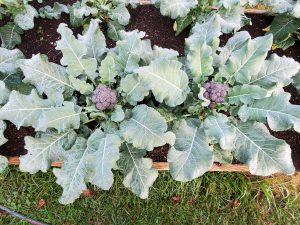
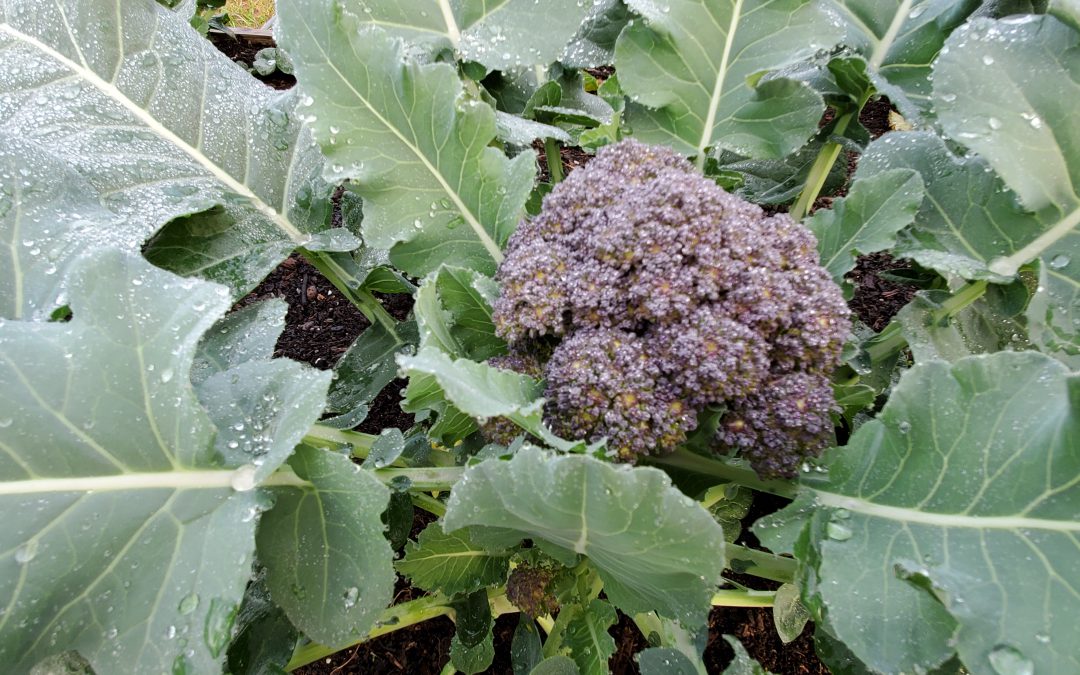
‘Burgundy’ Broccoli in the author’s raised bed garden.
‘Burgundy’ Broccoli, developed by Elsom Seeds in the United Kingdom, is a unique variety sure to turn heads in your garden. True to its name, the prolific florets are a deep, purple color. Though the central “head” on ‘Burgundy’ is quite small, that’s not the primary feature anyway. Considered a “sprouting” broccoli, this cultivar puts out an abundance of side shoots that make ‘Burgundy’ sort of a cut-and-come-again broccoli, allowing for a long harvest window. Another advantage from a disease avoidance perspective is the short maturity time (the time from planting seeds to having harvestable shoots) of around 40 days! For perspective, a “regular” heading broccoli has a maturity of around 60 day, lots more time for problems to happen. In the same growing conditions described above for cabbage, ‘Burgundy’ performed amazingly well for me, growing strong, healthy stalks, large, unblemished leaves and an abundance of purple shoots with a nice flavor profile!
If you want to enjoy homegrown broccoli and cabbage but disease pressures have made your previous efforts unproductive, give ‘Capture’ Cabbage and ‘Burgundy’ Broccoli a try! These two selections have made it easier than ever to enjoy unique, homegrown, healthy cruciferous veggies. Keep these and other quality, disease-resistant cultivars in mind when planning your winter garden in 2020!
by Matt Lollar | Sep 7, 2019
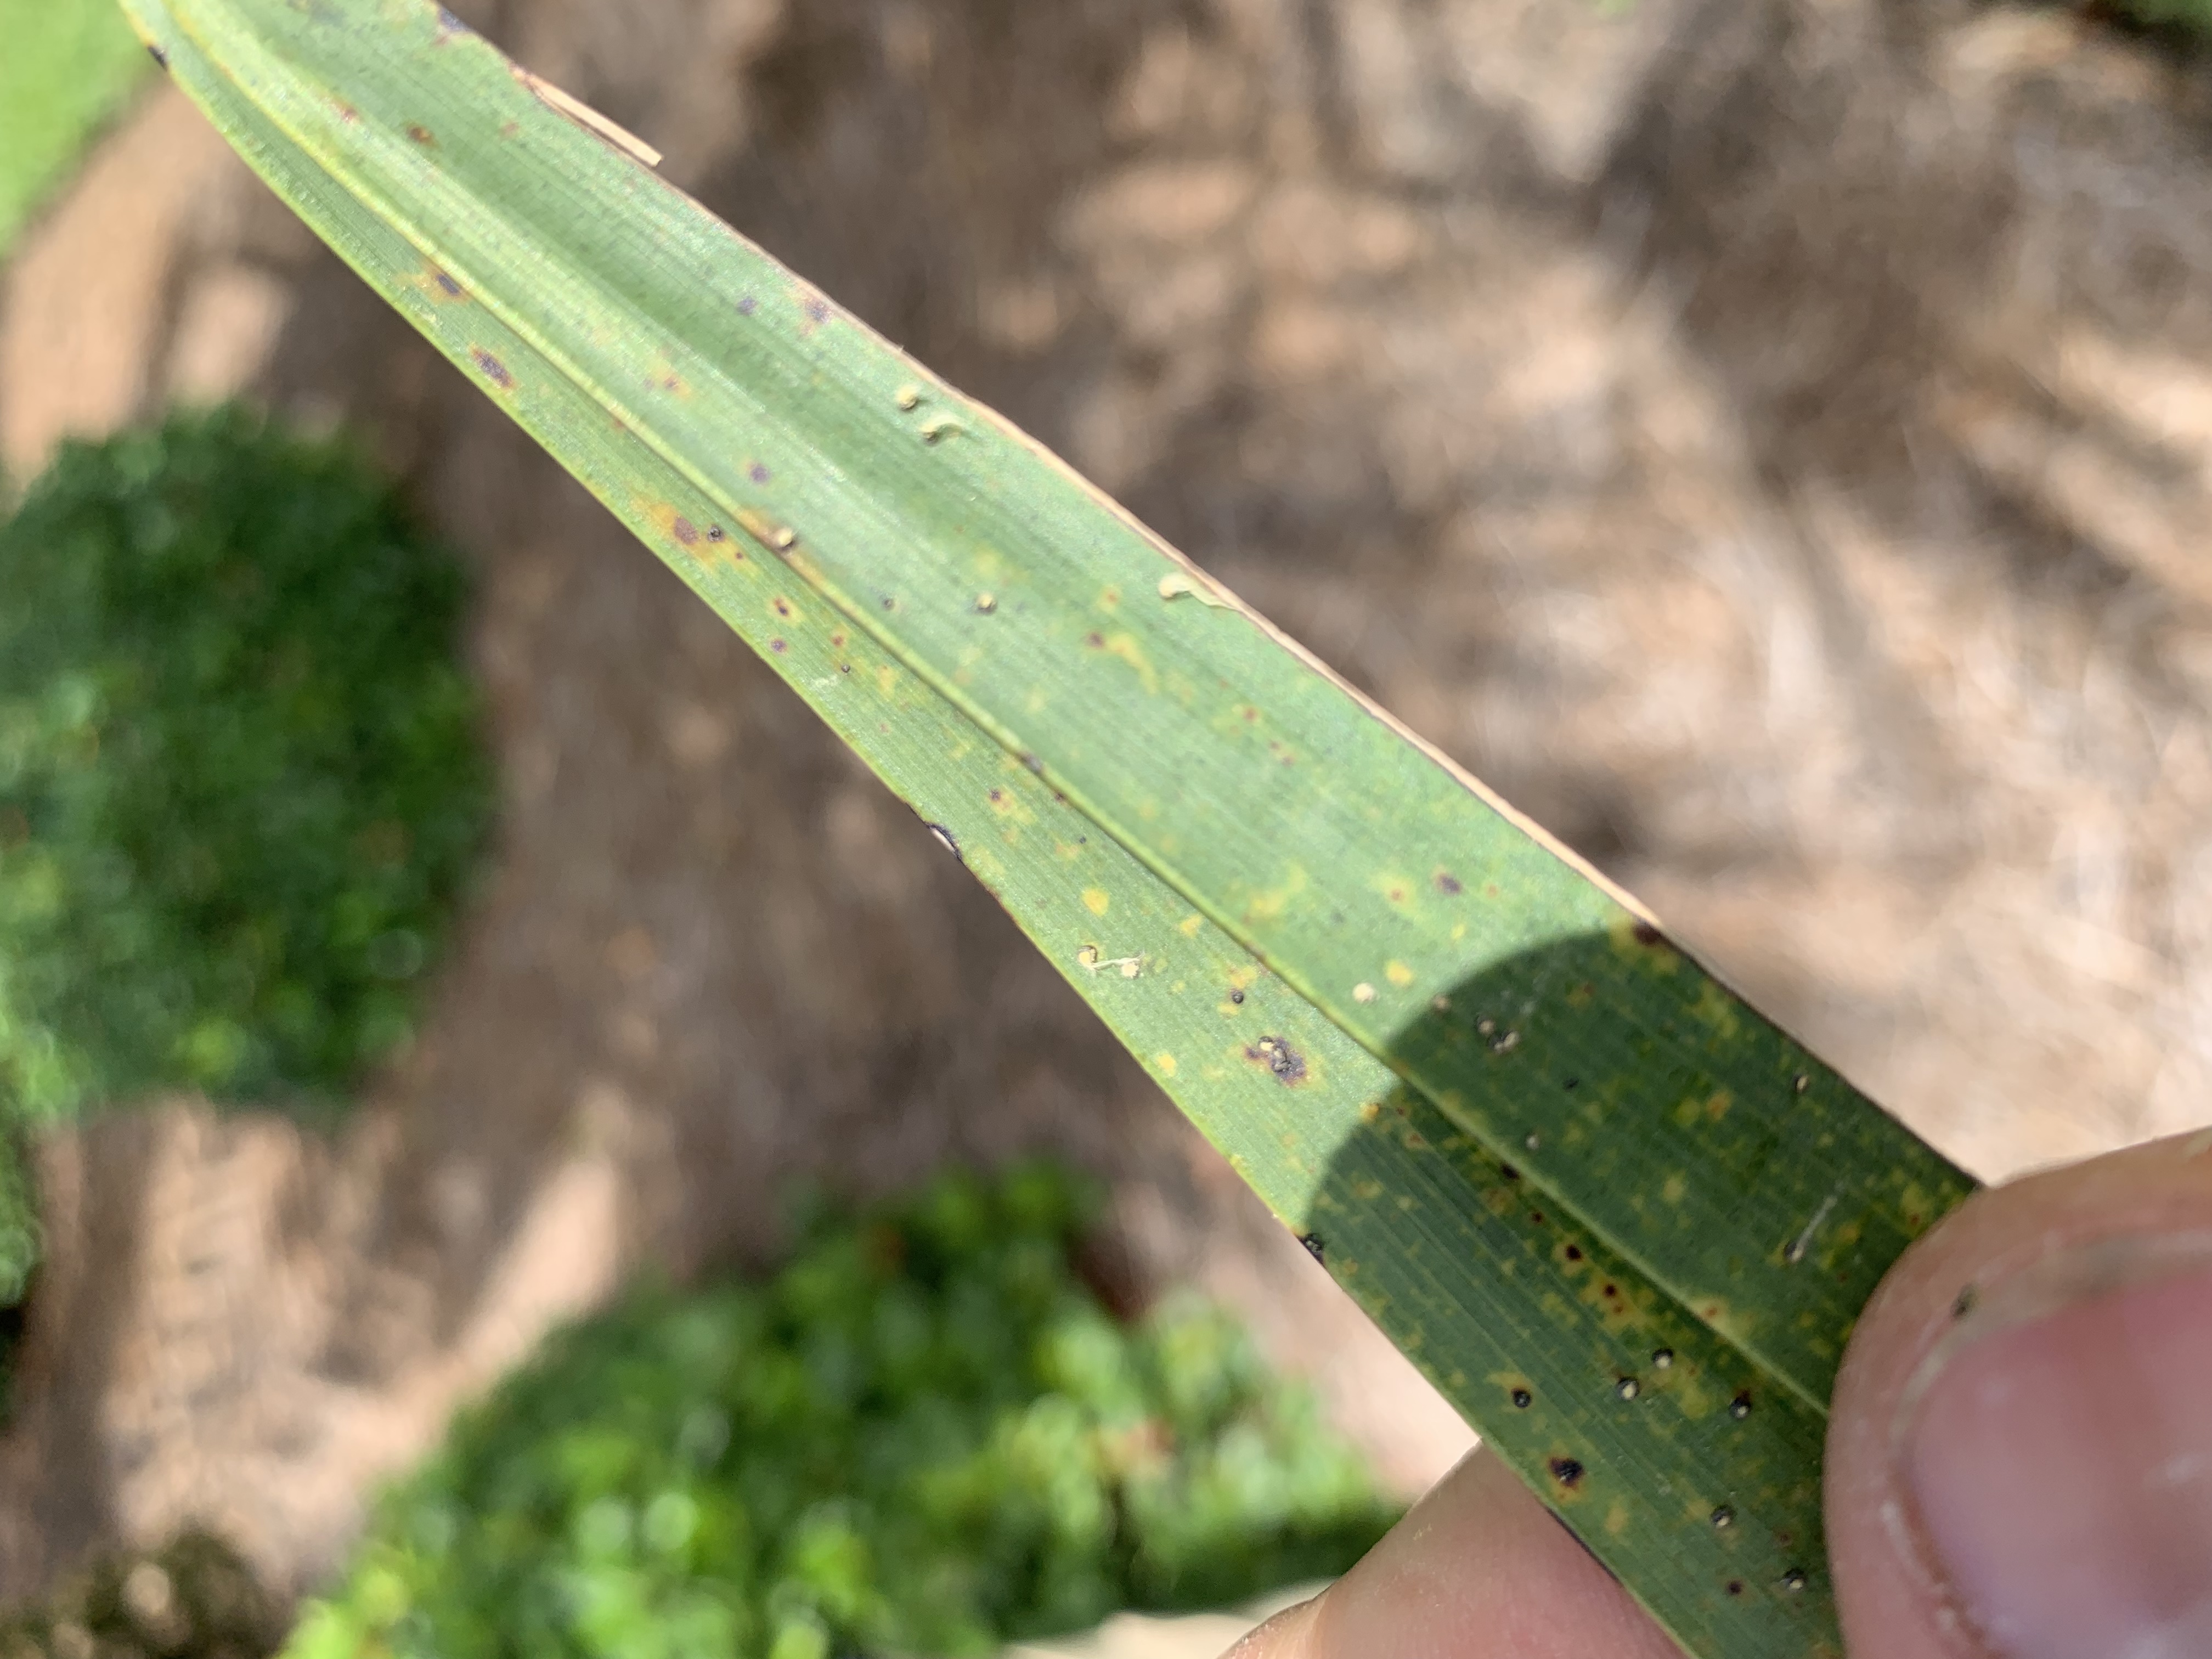
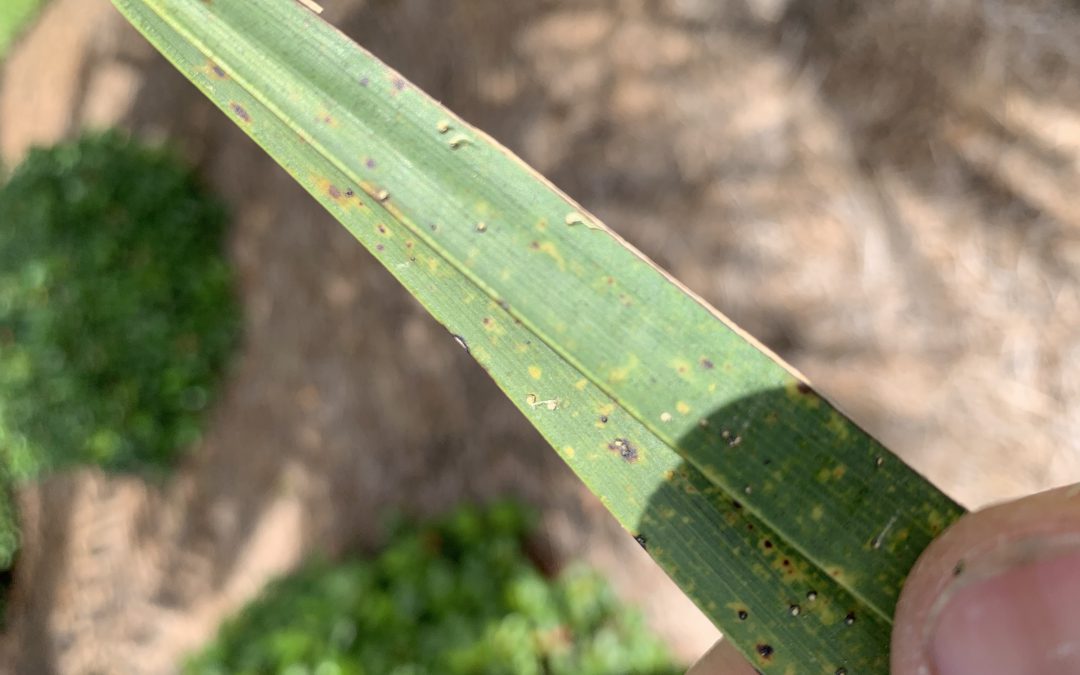
A couple weeks ago, I was on a site visit to check out some issues on Canary Island Date Palms. The account manager on the property requested a site visit because he thought the palms were infested with scale insects. He noticed the issue on a number of the properties he manages and he was concerned it was an epidemic. From a distance, lower fronds were yellowing from the outside in and the tips were necrotic. These are signs of potassium deficiency with possible magnesium deficiency mixed in.
Transitional leaf showing potassium deficiency (tip) and magnesium deficiency (base) symptoms. Photo Credit: T.K. Broschat, University of Florida/IFAS Extension
Nutrient deficiencies are slow to correct in palm trees. It’s much easier to prevent deficiencies from occurring by using a palm fertilizer that has the analysis 8N-2P2O5-12K2O+4Mg with micronutrients. Even if the palms are part of a landscape which includes turf and other plants that require additional nitrogen, it is best to use a palm fertilizer with the analysis previously listed over a radius at least 25 feet out from the palms. However, poor nutrition wasn’t the only problem with these palms.
Upon closer look, the leaflets were speckled with little bumps. Each bump had a little white tail. These are the fruiting structures of graphiola leaf spot also known as false smut.

Graphiola leaf spot (false smut) on a Canary Island Date Palm. Photo Credit: Matt Lollar, University of Florida/IFAS Extension – Santa Rosa County
Graphiola leaf spot is a fungal leaf disease caused by Graphiola phoenicis. Canary Island Date Palms are especially susceptible to this disease. Graphiola leaf spot is primarily an aesthetic issue and doesn’t cause much harm to the palms infected. In fact, the nutrient deficiencies observed in these palms are much more detrimental to their health.
Graphiola leaf spot affects the lower fronds first. If the diseased, lower fronds are not showing signs of nutrient deficiencies then they can be pruned off and removed from the site. All naturally fallen fronds should be removed from the site to reduce the likelihood of fungal spores being splashed onto the healthy, living fronds. A fungicide containing copper can be applied to help prevent the spread of the disease, but it will not cure the infected fronds. Palms can be a beautiful addition to the landscape and most diseases and abiotic disorders can be managed and prevented with proper pruning, correct fertilizer rates, and precise irrigation.
by Ray Bodrey | Aug 22, 2019
Seldom do we find the answer to a problem as being easy. More often, a difficult and complicated answer is what’s needed. However, the solution to a healthy lawn rebound may be found simply by adjusting your mower height and mowing schedule.
Mowing strategy is an important variable that keeps a lawn healthy and flourishing, no matter the species or cultivar of grass. Mowing too high can lead to an undesirable look and cause unwanted thatch buildup, which can create a favorable environment for pests and diseases. Mowing too low can weaken the root system causing thinning, which allows space for weeds to invade. Another problem with mowing too low is that it affects nutritional needs. Lawn grasses generate food for themselves through a process called photosynthesis. A healthy leaf surface area is needed to effectively accomplish this. If the lawn is mowed too low, then leaf surface area is lost. The grass can literally starve itself.

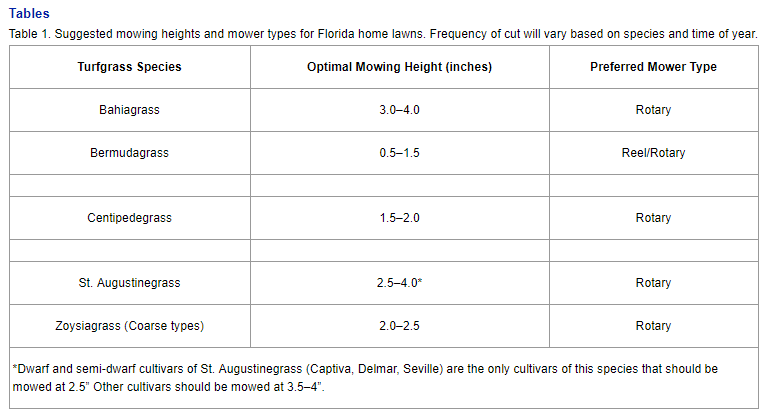
Table: Suggested mowing height for lawn grasses. Frequency of cut will vary based on species and time of year. Credit: L. E. Trenholm, J. B. Unruh & J. L. Cisar, UF/IFAS Extensio
Not all lawn grasses should be mowed at the same height, as show in the table above. Fine textured grasses like Bermuda and Zoysia matrella can be cut significantly lower than coarse textured grasses, such as Bahia or St. Augustine. Not sure of the type of lawn grass you have? Visit this site https://edis.ifas.ufl.edu/topic_book_florida_lawn_handbook_3rd_ed to review the Florida Lawn Handbook or contact your local county extension office for questions.
Mowing schedule is the other side of the coin. How often to mow ultimately depends on how fast your grass grows. By nature, Bermuda will grow quickly and Zoysia is somewhat slower growing. Regardless, summer months are when warm-season lawn grasses grow more rapidly. Historically, lawn grasses begin a dormant-slow growth stage in October and continues through March. Fertilizer schedule also plays a role in grass growth rate. So how often do you need to mow? This rate is best determined by the amount of growth since the last cutting, rather than the number of days which have elapsed. You should mow often enough so that no more than 1/4 to 1/3 of the total leaf surface is removed at any given mowing. In other words, leave twice as much leaf surface as you cut off. Remember, incremental adjustments should be made to your current practices. Never drastically change the height of the grass. If the lawn has been allowed to grow too long, you should gradually lower the mowing height on successive cuttings.
What are some other helpful tips? Always use a well-adjusted mower with a sharpened blade. You may find it easier replace your blade each year or every 2 years than periodic resharpening. Dull mower blades do a tremendous amount of damage with uneven cuts. This will cause gashes and splits in the leaf where fungal and bacterial pathogens can thrive. Never mow grass when it’s wet, either. Dry grass cuts are cleaner cuts and won’t clog the mower deck. If you have built up thatch, it’s a good idea to attach a bag to your mower that will catch clippings. These clippings will be great additions to your compost pile or to use as natural mulch. If no thatch problems exist, mowing without a bag will distribute clippings throughout the lawn, and the clippings will decompose into nutrients for the root system.
With proper mowing strategies, along with fertilizing & watering, your lawn grass can bounce back. For more information contact your local county extension office.
Information for this article provided by the UF/IFAS Extension EDIS Publication, “Mowing Your Florida Lawn”, by L. E. Trenholm, J. B. Unruh & J. L. Cisar: https://edis.ifas.ufl.edu/pdffiles/LH/LH02800.pdf
UF/IFAS Extension is an Equal Opportunity Institution.
by Daniel J. Leonard | Aug 20, 2019
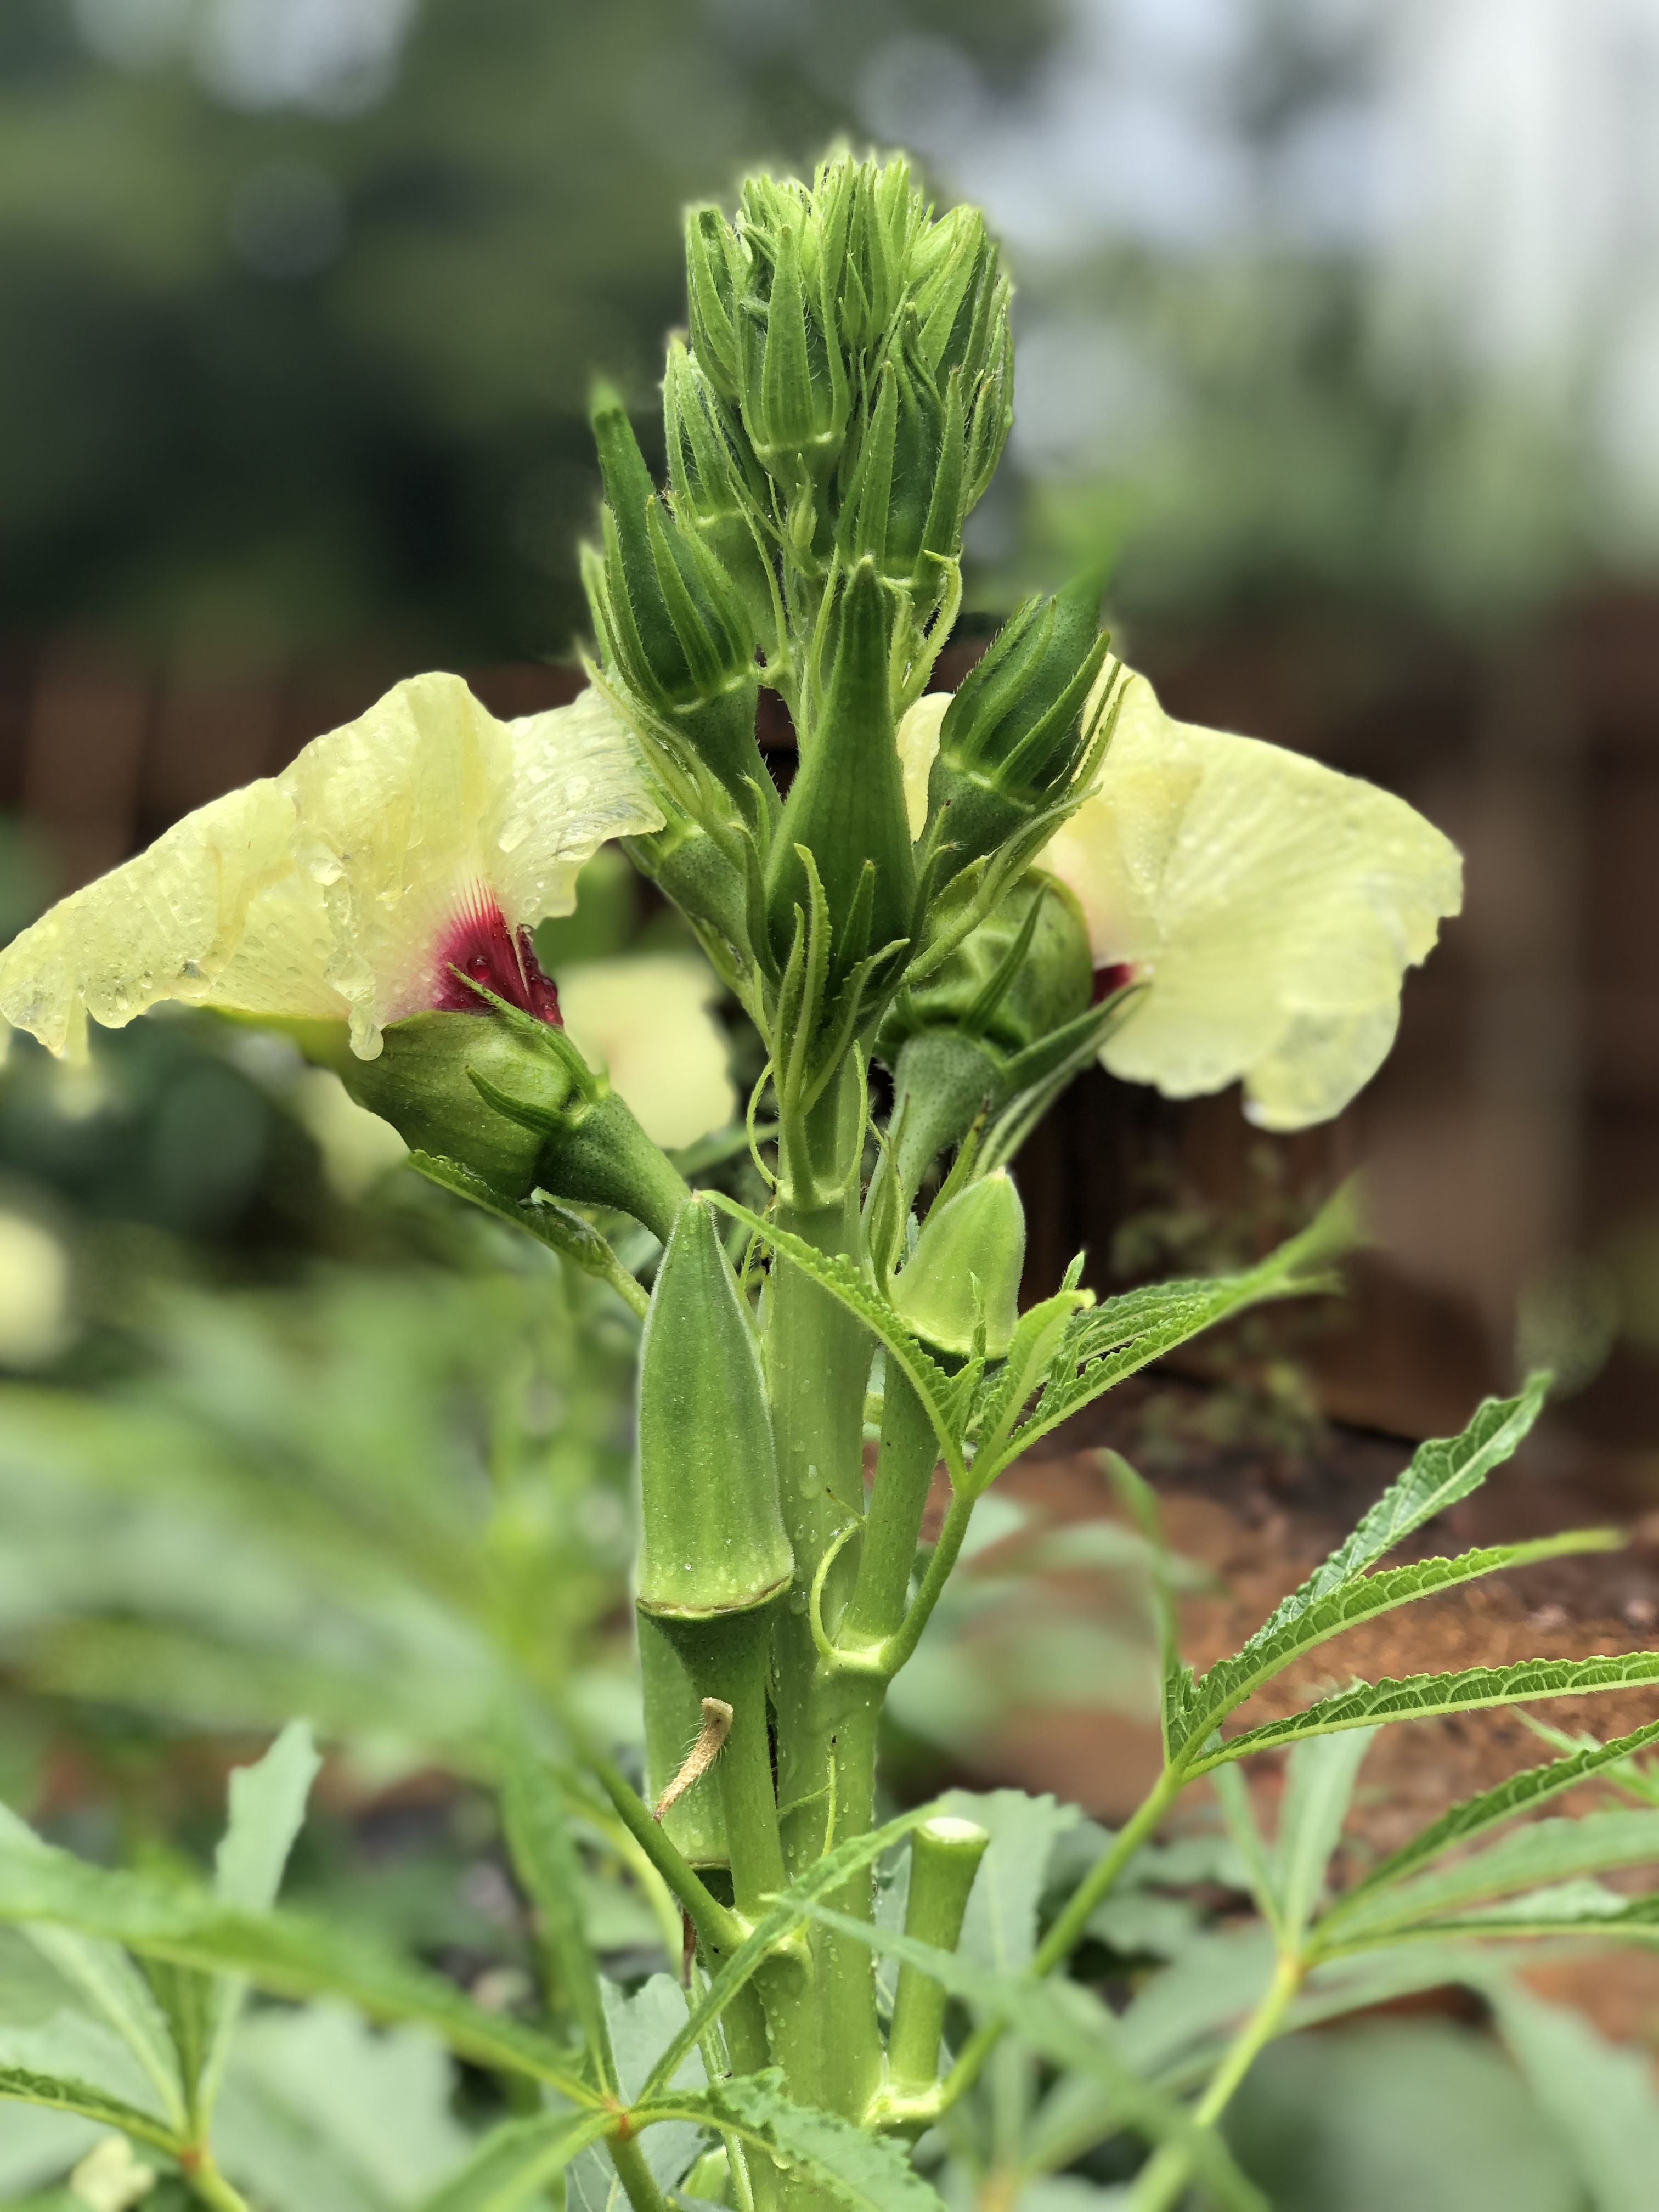
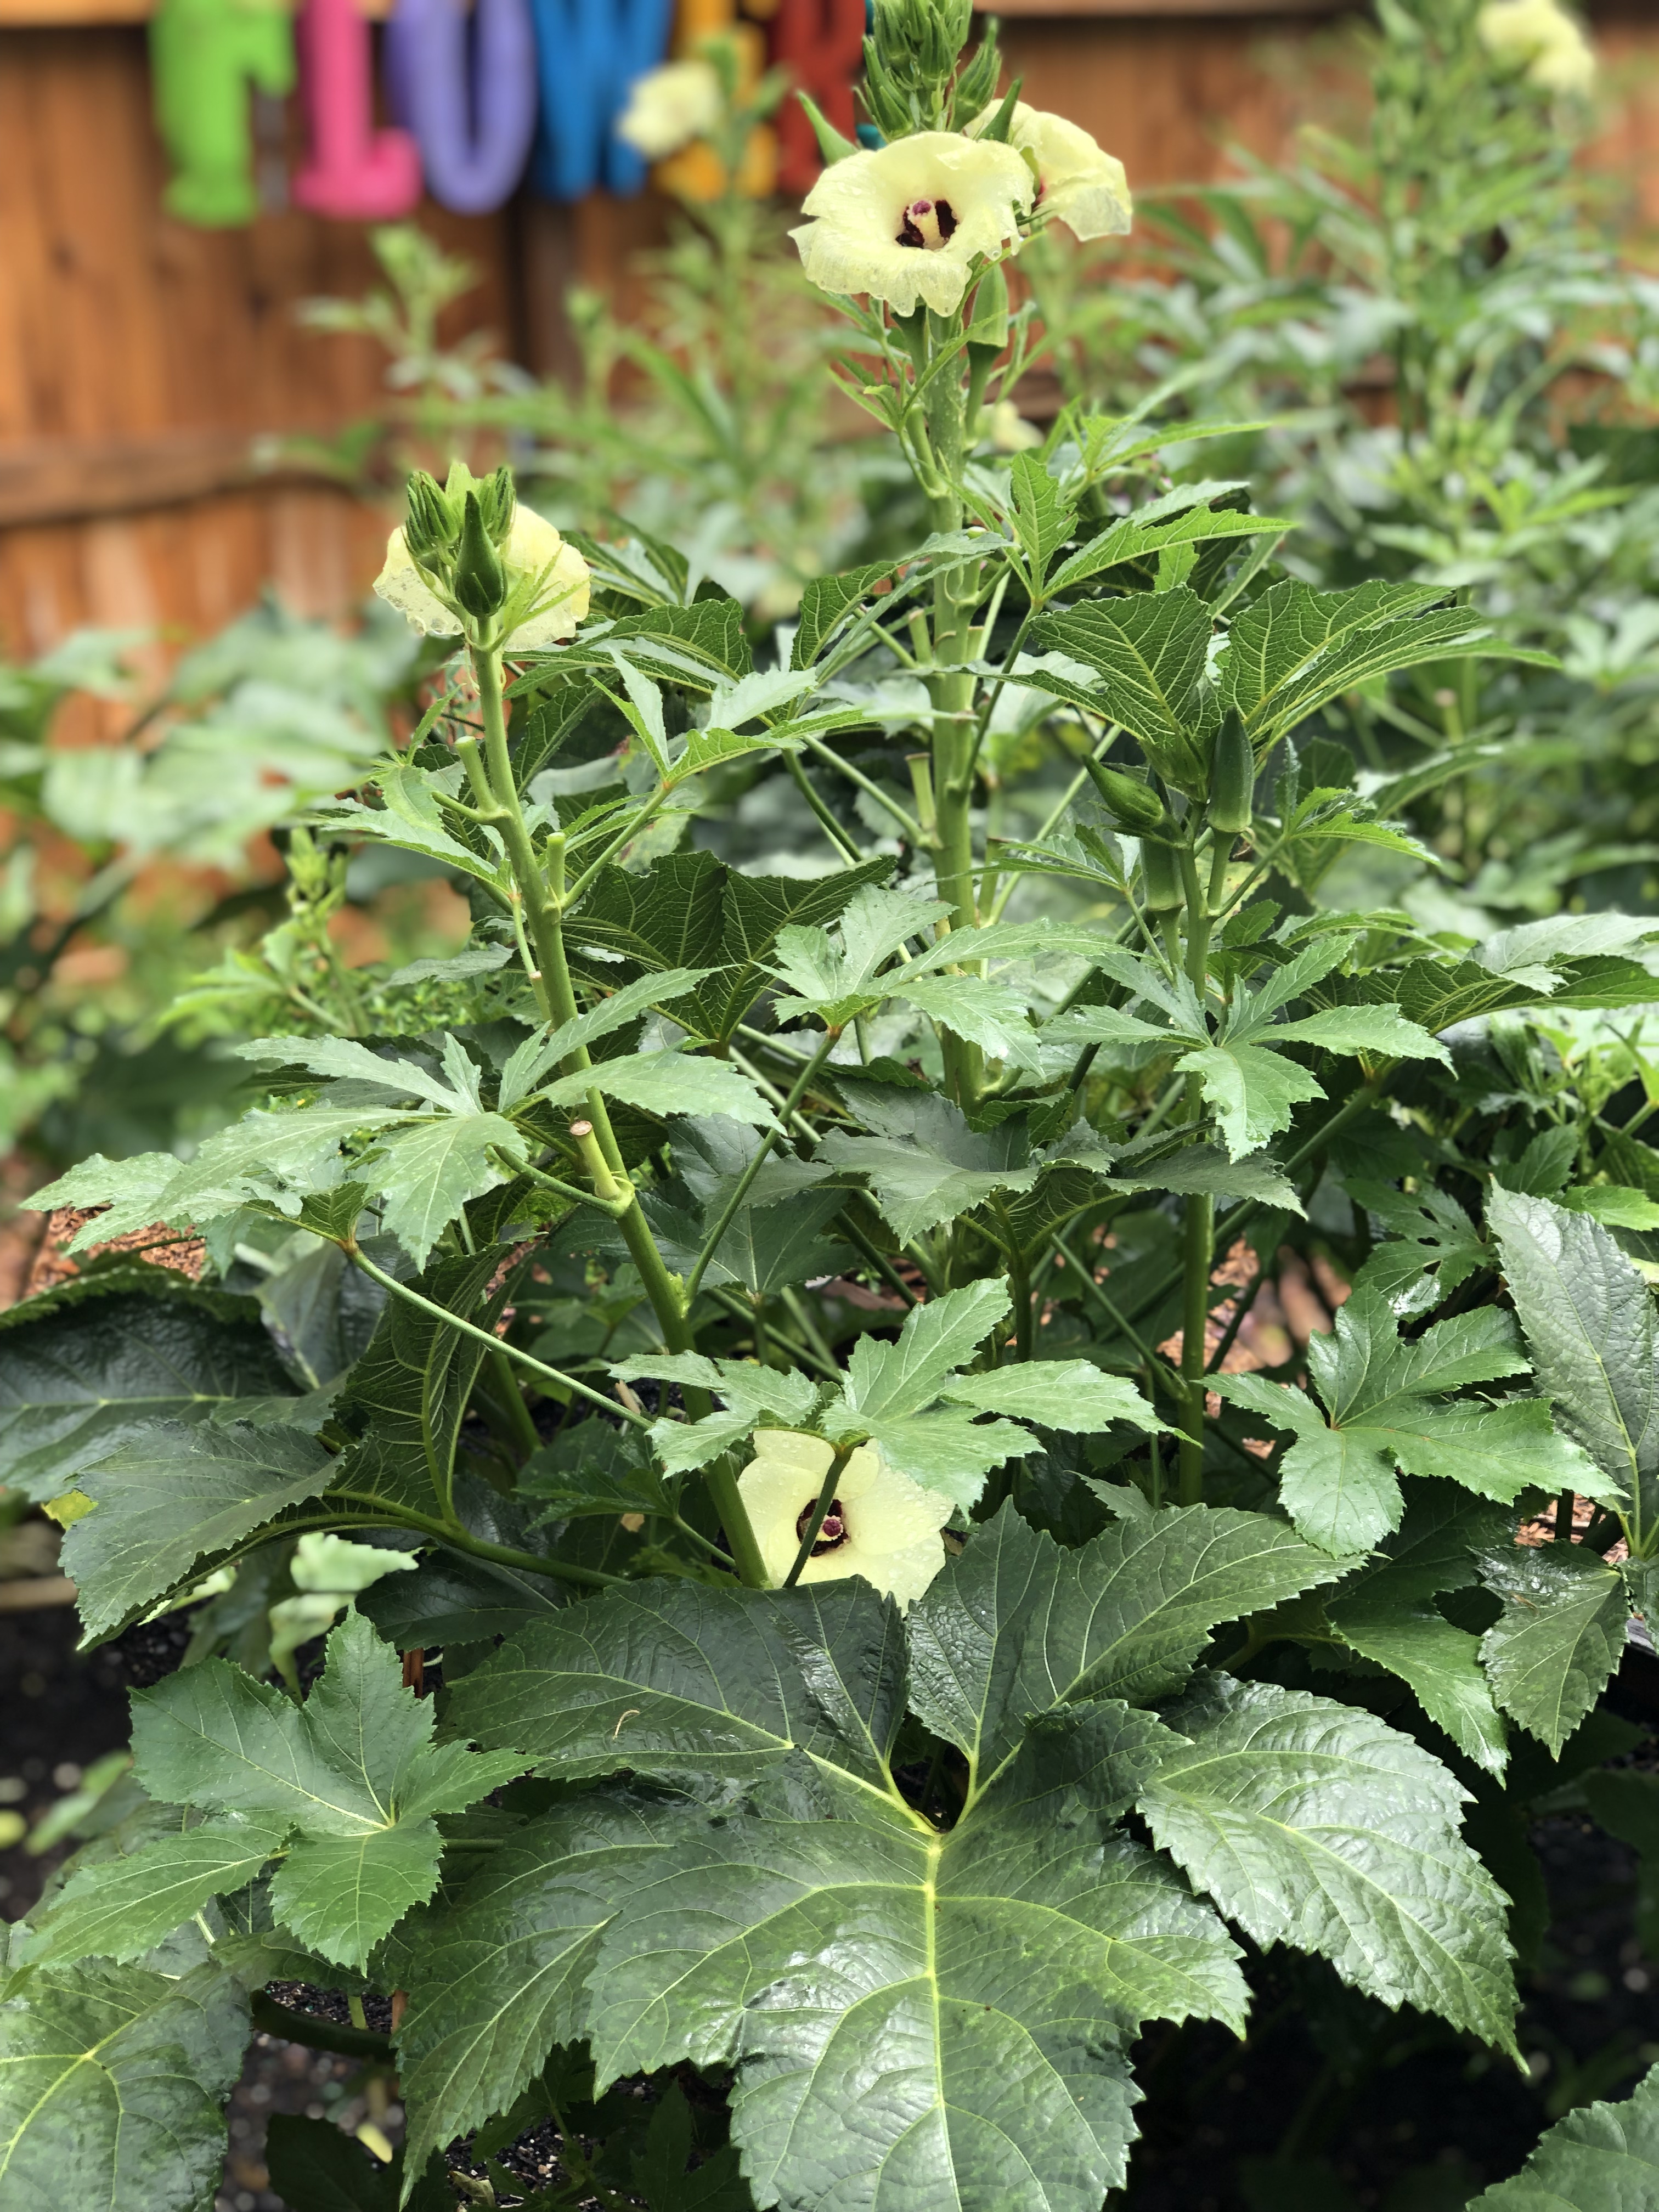
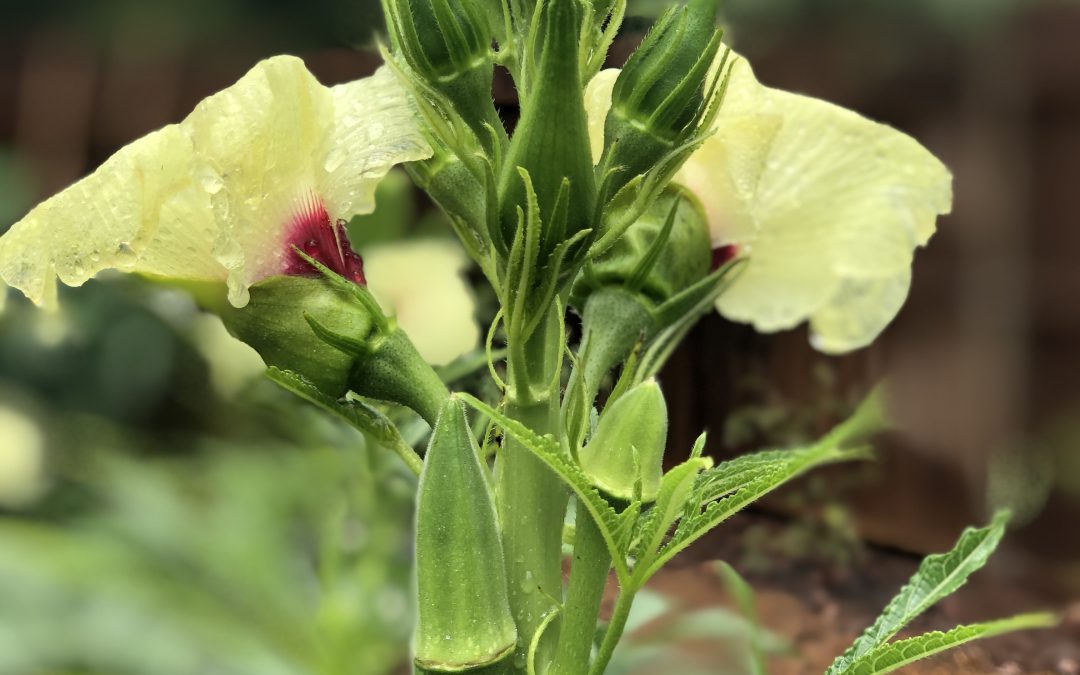
Though Okra (Abelmoschus esculentus) fruit isn’t much more than a thick green hull, slime and seeds and the plant itself is impossibly irritating to the skin, few plants are as integral to Southern heritage. In my mind, okra is among the best vegetables Panhandle gardeners can grow. Not only is it a gorgeous plant – Okra belongs to the Mallow family which also includes beauties like Hibiscus and Cotton – but it’s exceedingly versatile in the kitchen, excellent fried, grilled, roasted, boiled (though you have to acquire a taste for slimy textures to enjoy this method) and most famously, as a thickening agent in Cajun gumbo. Because of this exalted status in Southern culture, whether you enjoy eating okra or not, it’s almost mandatory here to include the plant in one’s garden. Most gardeners stick with the old standard varieties such as ‘Clemson Spineless’ or ‘Cowhorn’ and there is nothing wrong with them, however, these plants are almost too prolific for most gardens (growing upwards of 6-7’), especially for those of us growing in the close confines of raised beds. In the search for a less rambunctious but still ultra-productive cultivar, this summer I trialed ‘Jambalaya’, an F1 hybrid developed by Sakata Seed in 2012, with impressive results!
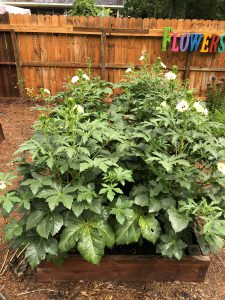
‘Jambalaya’ Okra in the author’s garden.
From my experience growing the cultivar this summer, ‘Jambalaya’ merits consideration in the garden, and is a must for raised bed gardeners, for two primary reasons. First, it was bred to be compact and is considered a dwarf cultivar. This is an awesome attribute, as I typically end the growing season picking okra from a small ladder! Most seed purveyors tout the plant as reaching a maximum height of 3-4’ and while this estimate might be a little conservative, I can attest that ‘Jambalaya’ is greatly reduced in height compared to the standard cultivars. The second advantage of growing this variety is that it begins producing very early relative to its peers and bears heavily. ‘Jambalaya’ fruit begin to ripen in about 50 days, about ten days to two weeks earlier than ‘Clemson Spineless’, a definite advantage if rotating behind a late maturing spring crop like potatoes as I typically do. Though ‘Jambalaya’ is a dwarf plant, in no way are yields reduced. My specimens have produced continuously since late-July and will continue to do so as long as adequate fertility and consistent harvesting are provided.

‘Jambalaya’ flower & fruit production.
Like any other okra cultivar, ‘Jambalaya’ has a couple of basic requirements that must be met for plants to thrive. In general, all okra cultivars love Southern summers and patience sowing seed is recommended, allow the soil to warm to at least 70 degrees before planting. Okra also prefers full sun, at least 6 hours per day, any less and yields will be reduced and plants will stretch towards the light. Belonging to the Mallow family, okra requires consistent moisture, particularly when in the flowering and fruiting phase. Finally, it is critical to keep up with your okra harvest as the plants produce! Okra pods grow quickly and should be harvested when they are no more than 3-4” long and still tender, larger pods are tough to the point of being inedible!

‘Jambalaya’ in the author’s garden.
Whether you’re new to the okra growing game or you’re a seasoned gumbo gardener, I highly encourage you to give ‘Jambalaya’ Okra a look next summer. While ‘Jambalaya’ is available through many seed sources, Johnny’s Selected Seeds sells a conveniently small package perfect for backyard gardeners, though they’ll be happy to provide larger quantities as well. In ‘Jambalaya’ you’ll find a nice compact plant that won’t outgrow your space, provide you a summer long harvest of tender green pods, and will rival the ornamentals in your landscape for the title of prettiest plant on your property! Happy gardening and as always, if you have questions about vegetable gardening or any other horticultural or agronomic topic, please contact your local UF/IFAS County Extension office!