by Danielle S. Williams | May 7, 2020
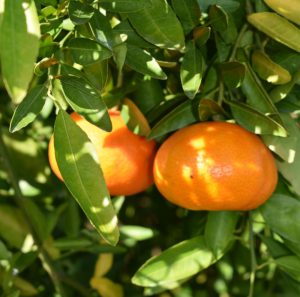
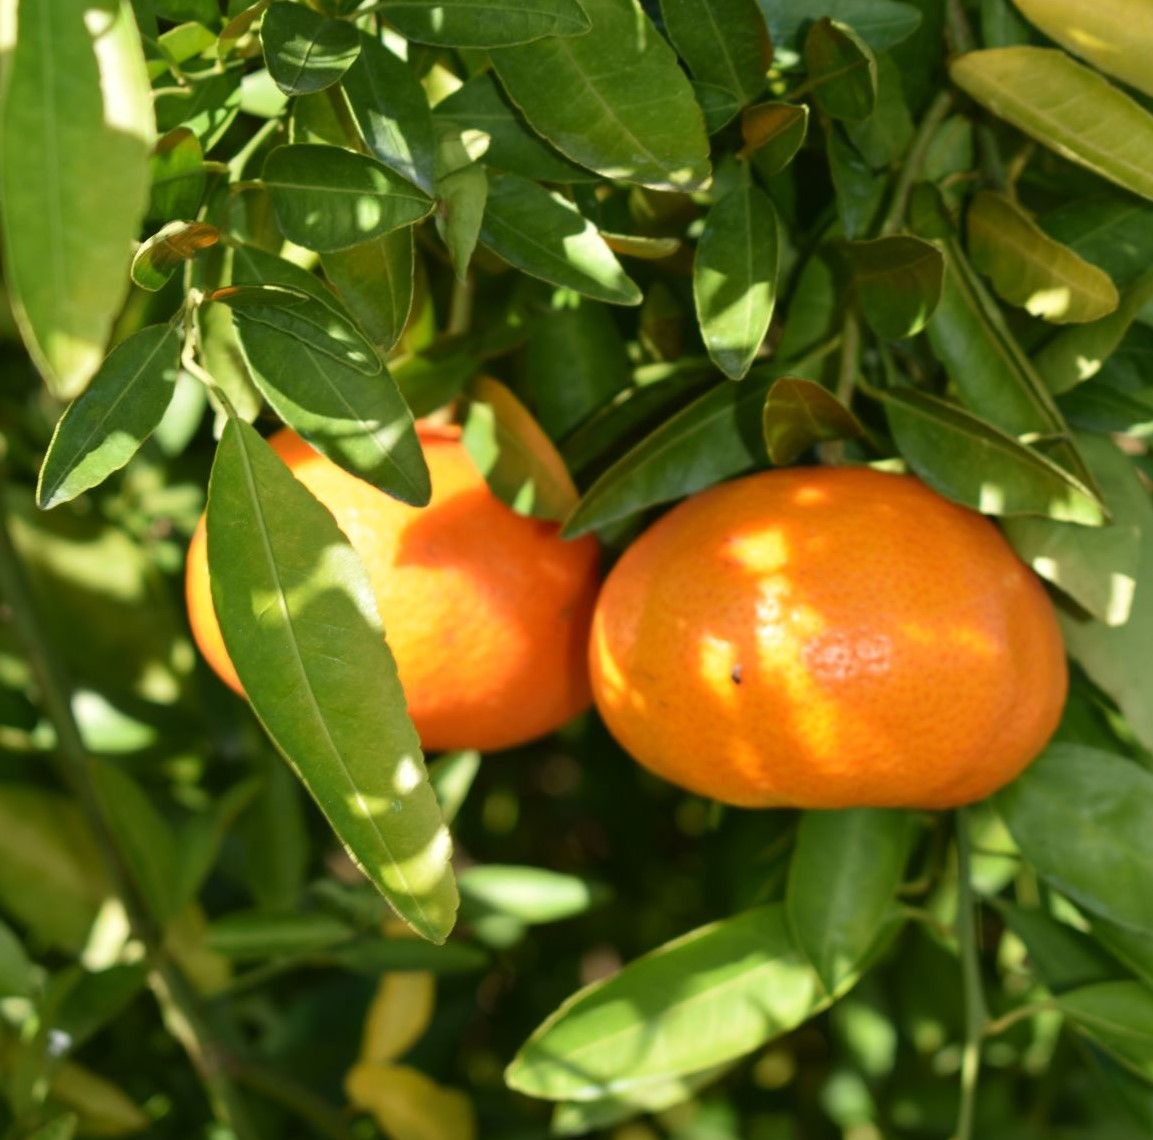
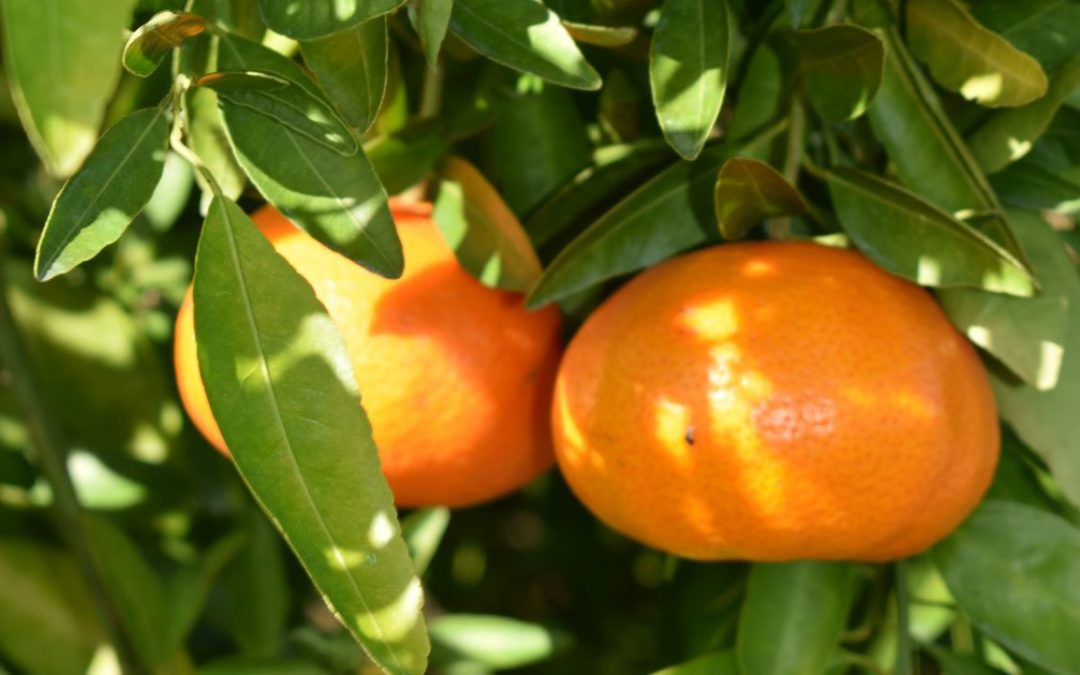
‘Early Pride’ Tangerine. Photo courtesy of Danielle Sprague.
Citrus is not only a vital part of our economy in Florida but it’s also a major component in our landscapes. Having grown up in the major grapefruit producing region of Florida, the citrus industry is near to my heart. So for me, it is very exciting to see all of the interest in the citrus industry in North Florida despite the devastation the industry is facing in South Florida. With many folks spending more time outdoors and working in the landscape, I wanted to share some ways homeowners can enjoy citrus in their landscape all while protecting the future of the citrus industry in North Florida!
First thing’s first…identification!
It’s important to be aware of some of the major pests and diseases affecting citrus. Fortunately for us in the Panhandle, many of the major pests and diseases troubling citrus to the south haven’t become quite as widespread in our area, and with your help we can keep it that way! Regularly scouting the citrus in your landscape and detecting any major pests or diseases early will be very important to prevent it from spreading.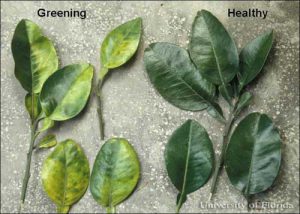
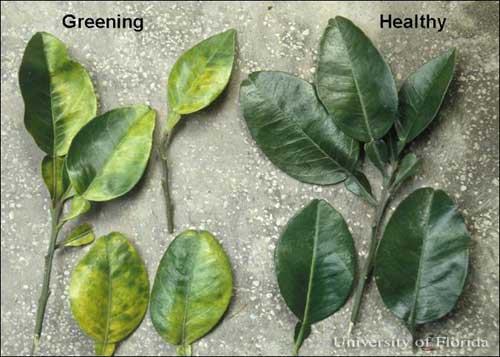
The first major disease all Floridians should be aware of is citrus greening. Citrus greening or huanglongbing (HLB) is the major disease affecting the citrus industry worldwide. It is a bacterial disease caused by the bacteria Candidatus Liberibacter. The bacterium is spread from tree to tree by a tiny insect known as the Asian citrus psyllid. Psyllids spread the disease by feeding on infected trees and moving on to non-infected trees. Once the tree is infected, there’s little hope for survival as there is no cure for citrus greening.
Citrus greening can be difficult to diagnose as it can be easily confused with nutrient deficiency. Symptoms of citrus greening include yellowing of the veins and a blotchy mottle pattern. Nutrient deficiencies tend to have a symmetrical pattern on each side of the leaf vein whereas citrus greening is asymmetrical. Overall, a tree infected with citrus greening will appear unhealthy with discolored leaves, a thin canopy, and reduced fruit production.

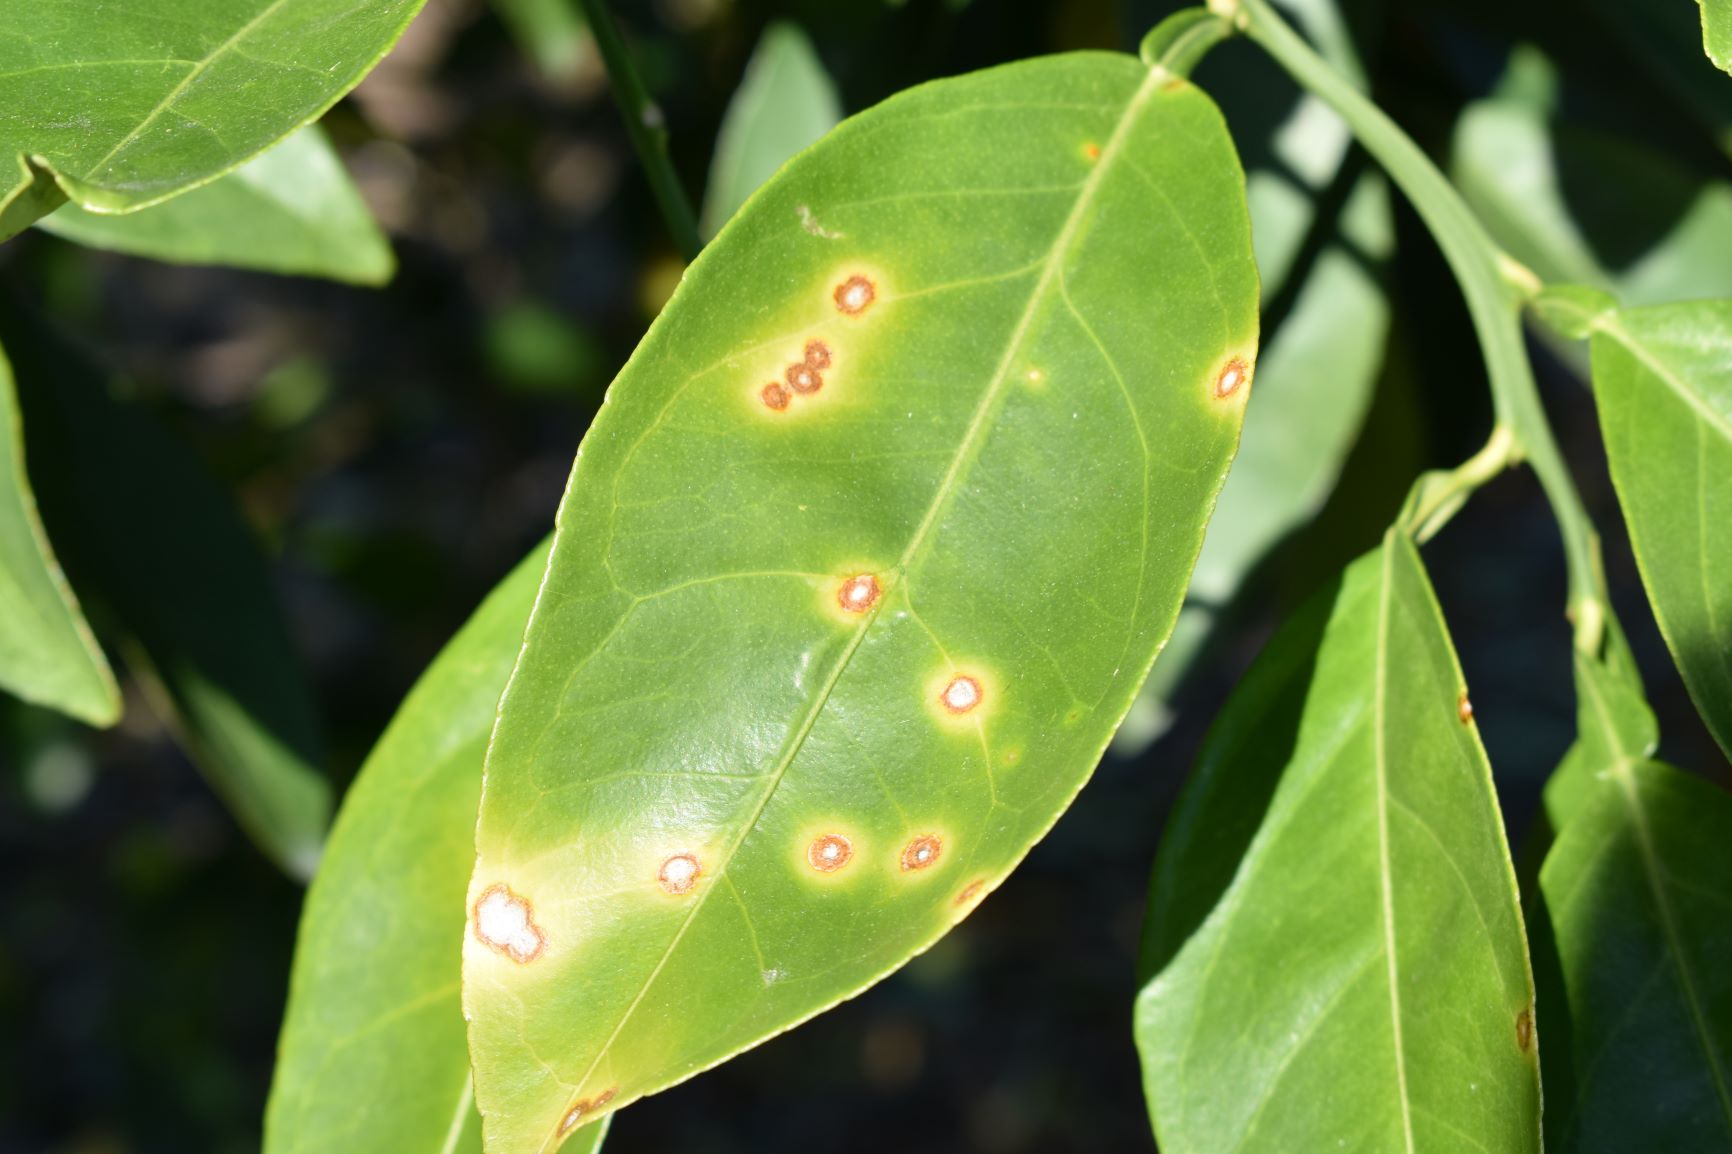
Citrus Canker presenting on a leaf. Photo courtesy of Danielle Sprague.
Another disease to be on the lookout for is citrus canker. Citrus is also caused by a bacterial pathogen but is spread primarily though wind, rain and human movement. Citrus canker is highly contagious and can spread very rapidly. Transporting infected plant material from an area where canker is present is the primary means of spreading the pathogen.
Purchase from a certified nursery!
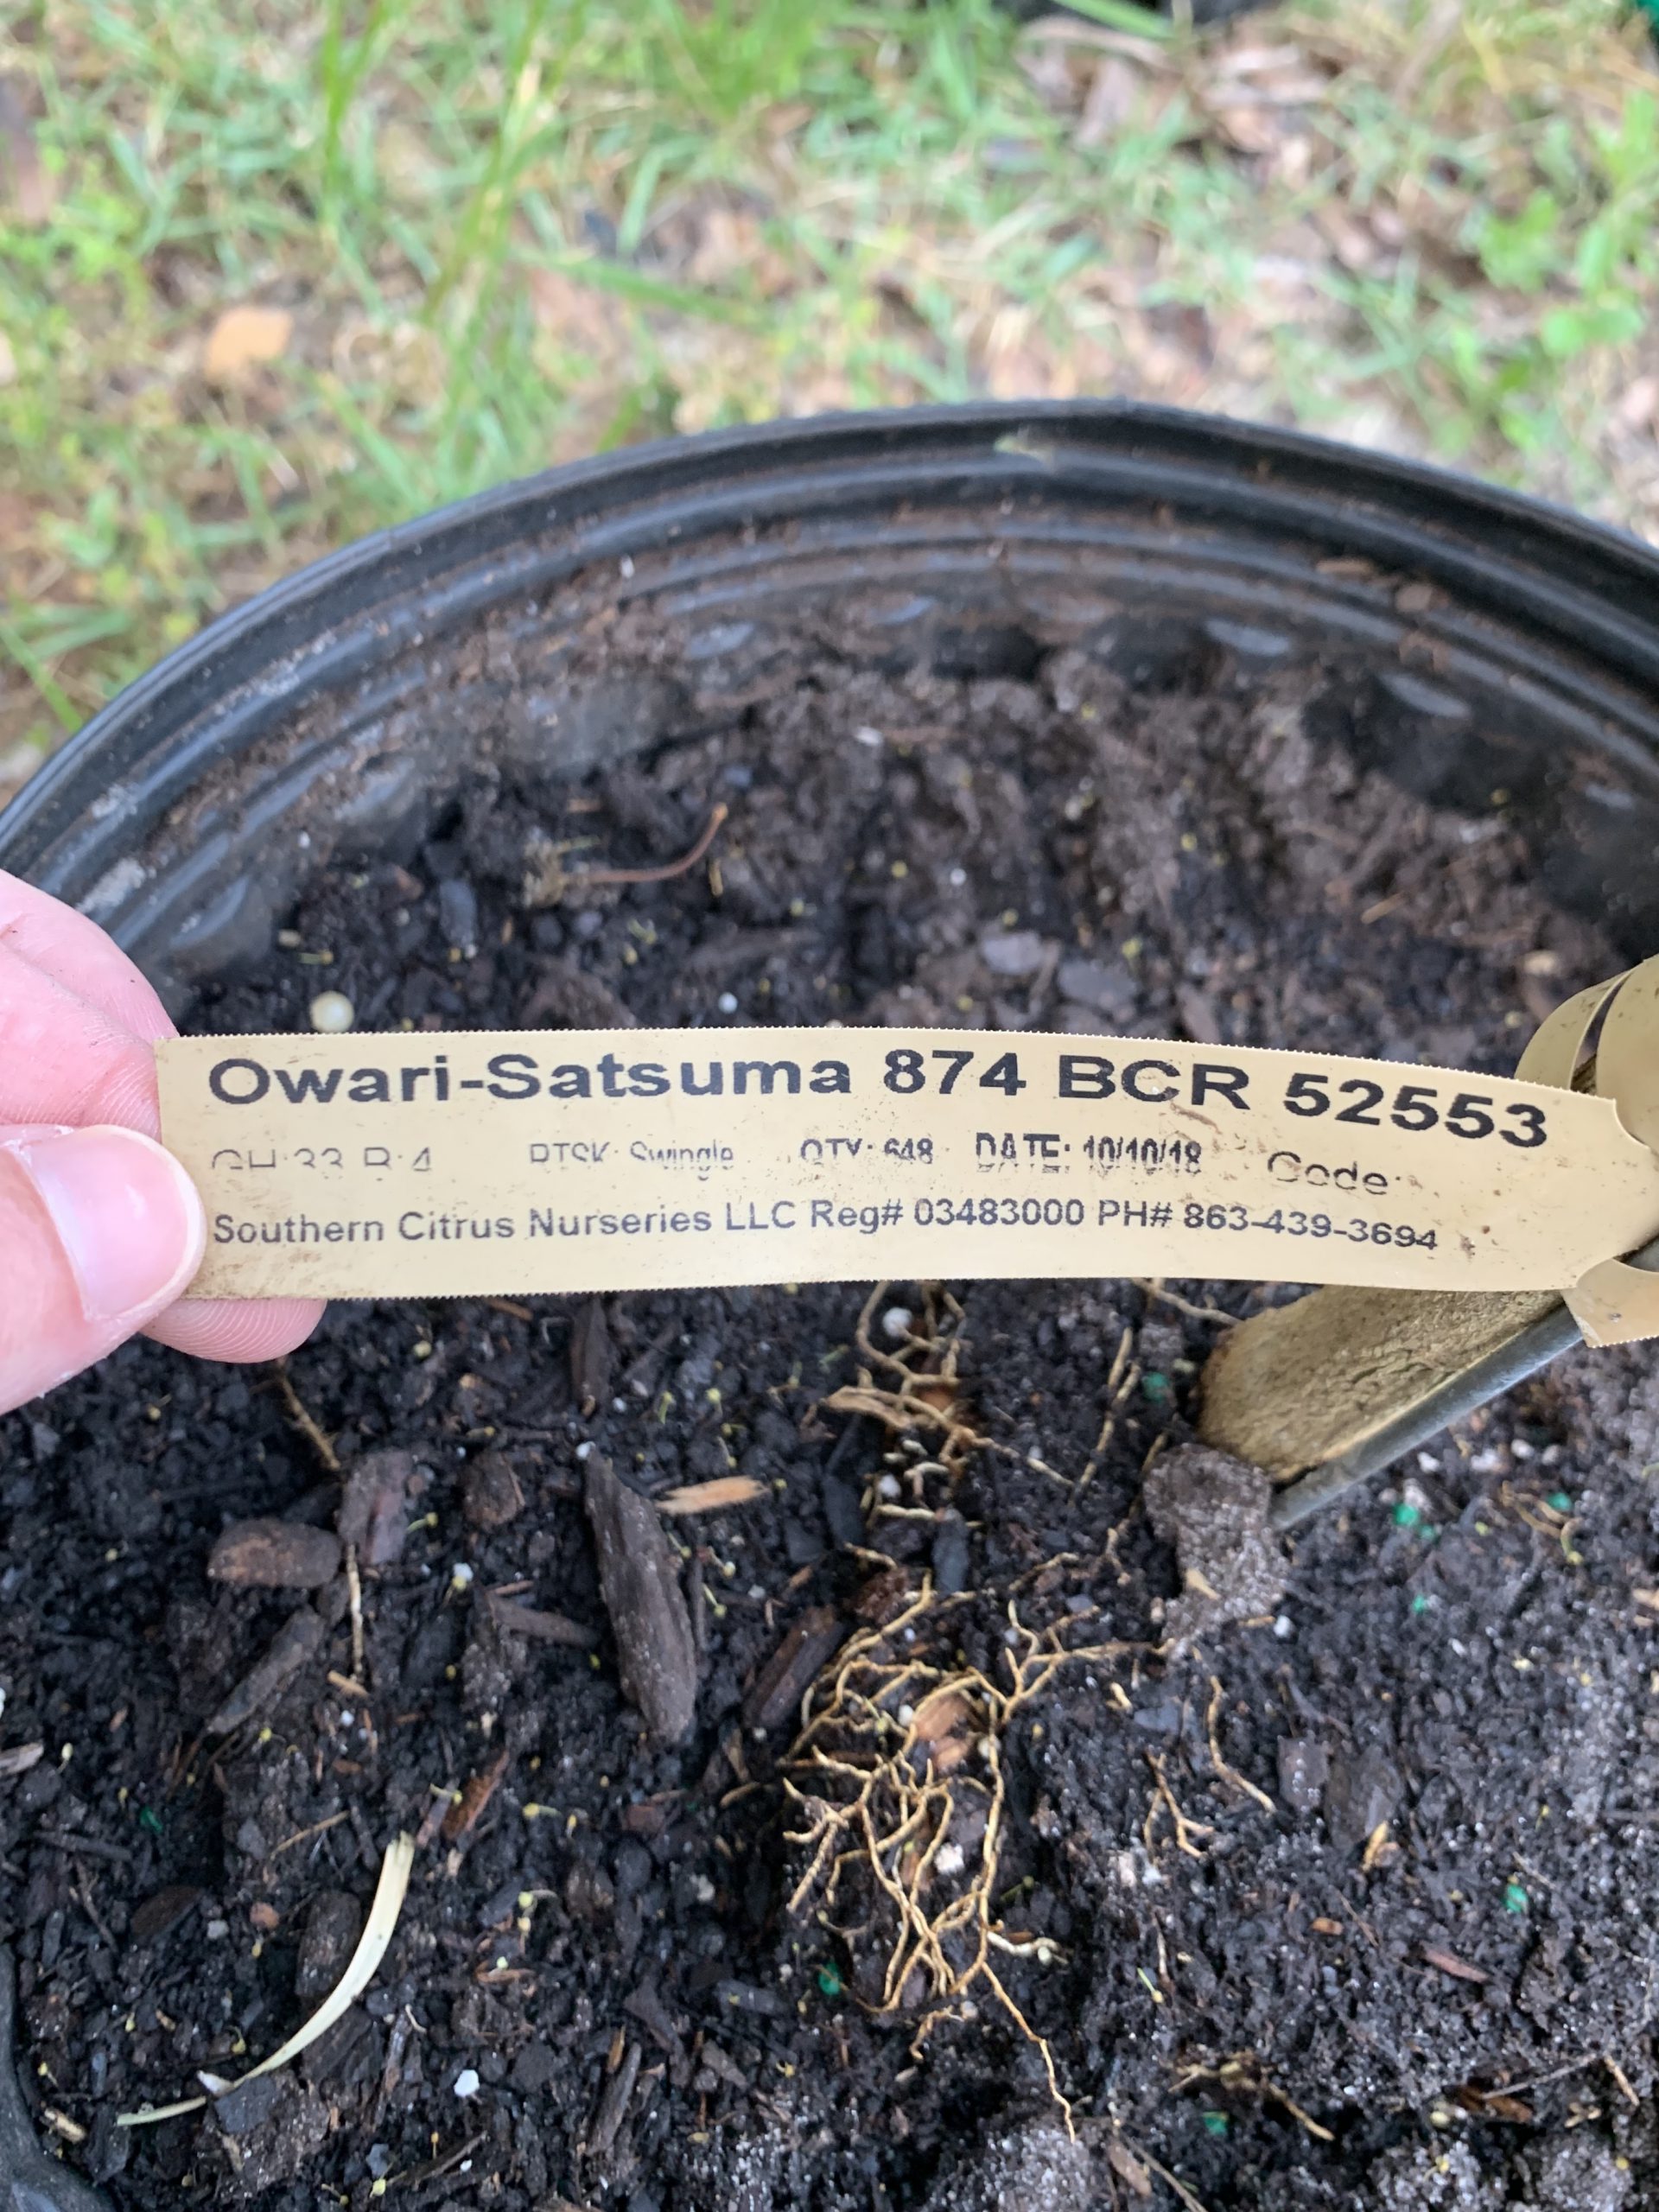
One of the absolute most important things you can do if you are planting citrus is to purchase your trees from a certified citrus nursery! A certified nursery has been inspected by the state to confirm that the nursery is producing clean, disease free trees. Citrus trees grown in a certified nursery will have a tag with the name of the nursery, registration number, the tree variety, and rootstock.
When buying a tree from a secondary retailer, you will want to be sure to examine the tree for any signs and symptoms of pests and diseases. A healthy tree will have dark green leaves, a smooth trunk and show no signs of wilt.
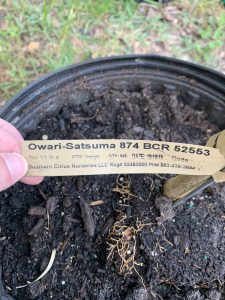
Certified nursery label. Photo courtesy of Danielle Sprague.
Other ways to protect citrus:
- Learn how to properly care for citrus trees. Proper watering an fertilization will make them less susceptible to pest and disease.
- Report any suspected pest and diseases to the Florida Department of Agriculture and Consumer Services (FDACS) Division of Plant Industry by calling 1-888-397-1517
- Don’t bring back plants or fruit into Florida! They could introduce new pests and diseases.
Keeping the Panhandle free of citrus greening and citrus canker will play a major role in the success of the citrus industry in North Florida. For assistance with pest and disease identification or for more information, contact your local Extension agent.
by Mark Tancig | Apr 30, 2020
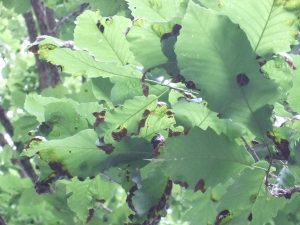
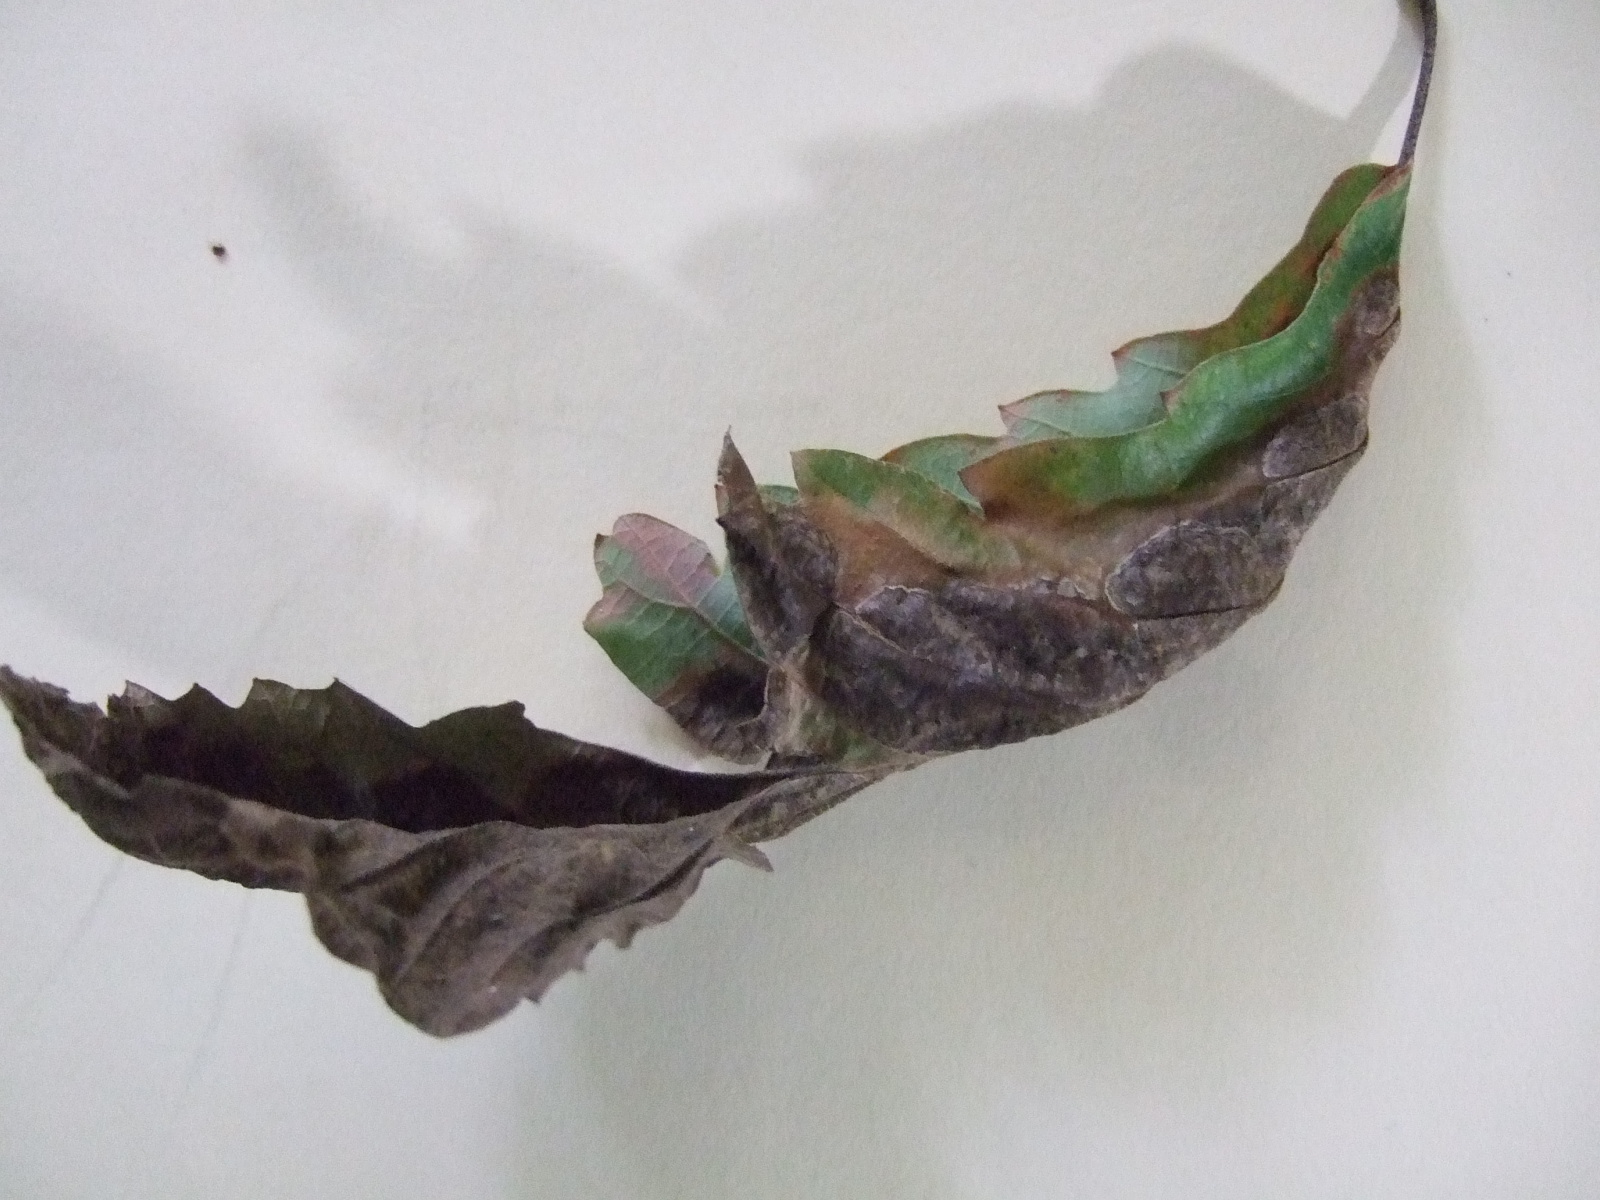
Symptoms of oak leaf blister on swamp chestnut oak. Credit: Gordon Magill.
Even during global pandemics, it’s a joy to be outside during the great north Florida spring we’ve been experiencing lately. As cold fronts come through with their rain bands, some packing a punch, they leave behind the most pleasant mornings, clear blue daytime skies, and crisp evenings. Unfortunately, we’re not the only organism that also enjoys those cool days. Many species of fungi are quite active this type of year as the rains, followed by warmer, yet not too hot temperatures, create the perfect conditions for fungal growth. Some of these fungi grow right on or in the plants we’d like to be enjoying for ourselves, stealing nutrients and causing plant decline or merely causing aesthetic damage. As this is an active time for certain species of fungi, local extension offices are getting more calls and questions regarding lawn and landscape damage due to fungal pathogens. A recent call was a new one for me and an example of a native fungi-plant interaction that looks bad but requires no intervention from us. It also highlights how correctly identifying a disease leads to the best action and can often save time and money and prevent unnecessary pesticides (in this case a fungicide) from entering the environment.
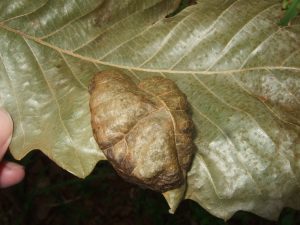
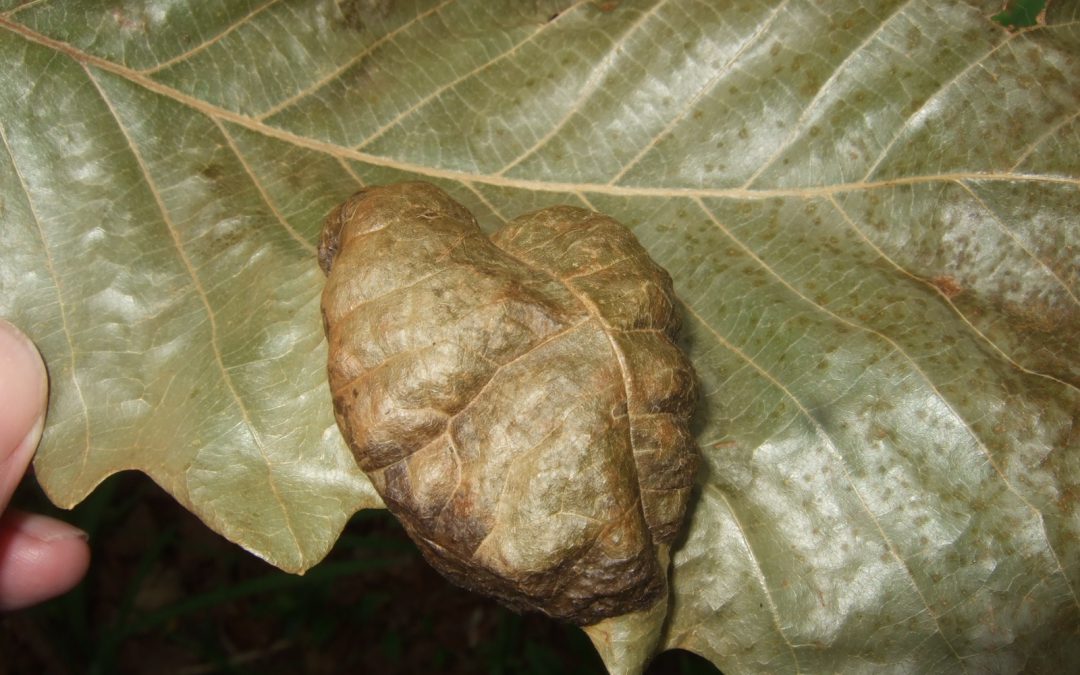
Close up of oak leaf blister on swamp chestnut oak. Credit: Gordon Magill.
The fungi and plant involved here was the oak leaf blister (Taphrina caerulescens) on a swamp chestnut oak (Quercus michauxii). It forms, you guessed it, blisters on the leaves of any of the oaks, though live oak (Quercus virginiana), laurel oak (Quercus laurifolia), and water oak (Quercus nigra) seem to be preferred hosts. The spores of the fungi, dormant since the previous summer/fall and which happen to get lodged in bud scales through wind and rain, germinate in cool, wet weather. The fungus then infects young leaves as they flush and its growth causes a disruption in the leaves’ development. This leads to the blistered look of the leaf tissue and, during extended periods of cool, wet weather, the entire leaf sort of shrivels, browns, and eventually falls off. Spores are eventually released from the fallen leaves to start the process over the next spring.
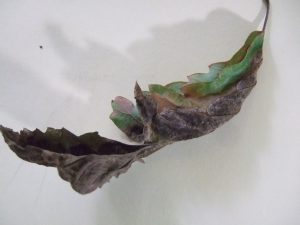
Severe oak leaf blister on swamp chestnut oak. Credit: Gordon Magill.
Though the leaves look pretty terrible, this fungal disease rarely causes plant health issues and the tree recovers just fine. Specimen trees that experience it year to year may be treated with a fungicide, but most homeowners can just let it go. Raking up and disposing of the leaves may help prevent further infections by reducing the number of spores released in the area.
As you enjoy another cool morning after an evening rainstorm, remember that the fungi all around you are also having a great day. You may want to look at your landscape plants and see if there’s anything abnormal going on. If so, take a photo and send it to your local extension office for help with identification and best methods of control, or, like in this case, just leaving it alone.
p.s. As I said this was a new one for me and I want to thank Stan Rosenthal, Extension Agent emeritus, for assisting with identification.
by Matt Lollar | Apr 23, 2020
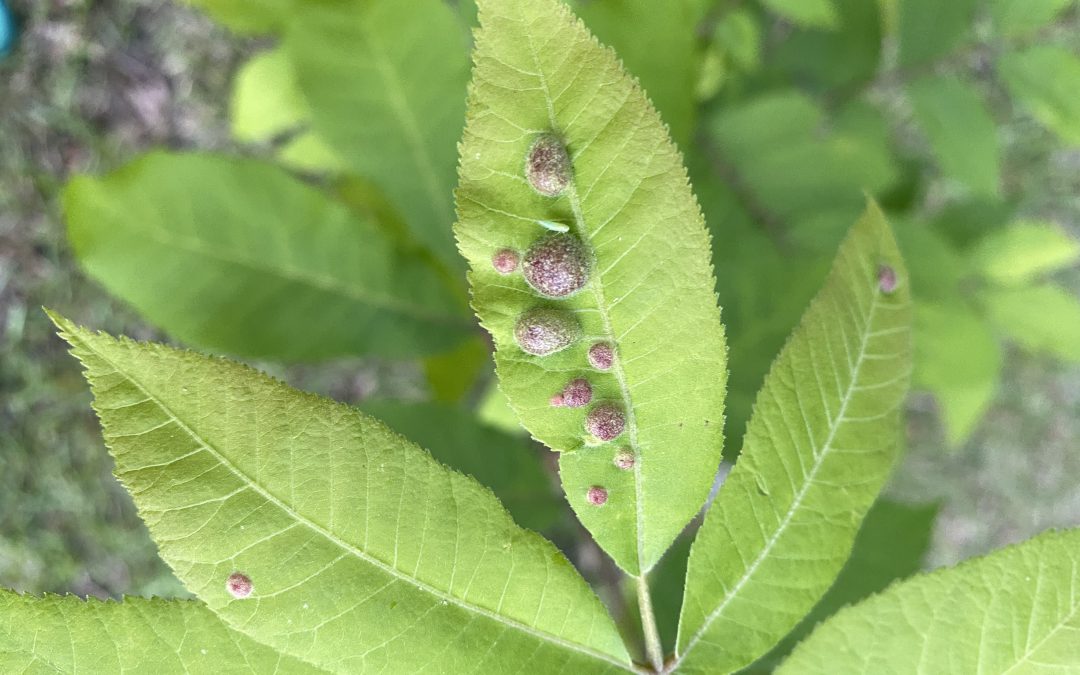
I was recently sent some pictures of some unusual growths on pecan tree leaves. At first glance, the growths reminded me of the galls caused by small wasps that lay their eggs on oak leaves. However, after a little searching it became apparent this wasn’t the case. These galls were caused by the feeding of an aphid-like insect known as phylloxera.
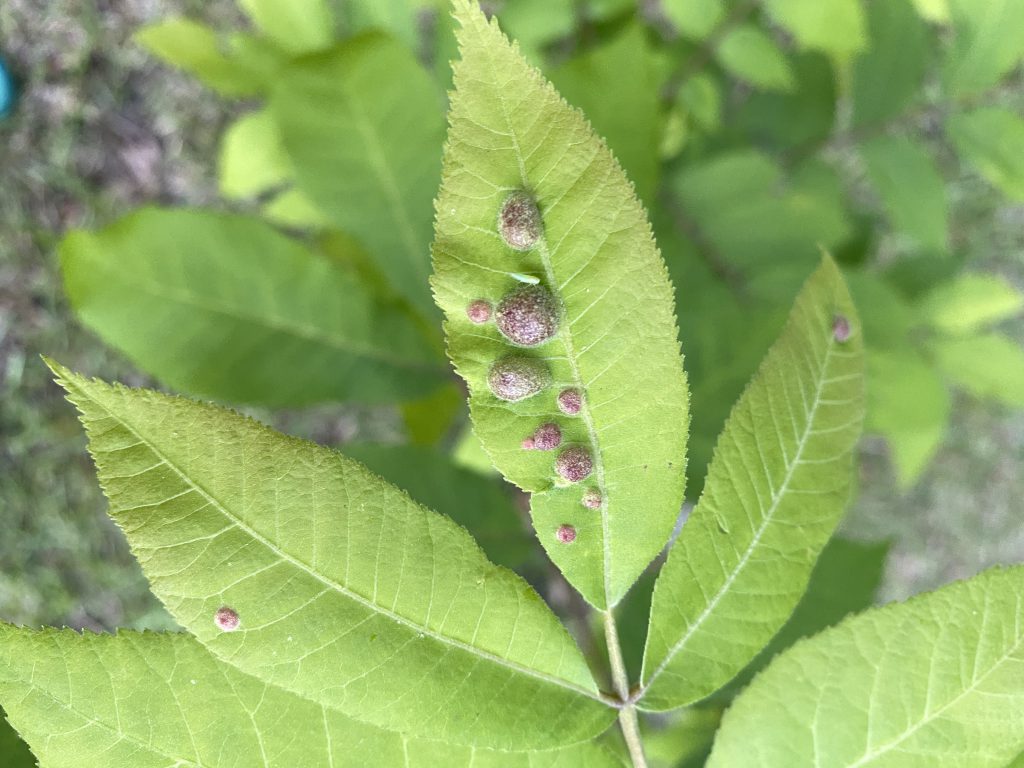
Leaf galls caused by pecan phylloxera. Photo Credit: Matt Lollar, University of Florida/IFAS Extension – Santa Rosa County
The feeding from the phylloxera causes the young leaf tissue to become distorted and form a gall that encloses this female insect called a “stem mother”. These insects are rarely seen, but the hatch from over-wintering eggs in March/April just after budbreak. Once hatched, these “stem mothers” crawl to the new leaves and begin feeding. Once the gall forms, they start to lay eggs inside the gall. The eggs hatch inside the gall and the young phylloxera begin to feed inside the gall and the gall enlarges. The matured insects break out of the gall in May and some will crawl to new spots on the leaves to feed and produce more galls.
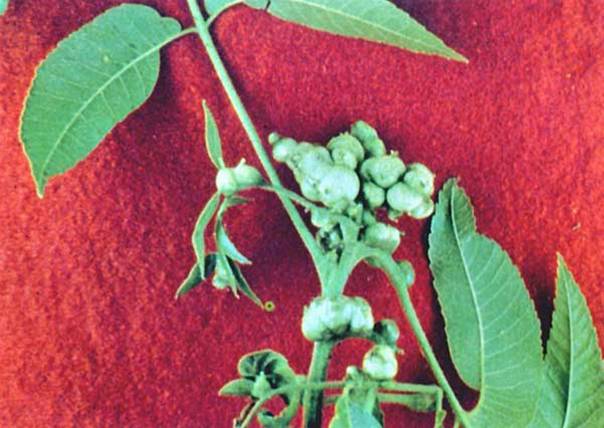
Pecan stem damage from phylloxera. Photo Credit: University of Georgia
There are two common species of phylloxera that infect the leaves. The Pecan Leaf Phylloxera seems to prefer young trees and the Southern Pecan Leaf Phylloxera prefers older trees. The damage from each of these insects is nearly indistinguishable. Damage from these insects is usually not severe and merely an aesthetic issue.
Once the damage is discovered on a tree, it is too late to control the current year’s infestation. There are currently no effective methods for control of phylloxera in home gardens. Soil drench applications witha product containing imidacloprid have been limited in their effectiveness.
by Larry Williams | Apr 15, 2020
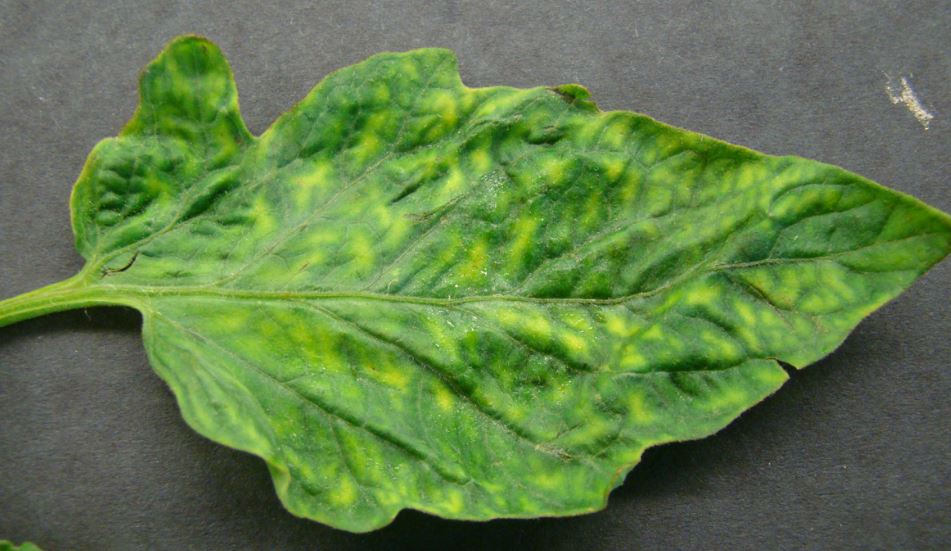
Did you know that the first virus discovered was in plants, not in humans? As early as 1857, tobacco farmers in the Netherlands recognized a new disease of tobacco. It wasn’t called a virus at the time as the causal agent was unknown. In 1886, Adolph Mayer, a German agricultural chemist, determined that the “tobacco mosaic” disease could be transmitted to healthy plants by rubbing them with infected leaf sap.
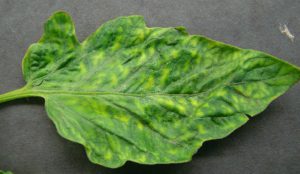
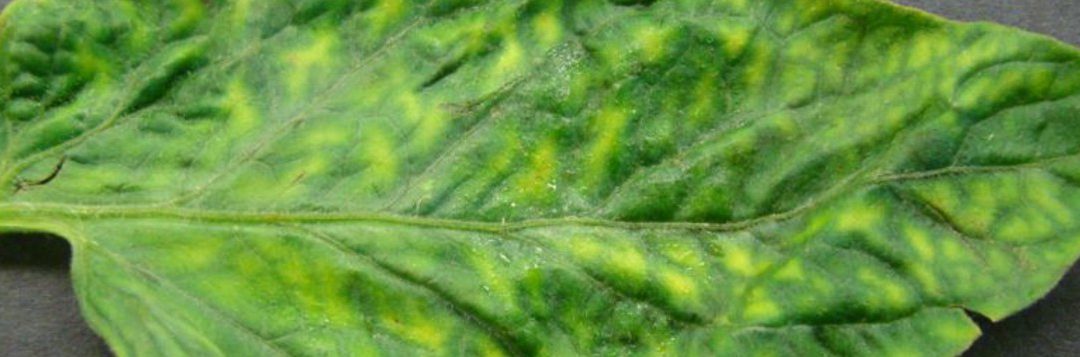
Tomato leaf with tobacco mosaic virus. Photo credit: UF Plant Pathology Department
When taking a plant pathology course in college, it amazed me that viral organisms were ever discovered. They are extremely small. So small that it was not until the development of the electron microscope in the late 1930s that scientists were able to see the structure of the tobacco mosaic virus. Viruses are 20 – 250 nanometers in diameter, about 100 times smaller than bacteria.
The discovery of fungi and bacteria came before the discovery of viruses as the cause for plant diseases. In most cases, we have many chemical options for control of fungal and bacterial diseases in plants. But there are few to no chemical options to control viral organisms in plants. By the nature of how a virus operates in a plant cell, chemical control results in death of the host cell, surrounding tissue and possibly the whole plant.
Control of viruses in plants involves eliminating the source of the virus such as nearby weeds, control of insect vectors that transmit the disease such as aphids and thrips and use of resistant plants.
Historically, plant diseases have caused major impacts on humans. In 1845, the Potato Famine in Ireland was caused by the fungus Phytophthora infestans. This disease was responsible for the death of more than 1 million people as it devastated the production of the potato as a major food source at the time and is credited for the beginning of plant pathology as a science. Cryphonectria parasitica, an introduced fungus, essentially wiped out the American chestnut as the dominant tree in the eastern U.S. forests during the early 1900s. The excellent wood was used to build homes and the nutritious nuts were eaten by humans and fed to livestock. Currently, UF/IFAS plant pathologists are working to solve Citrus Greening, a bacterial disease that has severely damaged the citrus industry and has the potential to completely eliminate citrus production in Florida.
If it were not for the land-grant university system, of which Extension Agents are a part, there would be few to no plant pathologists in the United States. It is these land-grant universities, like the University of Florida and others, that provide plant pathology courses, training, research, development and ultimately that graduate with degrees those who go on to careers in the field of plant pathology, discovering new diseases and developing controls for these diseases.

by Beth Bolles | Apr 8, 2020
Success in the garden can occur with proper watering. Learn several ways to water to your vegetables In the Home Garden with UF IFAS Extension Escambia County.
by Daniel J. Leonard | Apr 1, 2020
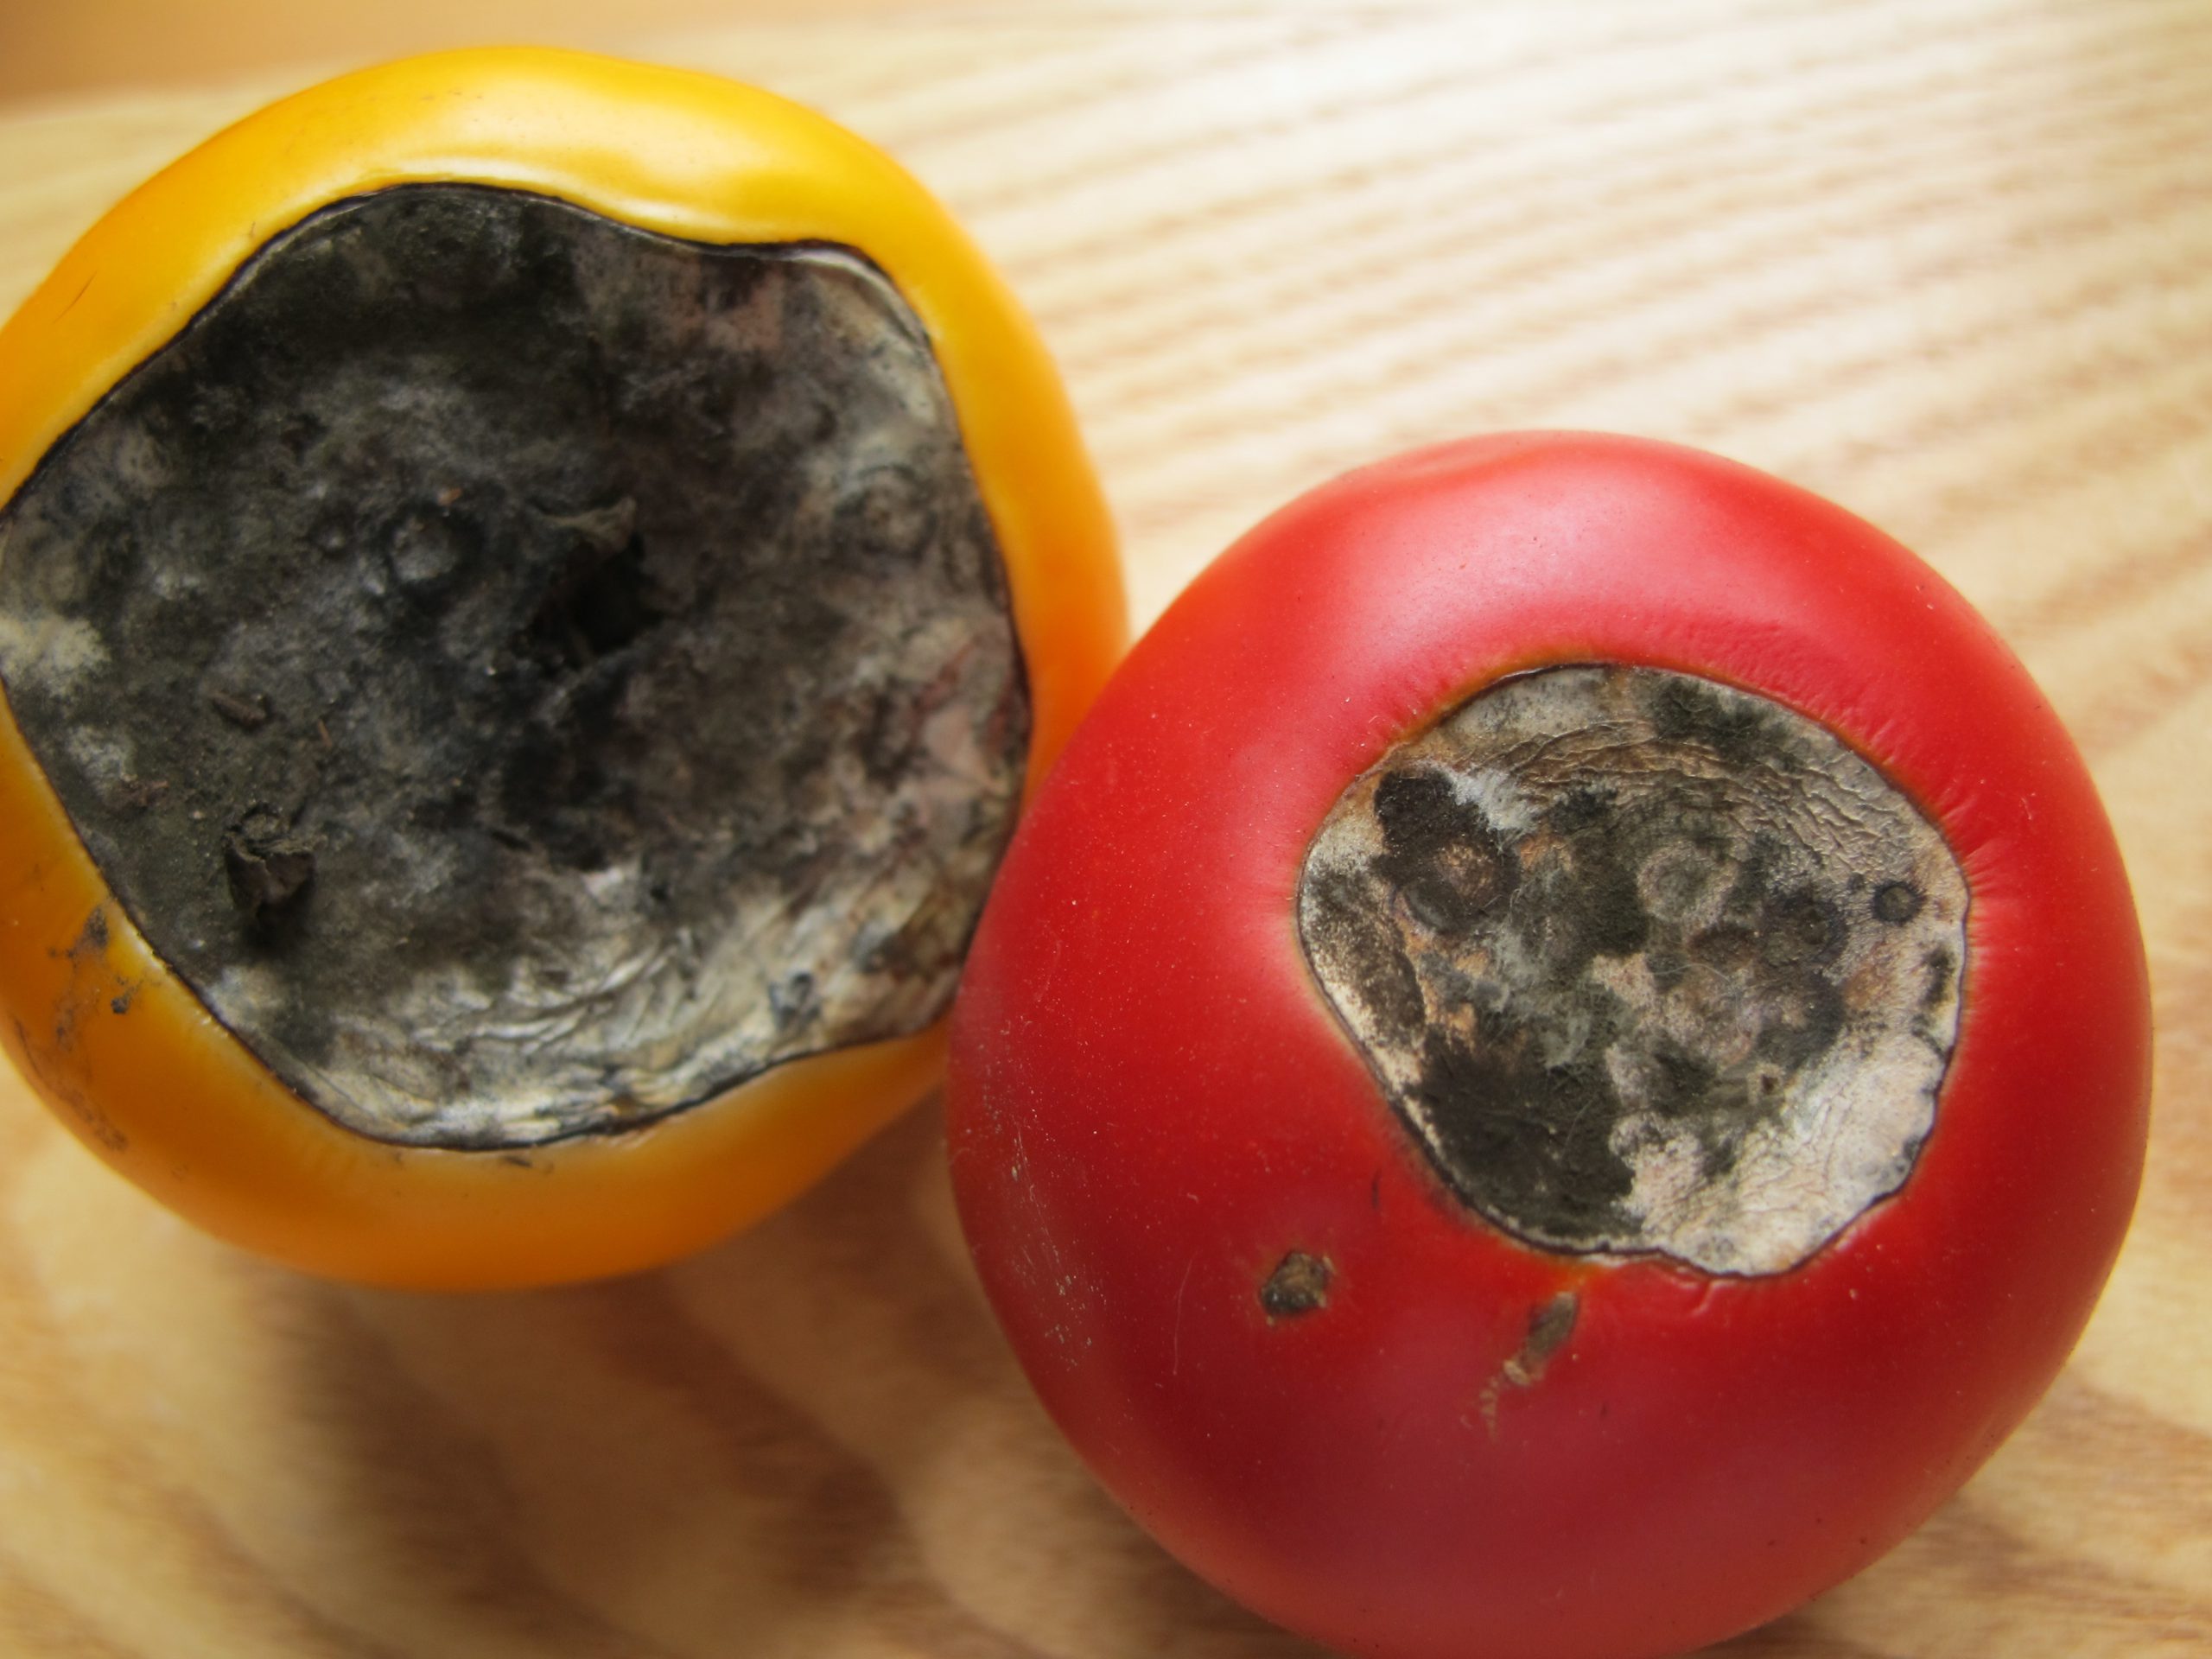
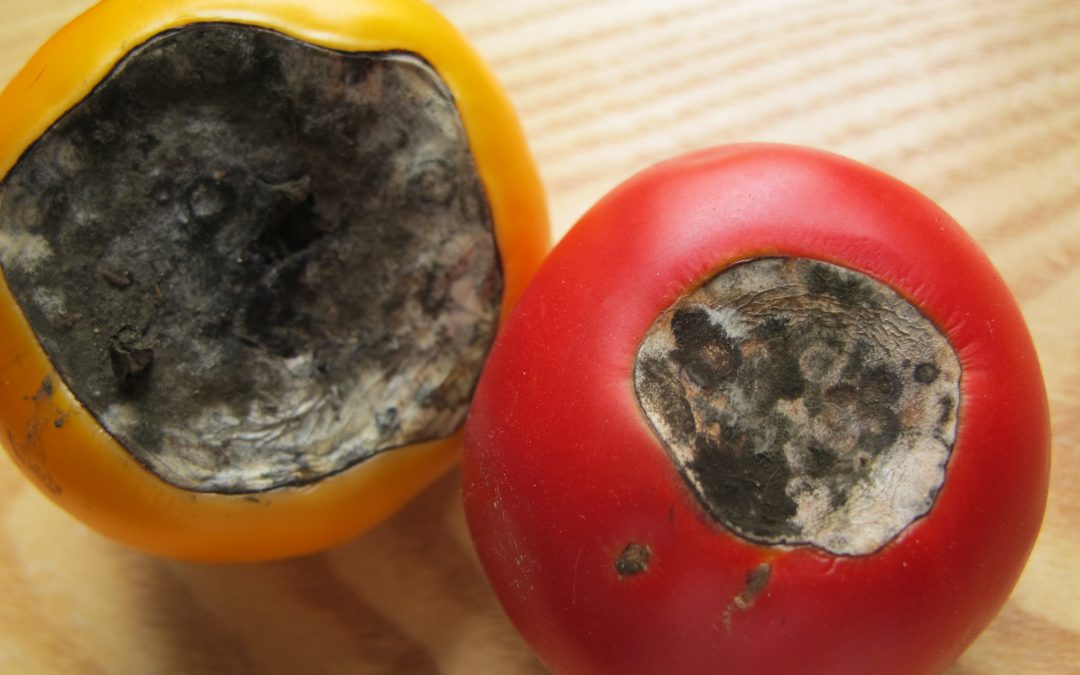
There aren’t many more frustrating things than growing seemingly healthy tomatoes, those plants setting an abundance of flower and fruit, and then, once your tomatoes get about the size of a golf ball, having the fruit rot away from the base. This very common condition, called Blossom End Rot (BER), is caused one of two ways: by either a soil calcium deficiency or disruption of soil calcium uptake by the plant. Fortunately, preventing BER from occurring and then realizing an awesome crop of tasty tomato fruit is relatively simple and home gardeners have a couple of possible preventative solution!
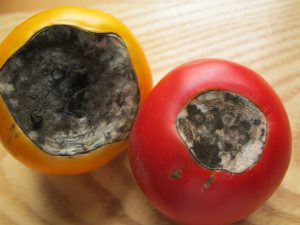
Blossom End Rot damage. Photo Courtesy Larry Williams, Okaloosa County Extension.
- Soil Test & Lime if Needed. The only way to really know if your soil calcium level is sufficient is through a soil test. A complete soil test through the UF Soil Lab or other lab measures both raw nutrient levels and pH. Testing for pH is especially critical. For calcium, either already in the soil or in a supplement you apply, to be available to tomato plants, soil pH needs to be between 6.0-7. In more “acidic” soil pH below 6, nutrients like iron and aluminum become more available to your tomato plants, outcompeting calcium for uptake into the roots. We don’t want that. If your soil test indicates a pH below 6, it will give a lime recommendation somewhere between 3-5 lbs/100 ft sq of garden area to raise the pH to the sweet spot between 6.0-7.0 where your tomatoes will thrive.
- Use a Non-Lime Calcium Supplement. If you’ve had your soil tested and your pH is fine, adding more lime as a calcium supplement isn’t helpful. Using lime as an additional calcium source can actually lift pH above that 6.0-7.0 zone and cause other problems. At this point, once pH is where we want it, I like to add a non-lime calcium supplement. There are lots of options here. Traditional fertilizers labeled for tomatoes and veggies tend to have a good calcium content in the 6-10% range and work great. However, if you’re into organic gardening or just don’t need the extra nutrient value of a complete fertilizer, Gypsum is a good calcium supplement and is widely available. Regardless of which non-lime source you choose, apply at planting or shortly after and follow label rates for best results.
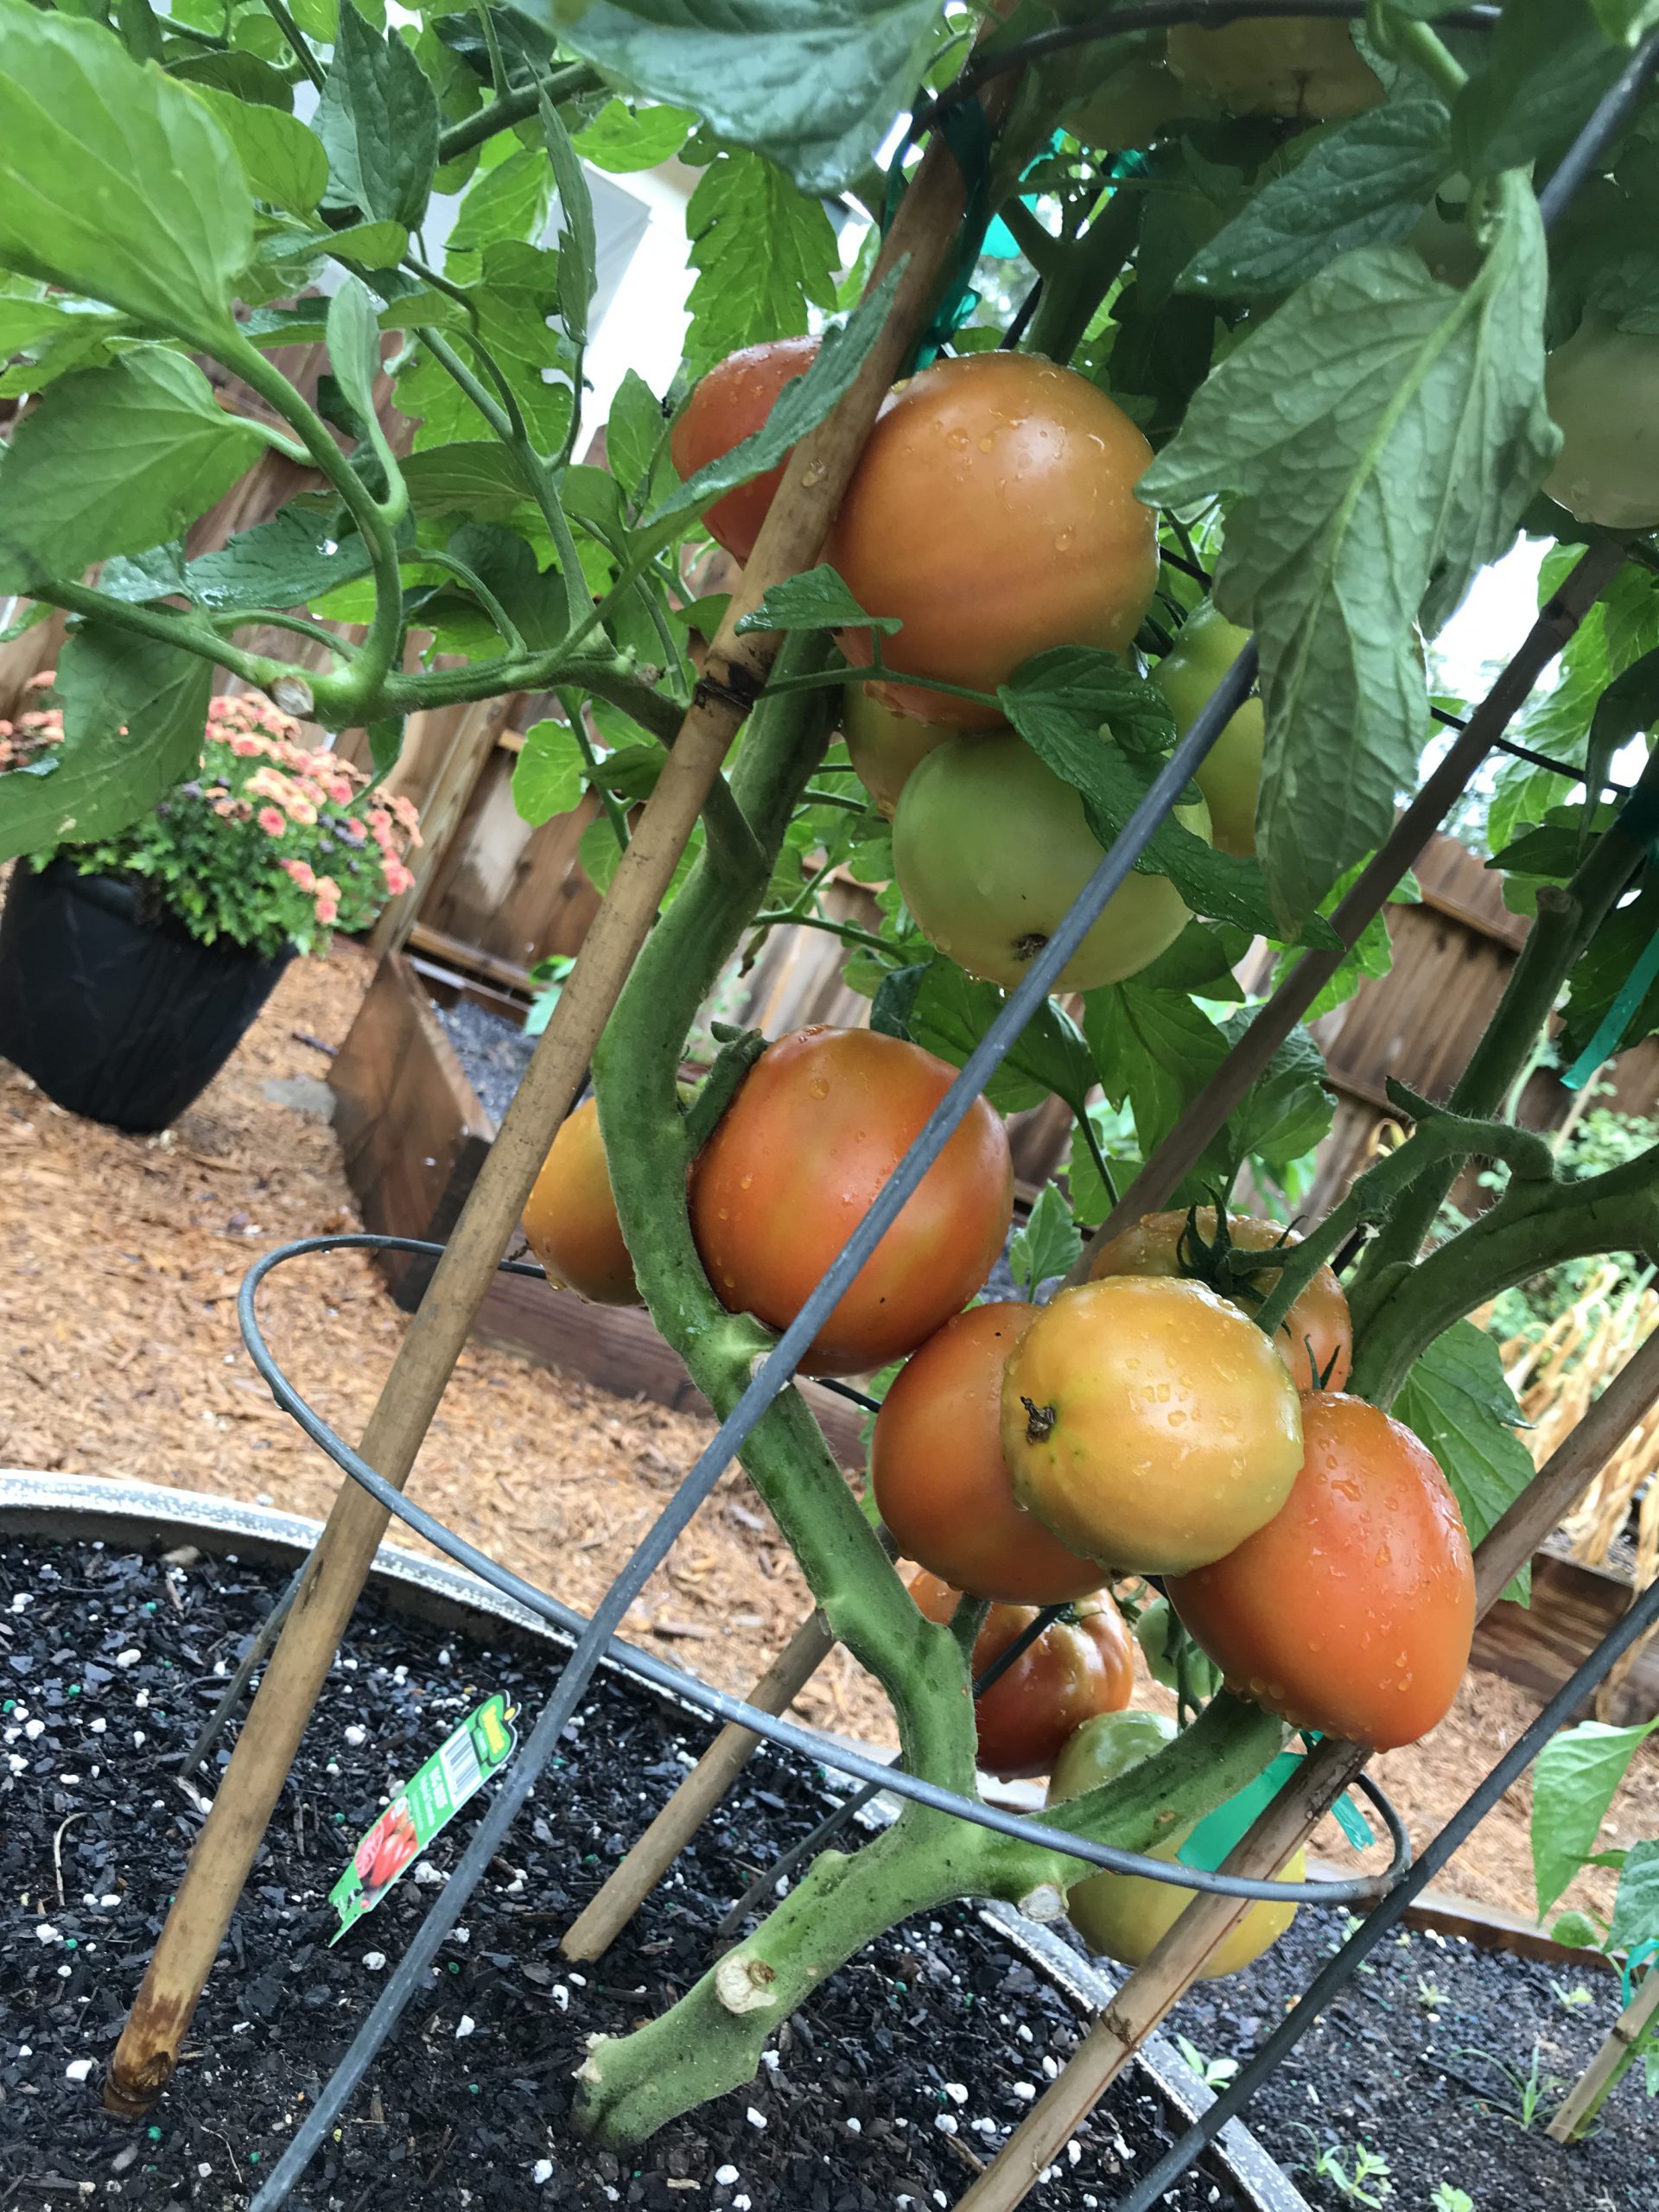
- Water Properly. Consistent watering is key in helping ward off BER. Though we know BER is generally

Healthy ‘Big Beef’ tomatoes grown in 2019 with a pH of 6.5, amended with Gypsum at planting, and watered regularly each day! Notice no BER. Photo courtesy the author.
caused by calcium deficiency, it can be induced by creation of distinct wet and dry periods from non-regular watering, interfering with calcium uptake and availability to the plant. So, while you may have adequate soil calcium, if you don’t water correctly, the condition will happen anyway! It’s also good to keep in mind that mature tomato plants use large quantities of water daily, so during the heat of summer, plants in containers may need to be watered multiple times daily to maintain consistently moist soil. Think about it, you don’t drink 8 glasses of water when you wake up and then never drink again throughout a hot day. A tomato is no different. Allowing your plants to wilt down before providing additional water ruins productivity and can induce BER.
Blossom End Rot, while one of the more destructive fates of tomatoes, is totally preventable by a little legwork early in the growing game from you! Soil test and change pH with lime if needed, add a shot of calcium through a tomato blend fertilizer or non-lime supplement like gypsum, and water regularly! Do these three things and you’ll be well on your way to a great crop of early summer tomatoes. If you have any questions about tomato blossom end rot or any other horticulture or agricultural topic, please don’t hesitate to reach out to us at the UF/IFAS Calhoun County Extension Office. Take advantage of this beautiful spring weather and get in the garden today! Happy gardening.