by Daniel J. Leonard | Apr 1, 2020
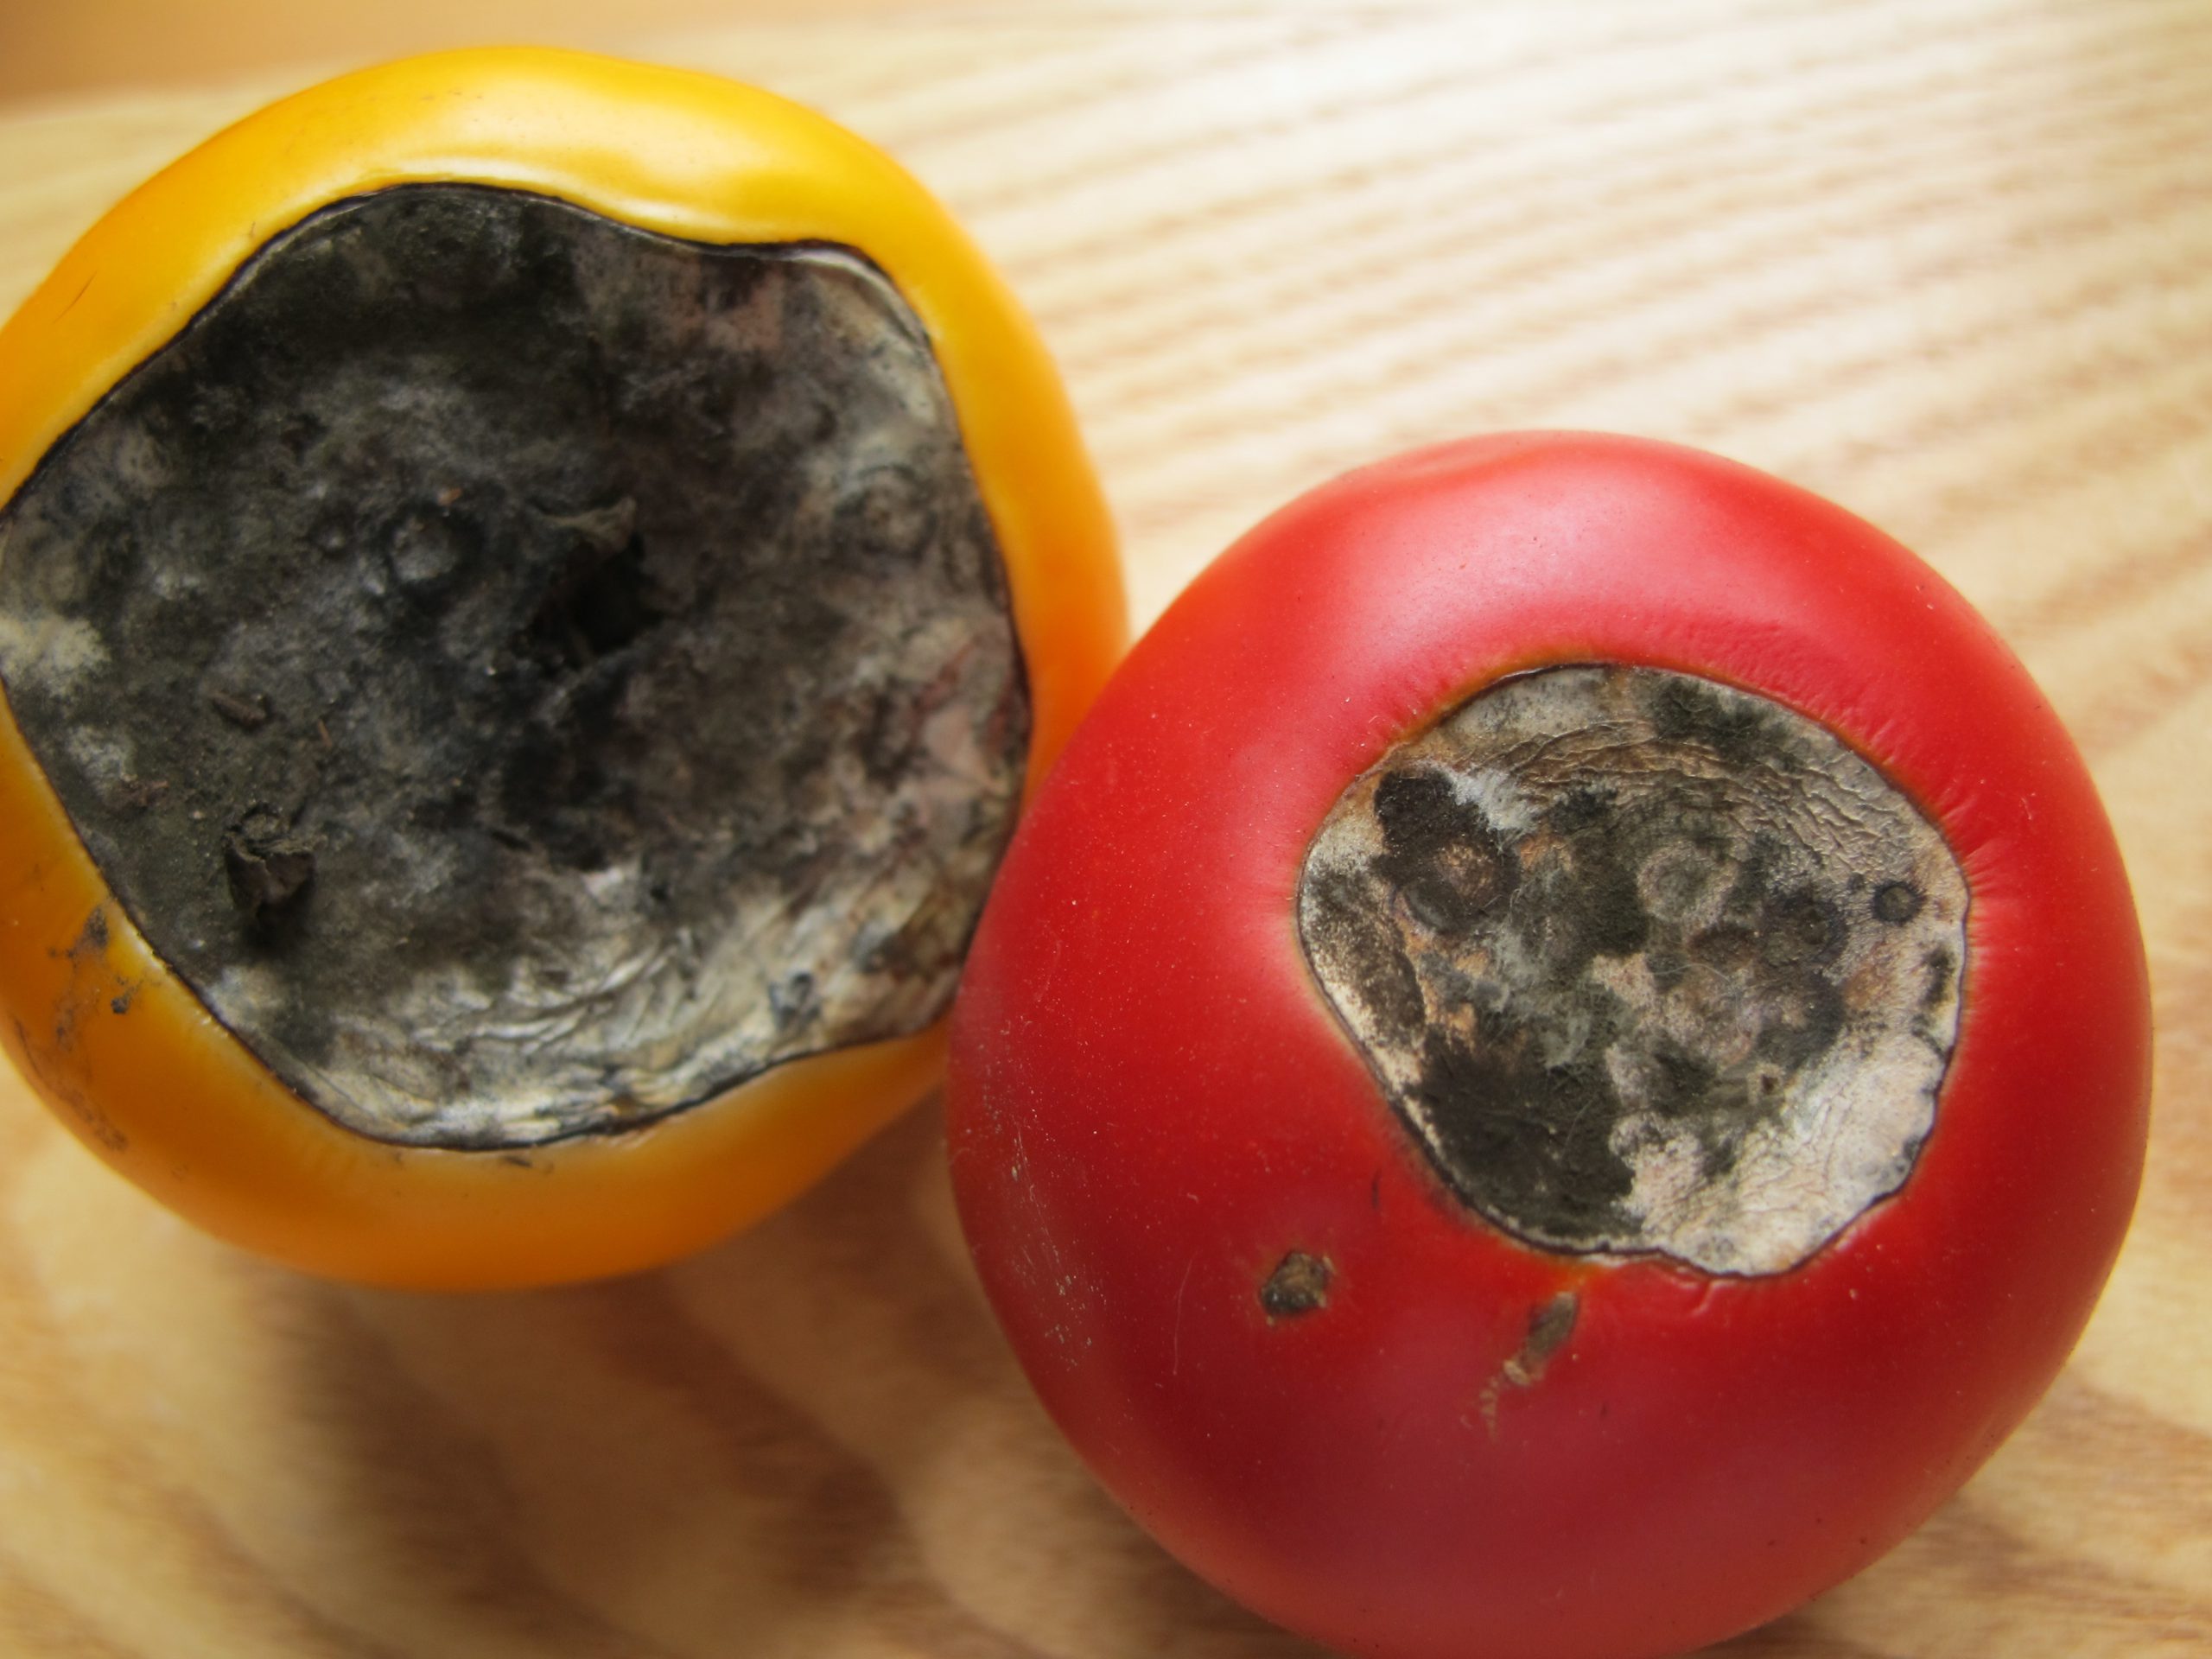
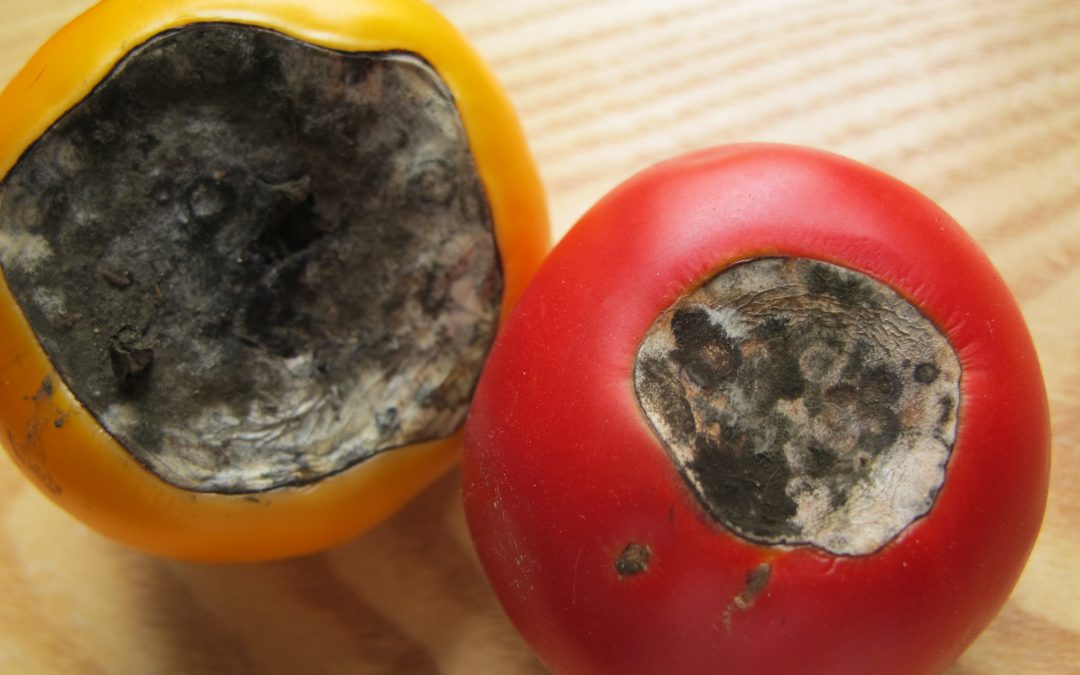
There aren’t many more frustrating things than growing seemingly healthy tomatoes, those plants setting an abundance of flower and fruit, and then, once your tomatoes get about the size of a golf ball, having the fruit rot away from the base. This very common condition, called Blossom End Rot (BER), is caused one of two ways: by either a soil calcium deficiency or disruption of soil calcium uptake by the plant. Fortunately, preventing BER from occurring and then realizing an awesome crop of tasty tomato fruit is relatively simple and home gardeners have a couple of possible preventative solution!
Blossom End Rot damage. Photo Courtesy Larry Williams, Okaloosa County Extension.
- Soil Test & Lime if Needed. The only way to really know if your soil calcium level is sufficient is through a soil test. A complete soil test through the UF Soil Lab or other lab measures both raw nutrient levels and pH. Testing for pH is especially critical. For calcium, either already in the soil or in a supplement you apply, to be available to tomato plants, soil pH needs to be between 6.0-7. In more “acidic” soil pH below 6, nutrients like iron and aluminum become more available to your tomato plants, outcompeting calcium for uptake into the roots. We don’t want that. If your soil test indicates a pH below 6, it will give a lime recommendation somewhere between 3-5 lbs/100 ft sq of garden area to raise the pH to the sweet spot between 6.0-7.0 where your tomatoes will thrive.
- Use a Non-Lime Calcium Supplement. If you’ve had your soil tested and your pH is fine, adding more lime as a calcium supplement isn’t helpful. Using lime as an additional calcium source can actually lift pH above that 6.0-7.0 zone and cause other problems. At this point, once pH is where we want it, I like to add a non-lime calcium supplement. There are lots of options here. Traditional fertilizers labeled for tomatoes and veggies tend to have a good calcium content in the 6-10% range and work great. However, if you’re into organic gardening or just don’t need the extra nutrient value of a complete fertilizer, Gypsum is a good calcium supplement and is widely available. Regardless of which non-lime source you choose, apply at planting or shortly after and follow label rates for best results.
- Water Properly. Consistent watering is key in helping ward off BER. Though we know BER is generally

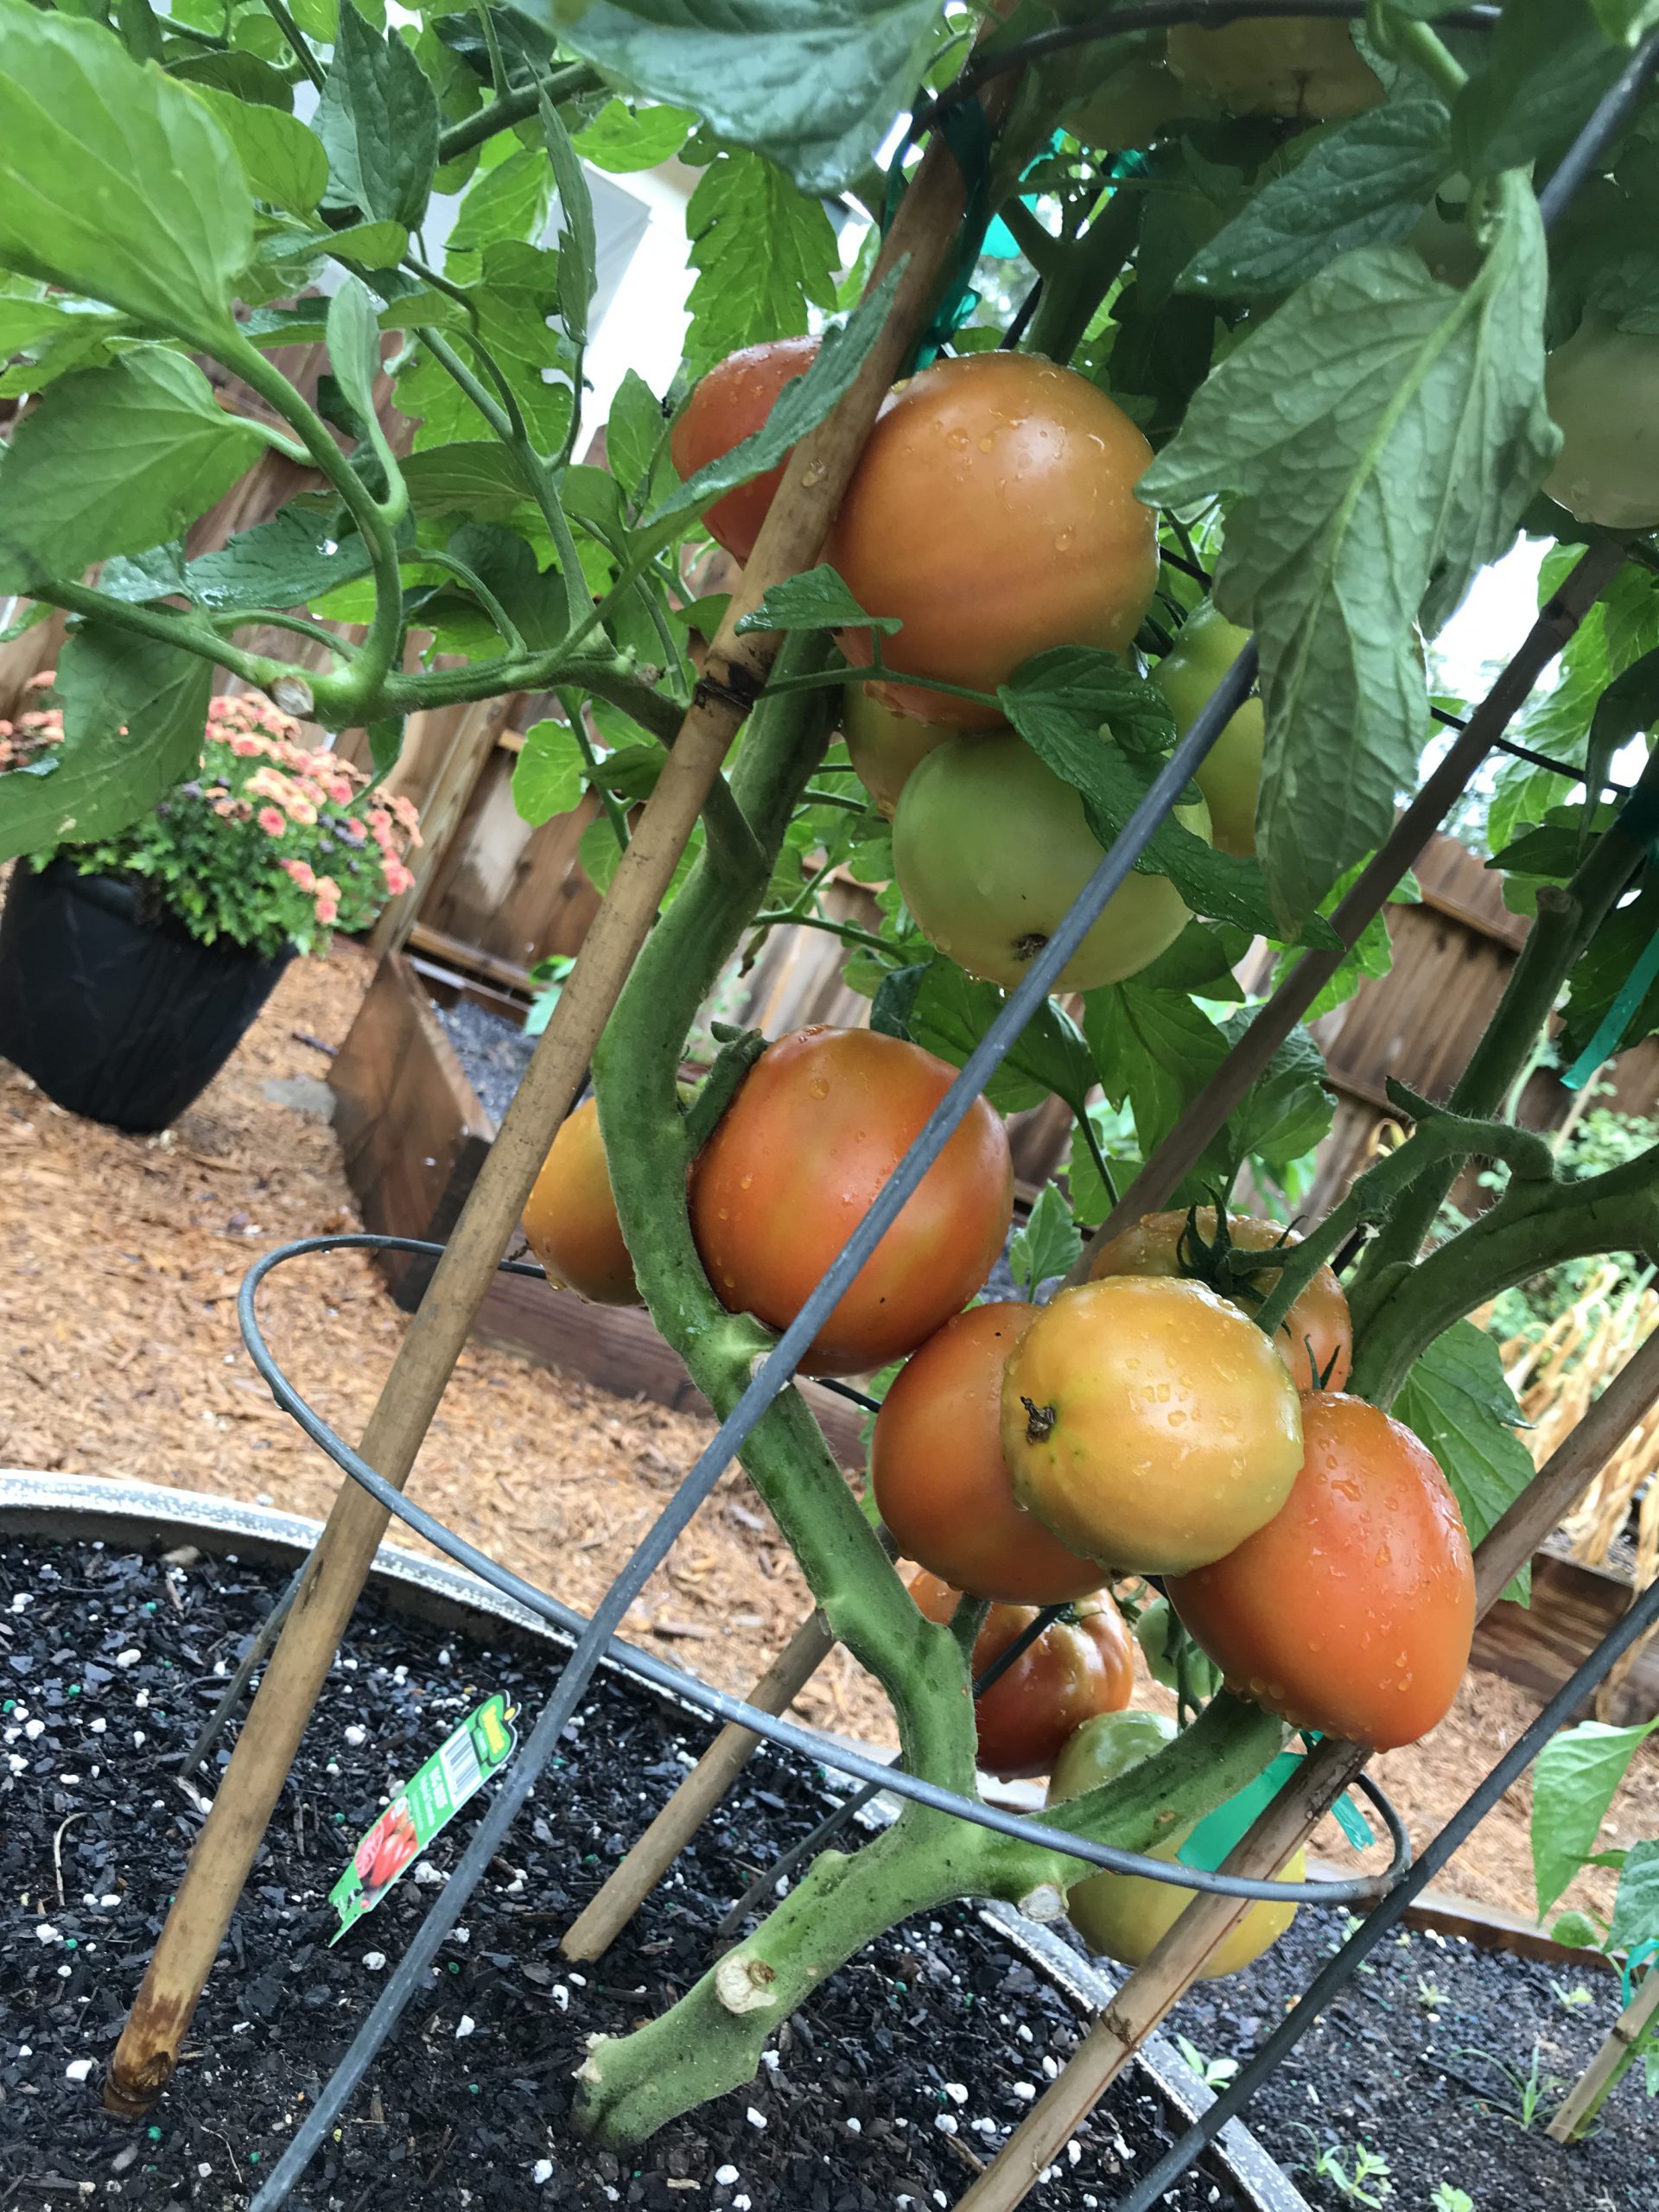
Healthy ‘Big Beef’ tomatoes grown in 2019 with a pH of 6.5, amended with Gypsum at planting, and watered regularly each day! Notice no BER. Photo courtesy the author.
caused by calcium deficiency, it can be induced by creation of distinct wet and dry periods from non-regular watering, interfering with calcium uptake and availability to the plant. So, while you may have adequate soil calcium, if you don’t water correctly, the condition will happen anyway! It’s also good to keep in mind that mature tomato plants use large quantities of water daily, so during the heat of summer, plants in containers may need to be watered multiple times daily to maintain consistently moist soil. Think about it, you don’t drink 8 glasses of water when you wake up and then never drink again throughout a hot day. A tomato is no different. Allowing your plants to wilt down before providing additional water ruins productivity and can induce BER.
Blossom End Rot, while one of the more destructive fates of tomatoes, is totally preventable by a little legwork early in the growing game from you! Soil test and change pH with lime if needed, add a shot of calcium through a tomato blend fertilizer or non-lime supplement like gypsum, and water regularly! Do these three things and you’ll be well on your way to a great crop of early summer tomatoes. If you have any questions about tomato blossom end rot or any other horticulture or agricultural topic, please don’t hesitate to reach out to us at the UF/IFAS Calhoun County Extension Office. Take advantage of this beautiful spring weather and get in the garden today! Happy gardening.
by Matt Lollar | Jan 13, 2020
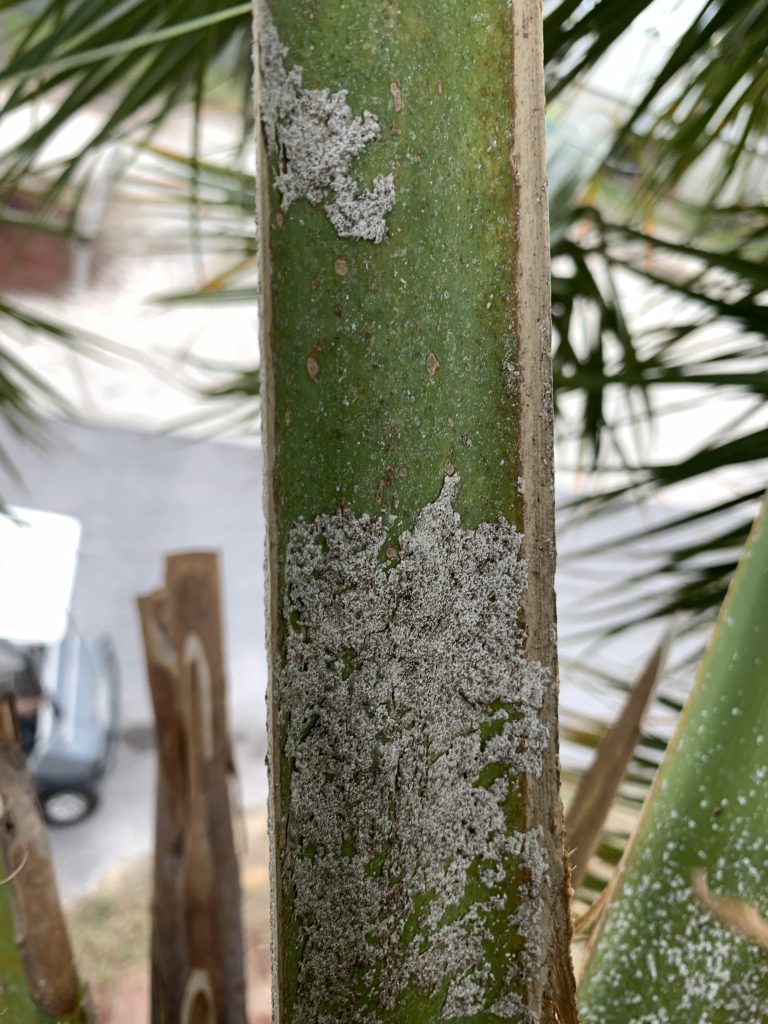
Scale insects on a cabbage palm (Sabal palmetto). Photo Credit: Matt Lollar, University of Florida/IFAS Extension – Santa Rosa County
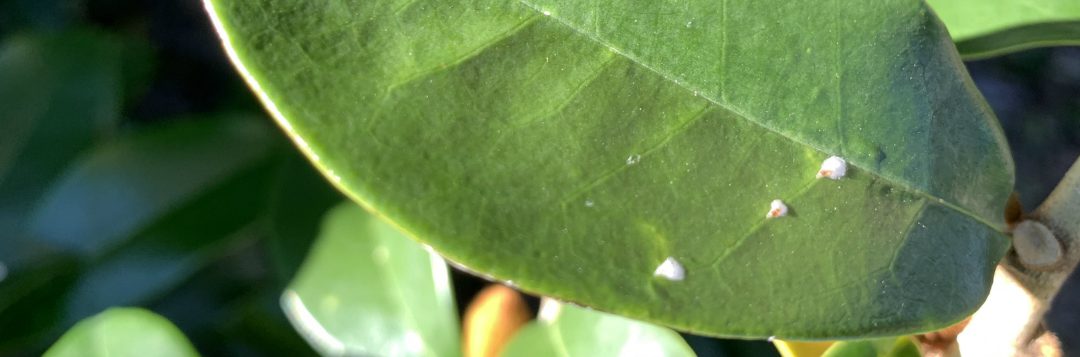
This week I was on a couple site visits to look on some cabbage palms (Sabal palmetto) and some banana shrubs (Michelia figo). The palms had a white, waxy substance on their frond petioles and the banana shrubs had white specs on the tops of their leaves. Upon further investigation, I realized the waxy substance and specs were both different species of scales. Scale insects are serious pests of a number of ornamental plants. Here in Florida there are 13 different families of scales with the most common being armored scales, soft scales, and mealybugs. Scales have piercing-sucking mouthparts which they use to siphon fluids from the leaves, stems, and sometimes roots of many ornamental plants. Heavy infestations cause extensive leaf yellowing, premature leaf drop, branch dieback, and eventually plant death.
Scale Biology
The life cycle of a scale begins with eggs being laid beneath wax coverings or beneath the adult female. Eggs typically hatch in 1 to 3 weeks. The newly hatched nymphs, called crawlers, move around a plant until they find a spot to feed. Once a feeding site is located, their piercing sucking mouthparts are inserted into the plant and the crawlers begin to feed and grow. The males of many scale species develop wings as adults and fly to other plants to reproduce.
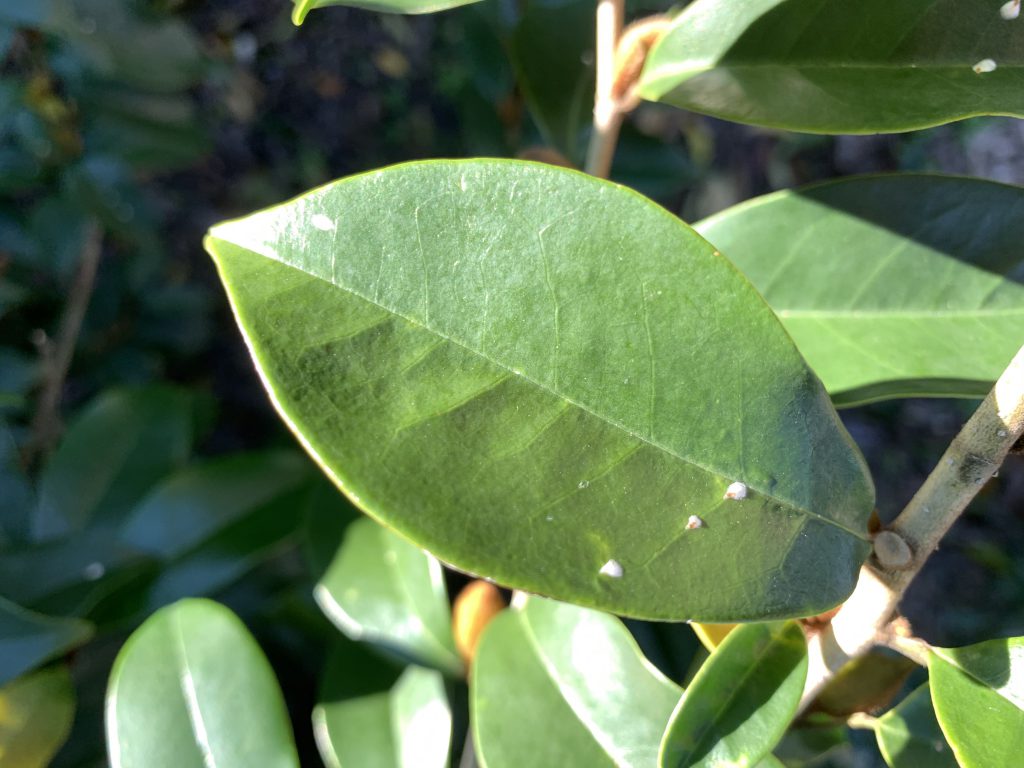
Magnolia white scales on a banana shrub (Michelia figo). Photo Credit: Matt Lollar, University of Florida/IFAS Extension – Santa Rosa County
Armored Scales
Armored scales get their armor by secreting a waxy covering over their bodies that is not attached. The scale lives under this covering and uses it as a protection to feed under. Armored scales can be almost any color or shape and range anywhere from 1/16 to 1/8 inch in diameter. For females, these shapes range from circular to oval to long and slender. The males typically have coverings that are more elongate and smaller than the females. As adults, the males are tiny, winged, gnat-like insects and are rarely seen.
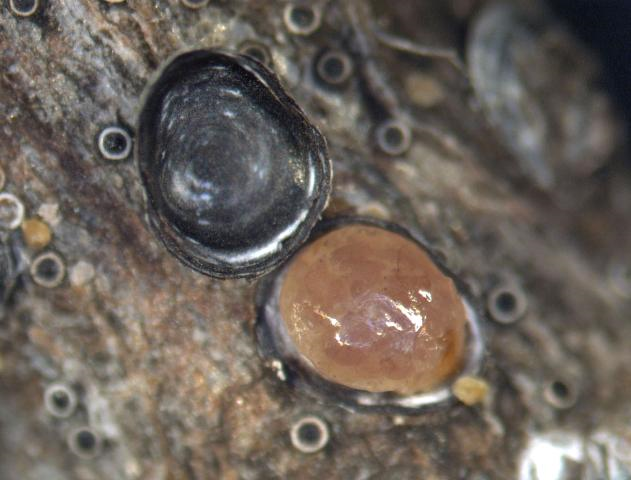
Gloomy scale (Melanaspis tenebricosa) with armored covering removed. Photo Credit: A. G. Dale, University of Florida/IFAS
Soft Scales
Similar to armored scales, soft scales secrete a waxy covering, but it is attached to their bodies. Soft scales can be a number of colors, shapes, and sizes and range anywhere from 1/8 to 1/2 inch in diameter. Their shapes vary from spherical to nearly flat.

Population of adult and immature tuttle mealybugs (Brevennia rehi) on a blade of zoysiagrass. Photo Credit: Lyle J. Buss, University of Florida/IFAS
Mealybugs
Mealybugs are soft-bodied insects that possess a covering of flocculent, white, waxy filaments. They are about 1/8 inch in length and usually pinkish or yellowish in color. Mealybugs have piercing-sucking mouthparts which they use to siphon fluids from the leaves, stems, and sometimes roots of many ornamental plants. Mealybug damage produces discolored, wilted, and deformed leaves.
Scale and Mealybug Management
- Cultural Control – Plant inspection prior to purchase or installation is the first line of defense against a scale or mealybug population. Make sure to inspect the undersides of leaves and plant stems. Infested sections of plants can be pruned and plant material should be cleaned from the planting area and discarded. Also, you can increase air flow and decrease humidity by proper installation and pruning. Over-fertilizing can also increase pest populations.
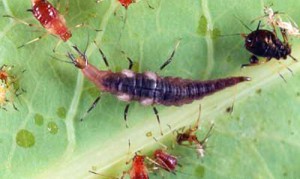
Larva of a brown lacewing. Credits: Lyle Buss, University of Florida.
- Biological Control – Predators, such as ladybugs and green lacewings, are usually present in large enough numbers to suppress scales and mealybugs to a desirable threshold. However, broad-spectrum insecticides and bad weather can reduce predator numbers. Look for signs of predation by inspecting dead scales for jagged holes in their waxy coatings. If predation signs are present, use more selective chemical controls and oils as opposed to broad-spectrum products.
- Chemical Control – Timing is everything when it comes to managing scale and mealybug insects. Crawler activity is more pronounced with the flush of new plant growth in the spring. Before application, prune infested plant parts off first to promote greater penetration of insecticides into the foliage. Dormant Oils are often used in the winter to smother scale insects. These are good choices to implement because they don’t harm non-target or beneficial insects. Care must be taken to read the label and use them at the correct temperature, since use in hot weather may burn foliage. Contact products (acephate, bifenthrin, carbaryl, etc.) must be applied to inhibit the crawler stages of these insects and systemic products (acetamiprid, imidacloprid, thiamethoxam, etc.) can be used on the sessile growth stage. Plants should be sprayed thoroughly to the point of drip or “run off” from leaves, twigs, and stems. Repeated applications may still be necessary even if the timing is right, as crawler populations are often large and crawlers like to hide under old waxy scales. Systemic drenches are also a viable option. With good spray coverage, horticultural oils can kill scales at all stages of growth. Refer to the product label for phytotoxicity and temperature guidelines. Even after successful treatment, the outer coatings of the scales may remain on the plant material for weeks, which can be unsightly. The best way to determine if scales are dead is to squeeze them. They will be dry when squeezed if they are dead and they will ooze liquids if they are living (they were at least alive to the point of being squashed).
For insect identification and additional information on scale control, please see:
A Guide to Scale Insect Identification
UF/IFAS Featured Creatures
Your County Extension Office
by Daniel J. Leonard | Nov 8, 2019
Most lawn weeds are annoying, appearing in unwanted places and numbers, but few actually cause physical harm like the pest plant Lawn Burweed (Soliva sessilis)! This infamous small, spreading winter weed’s seeds generally germinate when temperatures begin to cool in the fall (late October-November). Burweed then grows mostly unnoticed through the winter until spring, when it then produces the hard, spiny burs that contain the plant’s seeds and the plants finally die. Once the burs have formed, Burweed’s presence makes walking on newly greened-up spring turf extremely painful for pets and people (barefoot of course, the burs aren’t large enough to puncture shoe soles). At this point of the plant’s life, once it has made its unwanted presence known, control is not feasible as the Burweed plants have set seed, ensuring a new crop next year, and killing the remaining foliage doesn’t remove the burs. What is a homeowner to do?
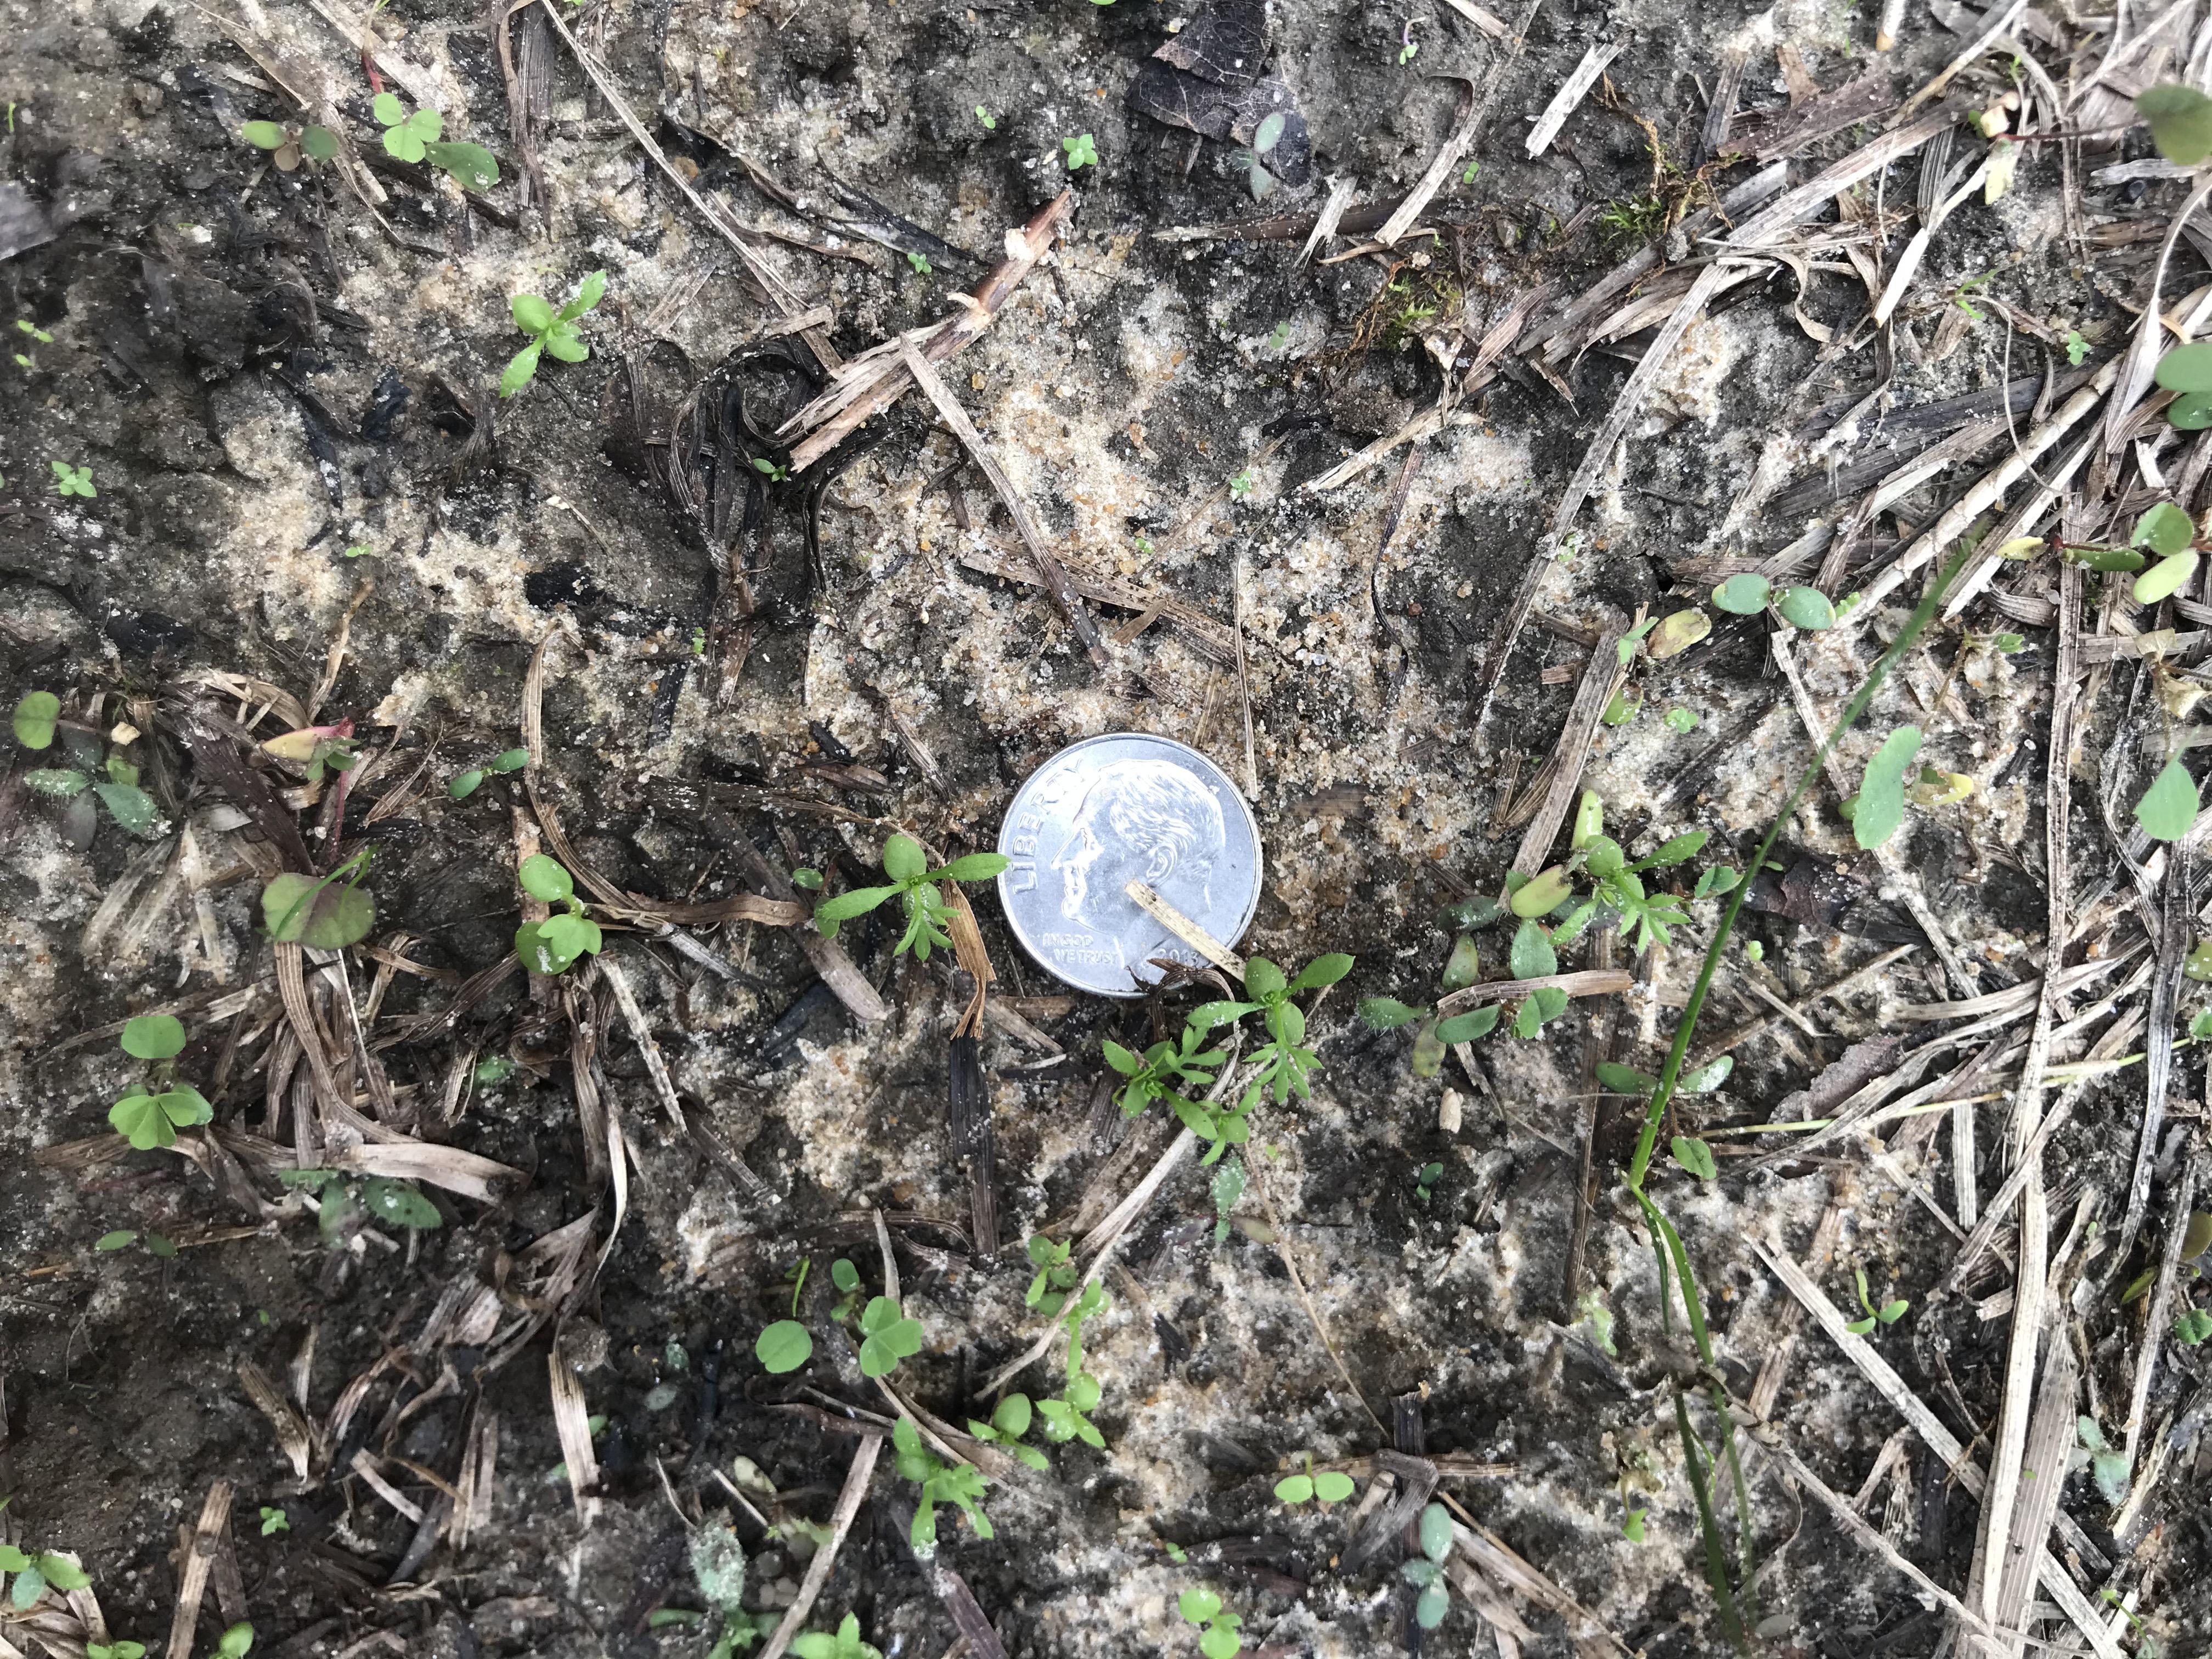
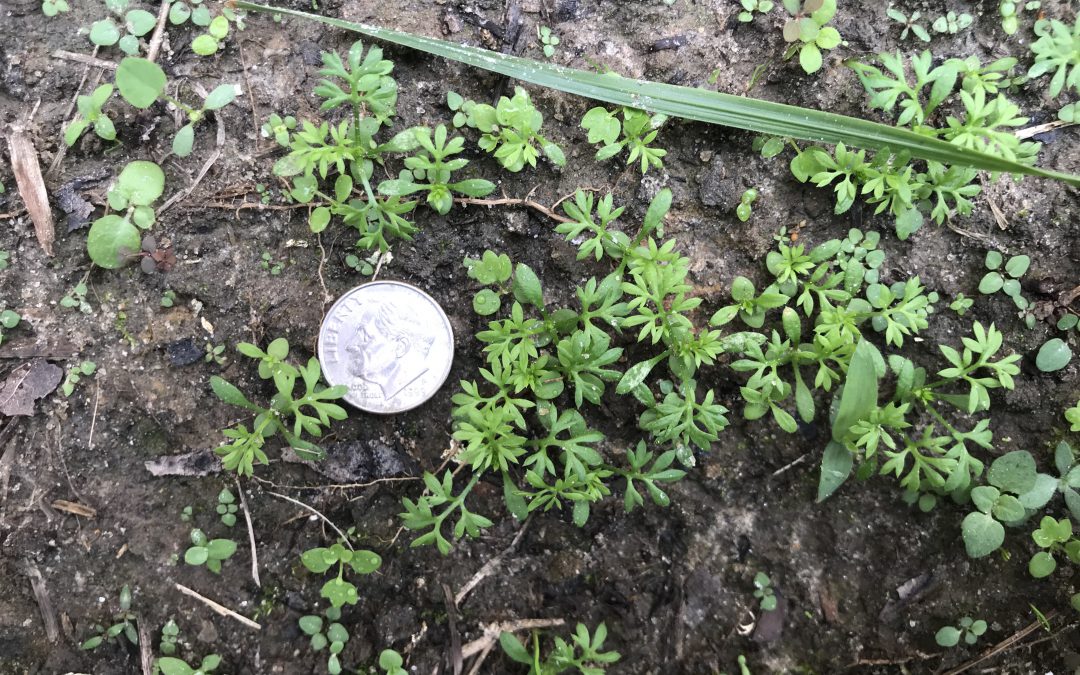
Newly germinated Lawn Burweed. Photo courtesy of the author.
Fortunately, Lawn Burweed is relatively easy to control chemically if one pays close attention to seasonal changes and uses herbicides (either pre-emergent or post-emergent herbicides) effectively.
Pre-emergent Herbicide Options: The first chemical control option for Lawn Burweed is a timely application of the pre-emergent herbicide Isoxaben (sold under various brand names at most farm or garden stores) to prevent Burweed seeds from germinating, greatly reducing plant populations. However, pre-emergent Isoxaben applications must be made before the plants sprout and begin to grow to be effective. For Burweed, this generally means application in October, once nighttime temperatures dip into the 55-60 degrees F range for several nights in a row, as consistent temperatures in this range give Burweed seeds the signal to germinate. Though we’re already past the point of pre-emergent herbicides being an option for control this year, homeowners should plan to include this method in their Lawn Burweed control plan for fall 2020!
Post-Emergent Herbicide Options: If you haven’t already used a pre-emergent herbicide this fall for Burweed control, you must turn to post-emergent options. Like pre-emergent herbicides, timing is critical if you want your post-emergent applications to work! These herbicides are most effective when Burweed plants are young, small, vigorously growing, and haven’t set burs yet. Successful post-emergent applications may be made from December-early February before burs harden. Unlike pre-emergents, where there is only one strong option for Burweed control, many post-emergent herbicides exist that are extremely effective! When shopping, look for products containing the following active ingredients:
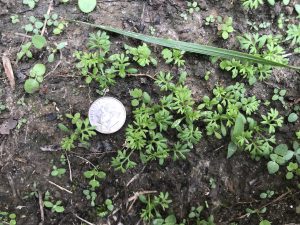
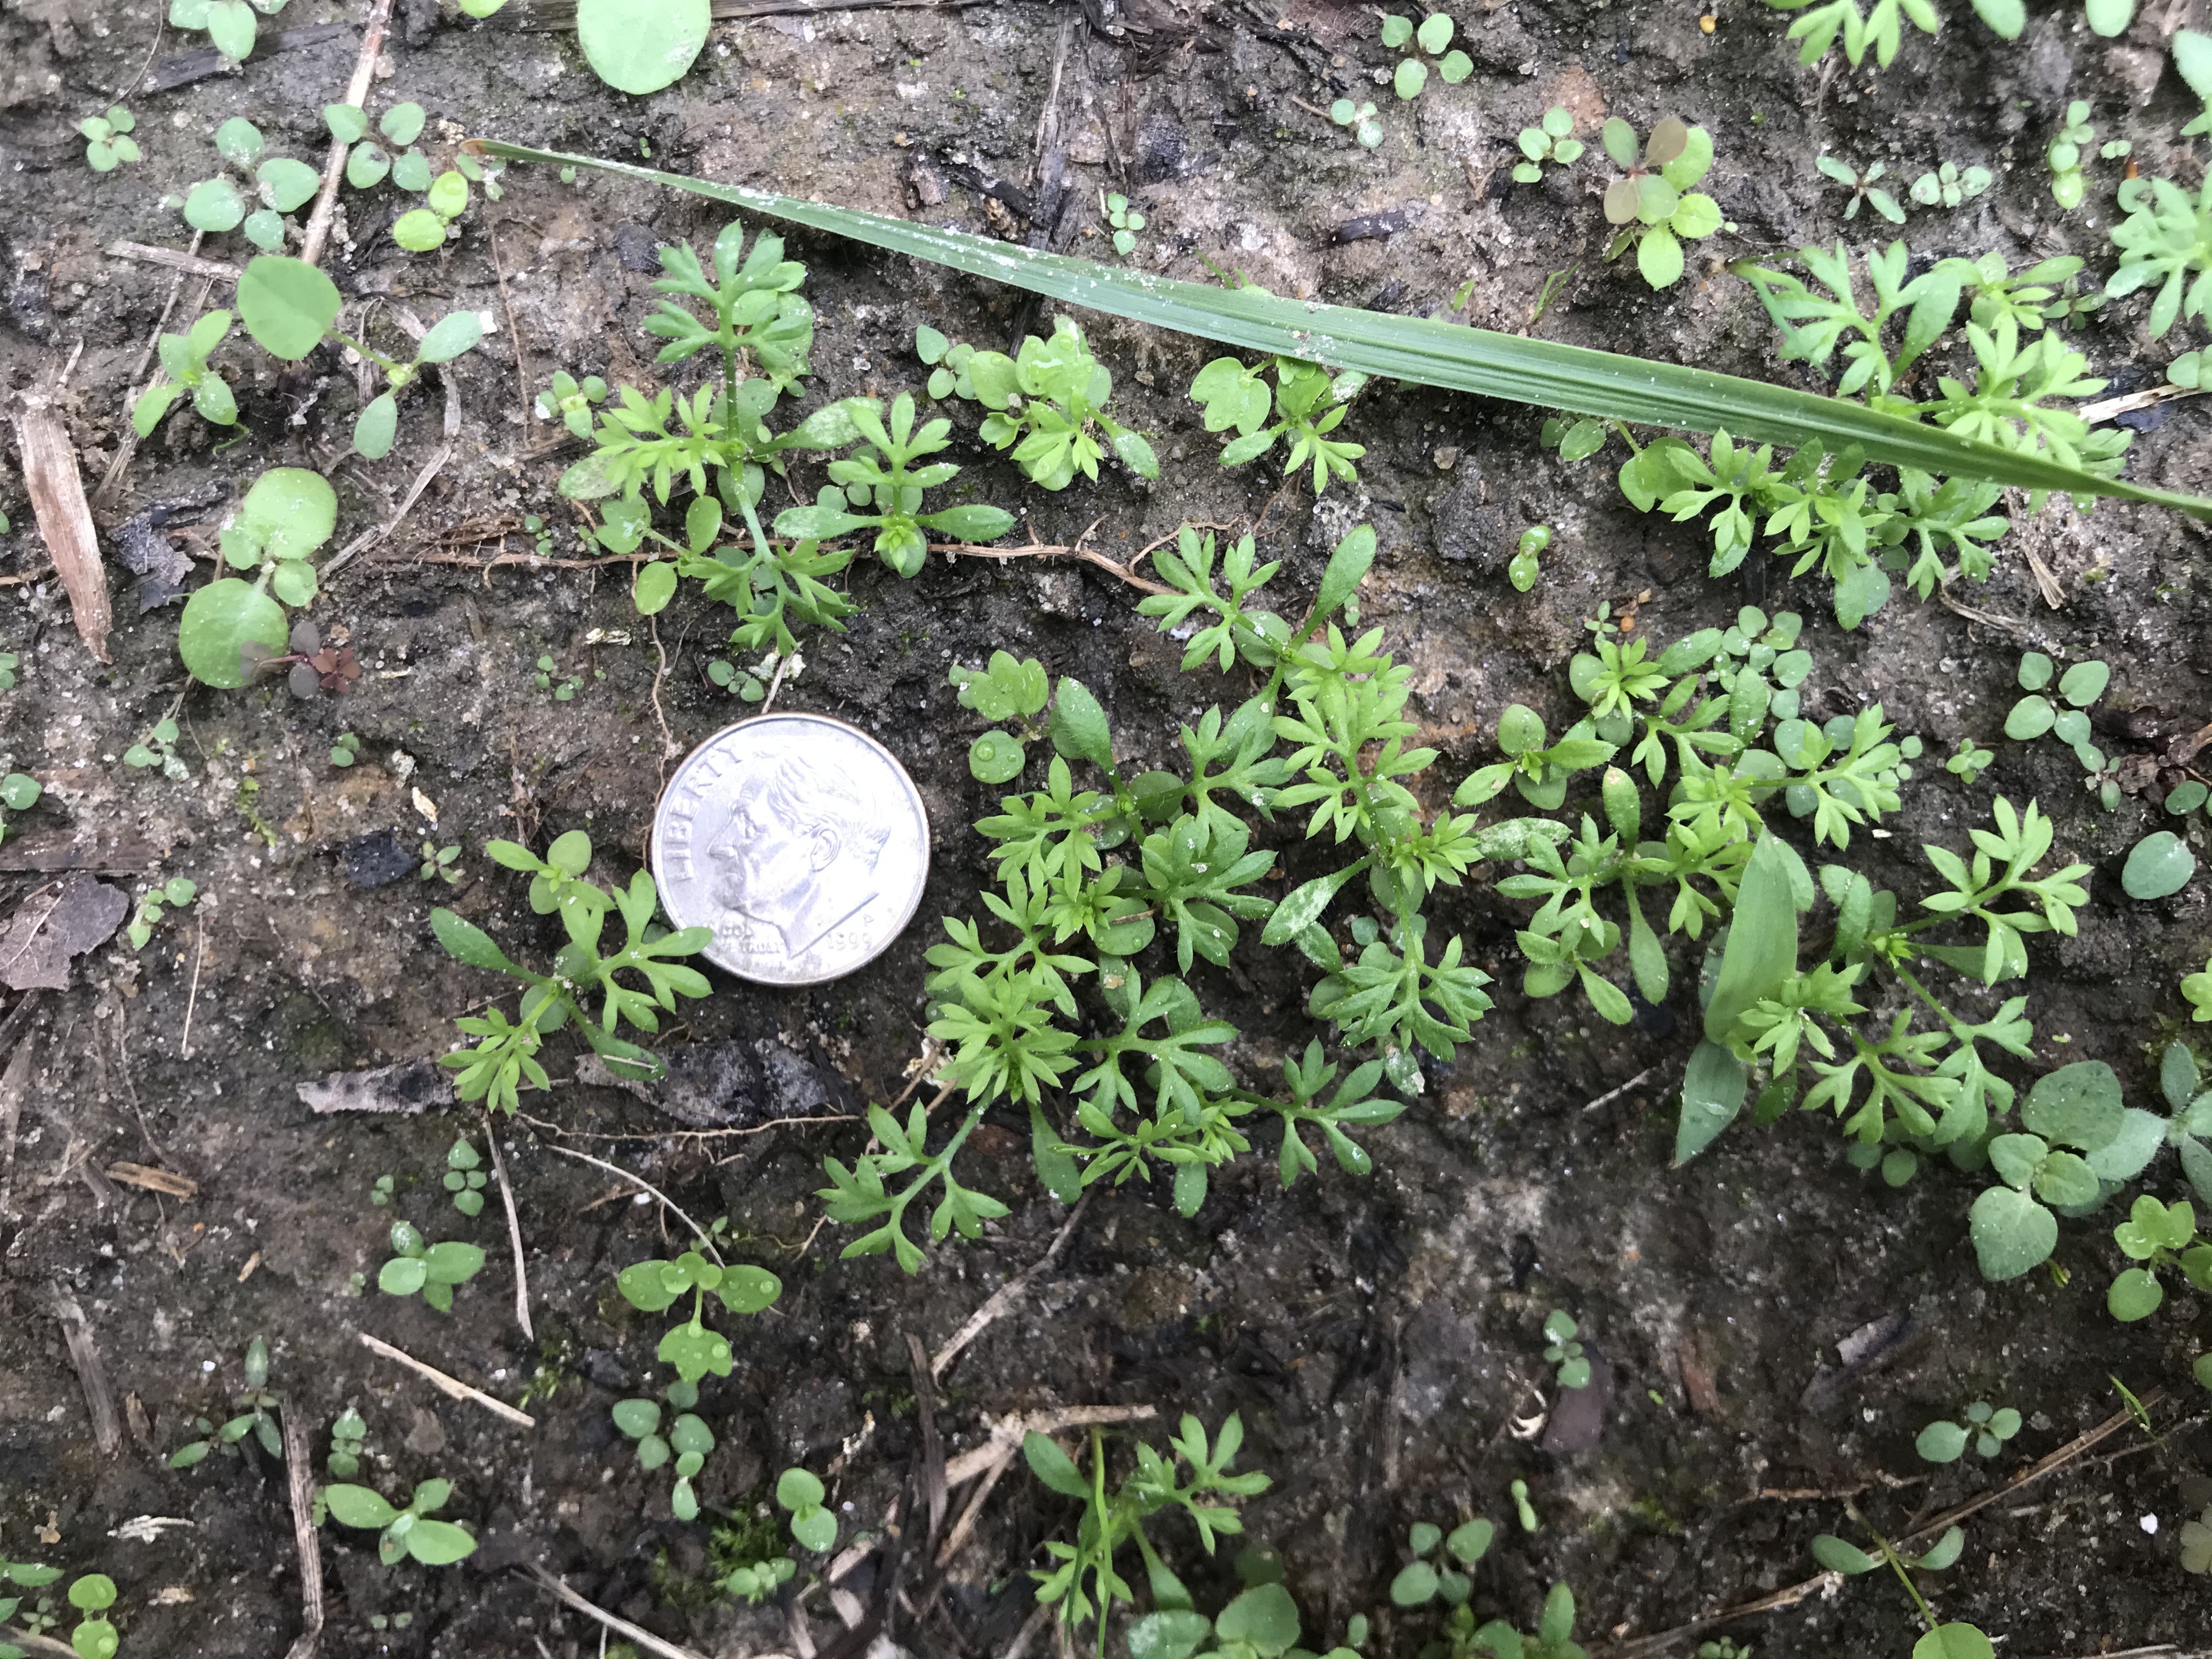
Lawn Burweed around 10 days after emergence. Photo courtesy of author.
- Atrazine – sold under many brand names and safe in Centipede, St. Augustine, & Bermudagrass. Do not use in Zoysia or Bahiagrass lawns.
- Dicamba, Mecoprop, 2,4-D – commonly sold in three-way formulations through many brand names. Generally safe in Centipede, St. Augustine, Bermuda, Zoysia, & Bahiagrass lawns.
- Metsulfuron – sold under several brand names and safe in Centipede, St. Augustine, Zoysia & Bermudagrass. Do not use in Bahiagrass. Be careful if used around ornamentals.
- Thiencarbazone, iodosulfuron, dicamba – sold as Celsius WG from Bayer. Safe in Centipedegrass, Zoysiagrass, Bermudagrass, and St. Augustinegrass. Do not use in Bahiagrass.
Lawn Burweed control with of all the above-listed herbicides will be most effective with a follow-up application 10-14 days later.
Note: With the exception of the Thiencarbazone, iodosulfuron & dicamba mixture (Celsius), do not apply any of these post-emergent herbicides during spring turf green up.
As always, if you have questions about Lawn Burweed control or any other horticulture or agriculture related questions, please contact your local UF/IFAS County Extension office or consult any of the following related articles: https://nwdistrict.ifas.ufl.edu/hort/2015/10/06/lawn-burweed-prevention-is-easier-than-cure/ and http://blogs.ifas.ufl.edu/washingtonco/2017/10/11/prepare-now-to-avoid-lawn-burweed-infestation-later/
Happy gardening!
by Mark Tancig | Sep 16, 2019
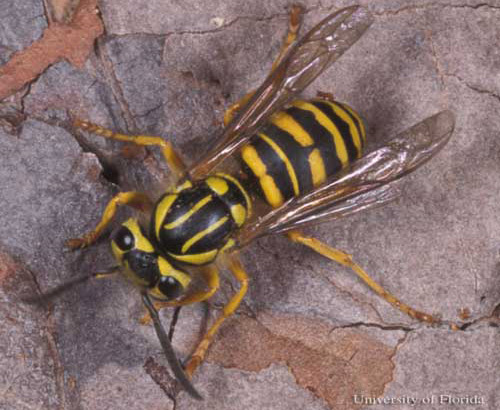
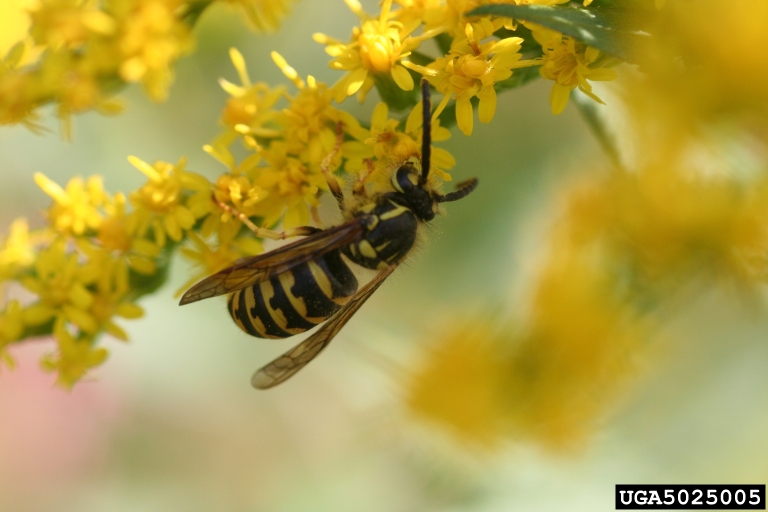
Paper wasps can hide among vegetation and surprise gardeners. Credit: UF/IFAS
As summer comes to a close, many gardeners are getting their landscapes back in shape after the long, hot summer months. There are likely some large weeds and/or vines that have taken over areas where they are not wanted. As you begin to hack these back, it is wise to be on the lookout for wasps and yellow jackets. These stinging insects pack a punch and are particularly active this time of year.
Wasps and yellow jackets are closely related in the insect family Vespidae. These are social insects, similar to ants and bees, that have a division of labor with a queen and workers (both female) carrying out specific tasks for the colony. Males arise from unfertilized eggs and are only needed for reproductive purposes. Once they mate with a female from another nest, they die. Once the fertilized females emerge in late fall, they will overwinter under the bark of a log, or other safe habitat, until spring, when they start a new colony. Unlike bees, who die after a single sting, wasps, yellowjackets, and hornets can sting multiple times. Yellowjackets and hornets even emit an alarm pheromone that causes other members of the nest to aggressively defend the colony.
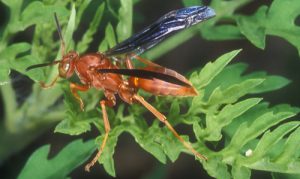
While there are many different species of wasp in Florida, including the paper, red, mason, potter, and mud dauber wasps, the paper and red wasps (Polistes spp.) are the ones that tend to be most aggressive when provoked and cause a harmful sting. Their nests are often found under house eaves or hidden in amongst shrubbery. These nests hidden in vegetation are the ones that gardeners typically run into when trimming or weeding.
There are three species of yellowjacket in Florida, including the eastern yellowjacket (Vespula maculifrons), southern yellowjacket (Vespula squamosa), and baldfaced hornet (Dolichovespula maculata). All three can be aggressive and sting humans, especially if they feel threatened, such as when pruning or working over or near a colony. Yellowjackets build extensive colonies underground, though can also build colonies in hay, palm fronds, and other loose debris aboveground. These underground colonies usually have a single entrance but can also have multiple entrance holes. Hornets build aerial colonies. Gardeners are most likely to have run-ins with yellowjackets since hornet nests are typically up in trees and more obvious than an underground yellowjacket colony.

Southern yellowjackets create underground colonies that can hold over 2,000 yellowjackets. Credit: UF/IFAS
While these insects can be a major pain, figuratively and literally, they actually do help out us gardeners. The main food source of wasps, yellowjackets, and hornets are caterpillars and beetle larvae, which are often garden pests. They are also native pollinators. Therefore, it’s best that we accept some in the landscape, manage colonies in high-traffic areas, and prevent encounters with them. To reduce your chance of weeding right into a wasp nest, take a stick and knock around the vegetation to see if any are hiding in the brush before getting started. Be ready to run. Yellowjackets are harder to avoid as they are stealthy in their underground bunkers.
When it comes time to remove these insects from near a structure or heavily trafficked area, you may want to consider hiring a professional pest control company. Wasps can be managed by most homeowners with a broom (if the nest is small and/or relatively inactive) or aerosol insecticides specifically formulated for wasp control. Yellowjackets and hornets are trickier to deal with and should be approached very cautiously. Spraying aerosols into a yellowjacket entrance hole is dangerous and may not be very effective as some colonies can be up to a foot wide and contain over 2,000 yellowjackets. Any attempts to control wasps, yellowjackets, and hornets should be done in the evening when they are less active and with appropriate clothing that covers the skin.

Yellowjackets are pollinators and eat caterpillar pests! Credit: Whitney Crenshaw, Colorado State University, Bugwood.org
For more information on wasps, yellowjackets, hornets, and other stinging insects, see the Biting and Stinging Insects section of the UF/IFAS EDIS site (https://edis.ifas.ufl.edu/topic_biting_and_stinging_pests) or contact your local Extension Office.
by Matt Lollar | Sep 7, 2019
A couple weeks ago, I was on a site visit to check out some issues on Canary Island Date Palms. The account manager on the property requested a site visit because he thought the palms were infested with scale insects. He noticed the issue on a number of the properties he manages and he was concerned it was an epidemic. From a distance, lower fronds were yellowing from the outside in and the tips were necrotic. These are signs of potassium deficiency with possible magnesium deficiency mixed in.
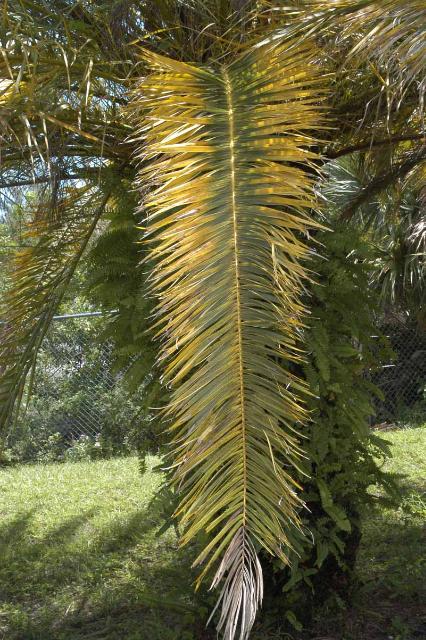
Transitional leaf showing potassium deficiency (tip) and magnesium deficiency (base) symptoms. Photo Credit: T.K. Broschat, University of Florida/IFAS Extension
Nutrient deficiencies are slow to correct in palm trees. It’s much easier to prevent deficiencies from occurring by using a palm fertilizer that has the analysis 8N-2P2O5-12K2O+4Mg with micronutrients. Even if the palms are part of a landscape which includes turf and other plants that require additional nitrogen, it is best to use a palm fertilizer with the analysis previously listed over a radius at least 25 feet out from the palms. However, poor nutrition wasn’t the only problem with these palms.
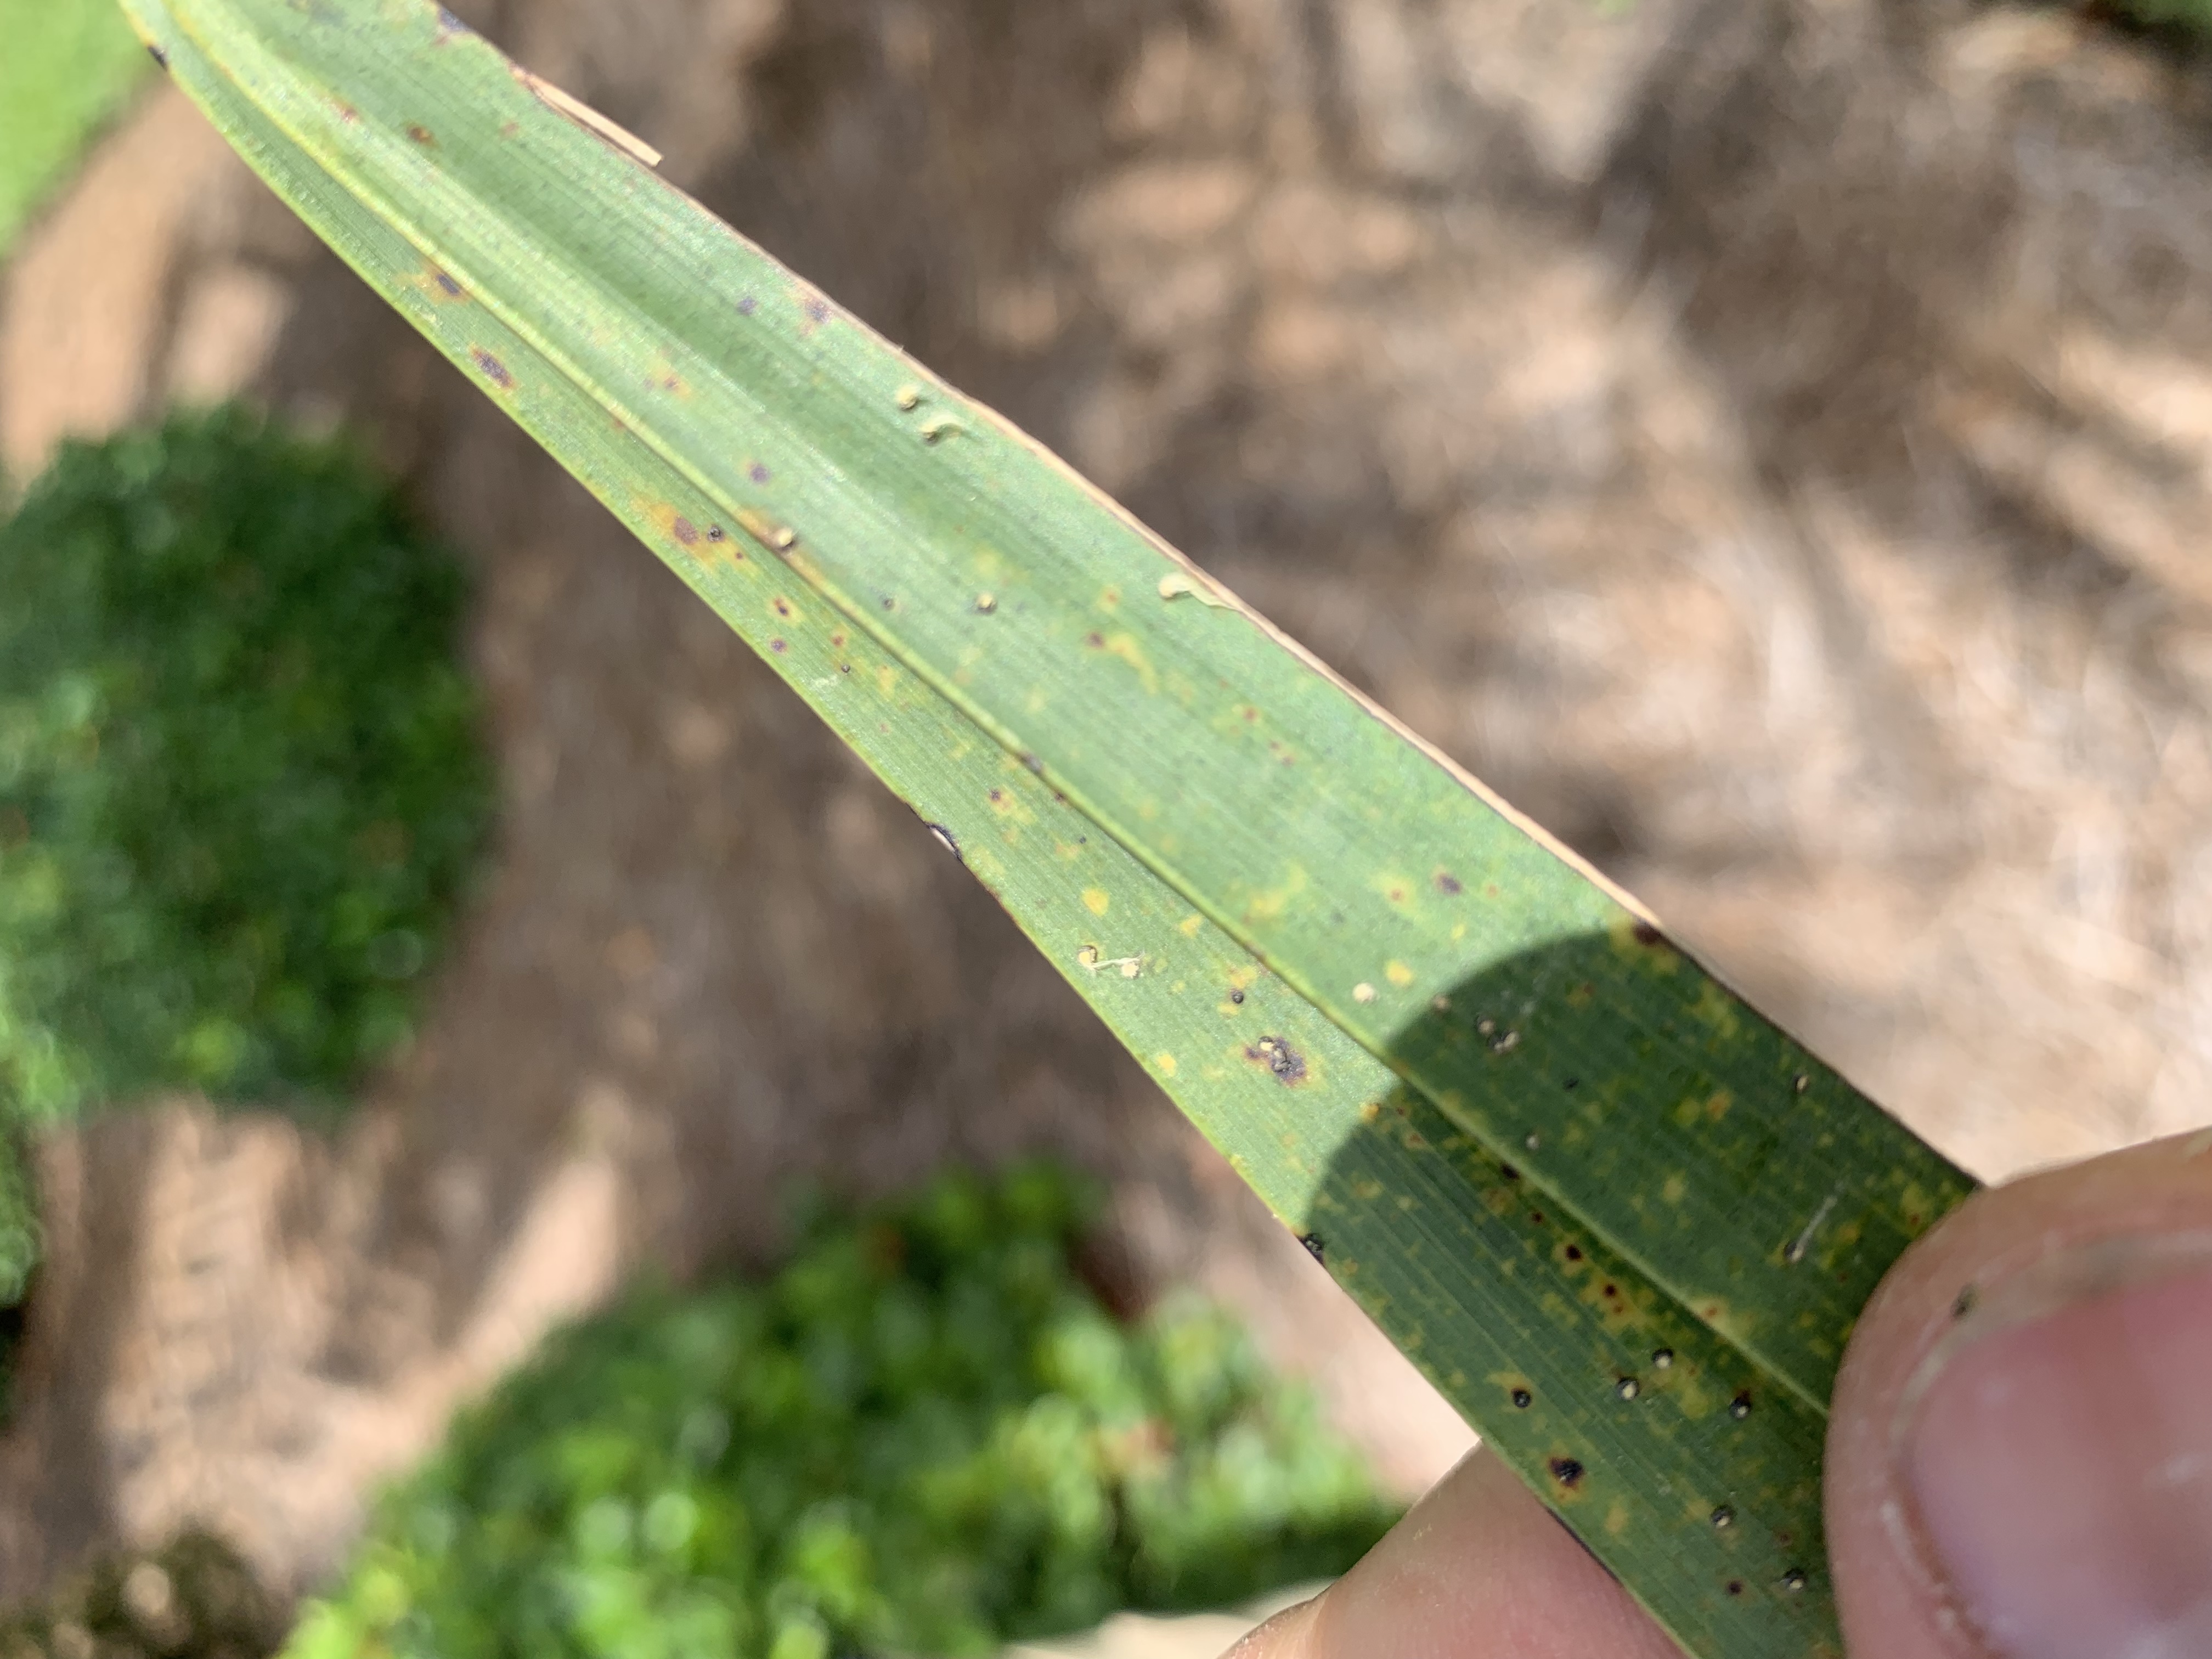
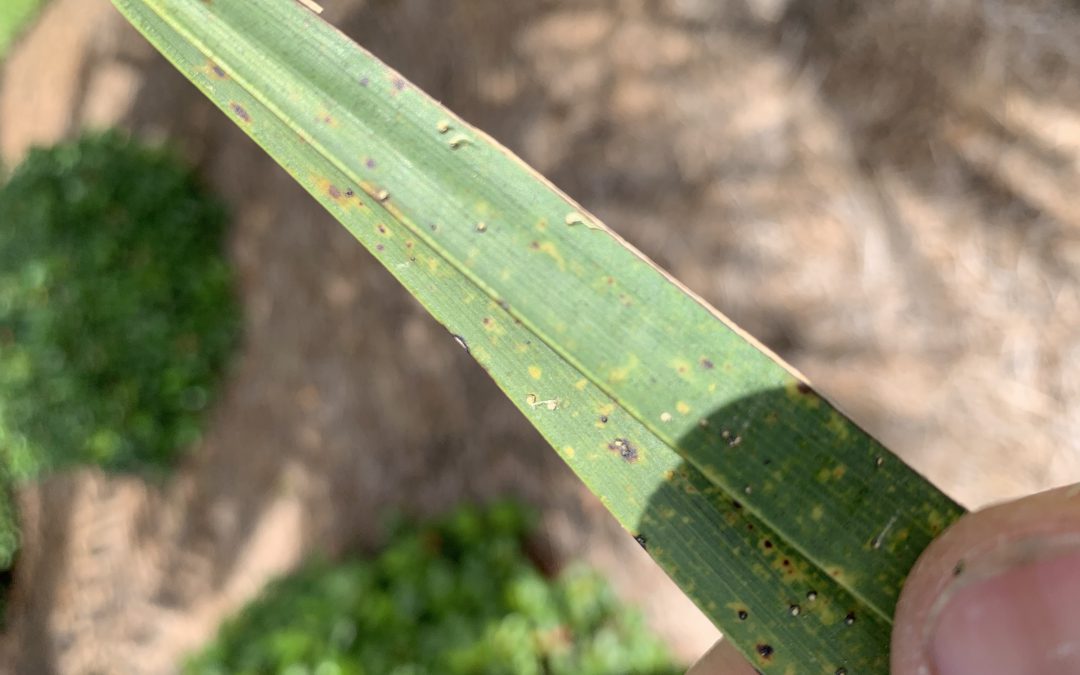
Upon closer look, the leaflets were speckled with little bumps. Each bump had a little white tail. These are the fruiting structures of graphiola leaf spot also known as false smut.

Graphiola leaf spot (false smut) on a Canary Island Date Palm. Photo Credit: Matt Lollar, University of Florida/IFAS Extension – Santa Rosa County
Graphiola leaf spot is a fungal leaf disease caused by Graphiola phoenicis. Canary Island Date Palms are especially susceptible to this disease. Graphiola leaf spot is primarily an aesthetic issue and doesn’t cause much harm to the palms infected. In fact, the nutrient deficiencies observed in these palms are much more detrimental to their health.
Graphiola leaf spot affects the lower fronds first. If the diseased, lower fronds are not showing signs of nutrient deficiencies then they can be pruned off and removed from the site. All naturally fallen fronds should be removed from the site to reduce the likelihood of fungal spores being splashed onto the healthy, living fronds. A fungicide containing copper can be applied to help prevent the spread of the disease, but it will not cure the infected fronds. Palms can be a beautiful addition to the landscape and most diseases and abiotic disorders can be managed and prevented with proper pruning, correct fertilizer rates, and precise irrigation.