by Danielle S. Williams | Aug 22, 2019
Recently, I received a call about a garden not producing the way it used to. After speaking with the homeowner, I decided to take a visit to see what was going on. On my visit, I could see that the tomatoes were stunted, yellow and wilting, the squash plants were flowering but not setting fruit, and the okra was stunted. After digging up some of the sick plants and examining the roots, the problem was as clear as day…root-knot nematodes.
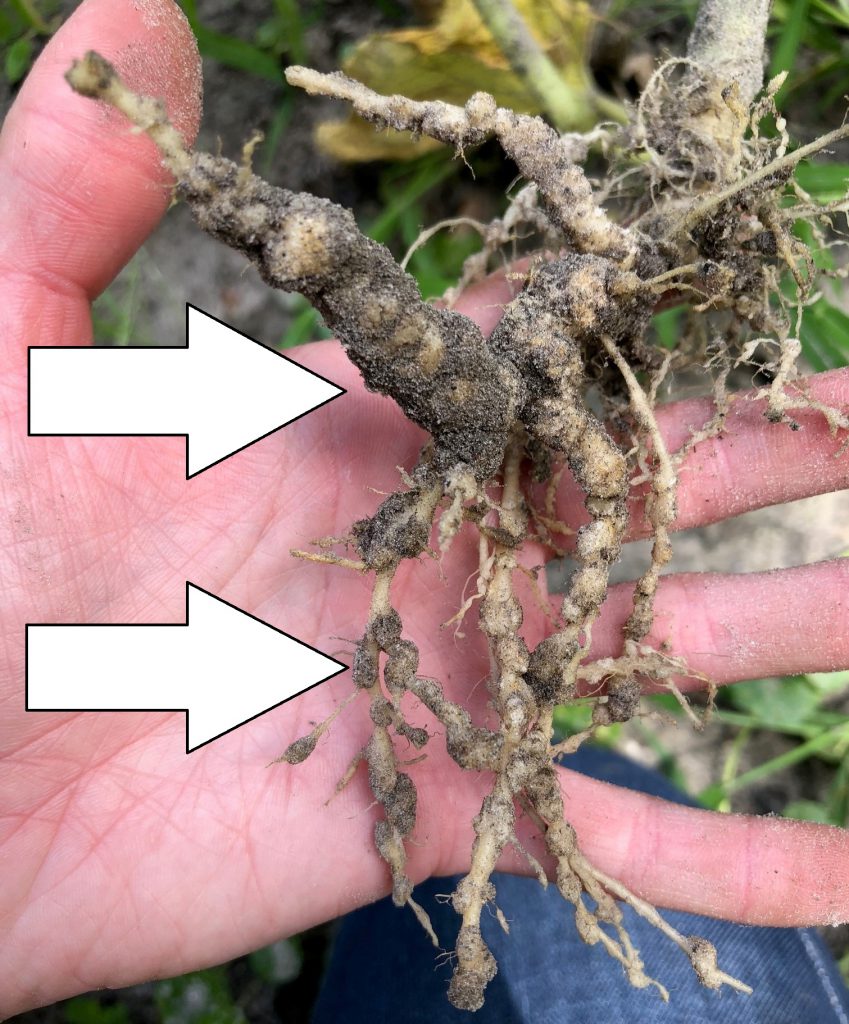
Galls on roots from root-knot nematodes
Root-knot nematodes are microscopic, unsegmented roundworms that live in the soil and feed on the roots of many common garden plants. Some of the most commonly damaged crops are tomatoes, potatoes, okra, beans, peppers, eggplants, peas, cucumbers, carrots, field peas, squash, and melons. Root-knot nematodes enter the root and feed, causing knots or galls to form. These galls are easily recognizable on the roots. If you’re inspecting the roots of beans or peas, be careful not to confuse nematode galls with the nitrogen-fixing nodules that are a normal part of the root system. As the nematodes feed, the root system of the plant becomes damaged and the plant is unable to take up water and nutrients from the soil. As a result, the plant may show symptoms of stunting, yellowing, and wilting.
What can I do about nematodes?
There are currently no nematicides labeled for use in the home garden but the best means of root-knot nematode management involves using a combination of strategies that make your garden less susceptible to attack.
Grow Resistant Varieties
Some varieties of crops are resistant to root-knot nematodes. This means is that a particular nematode can’t reproduce on the plant roots. When buying seed, read the variety label. The label may have ‘VFN’ written in capital letters. These letters indicate that the variety has resistance to certain diseases: V = Verticillium wilt; F = Fusarium wilt; and N = root-knot nematode. It’s best to use resistant varieties when root-knot nematodes are present.
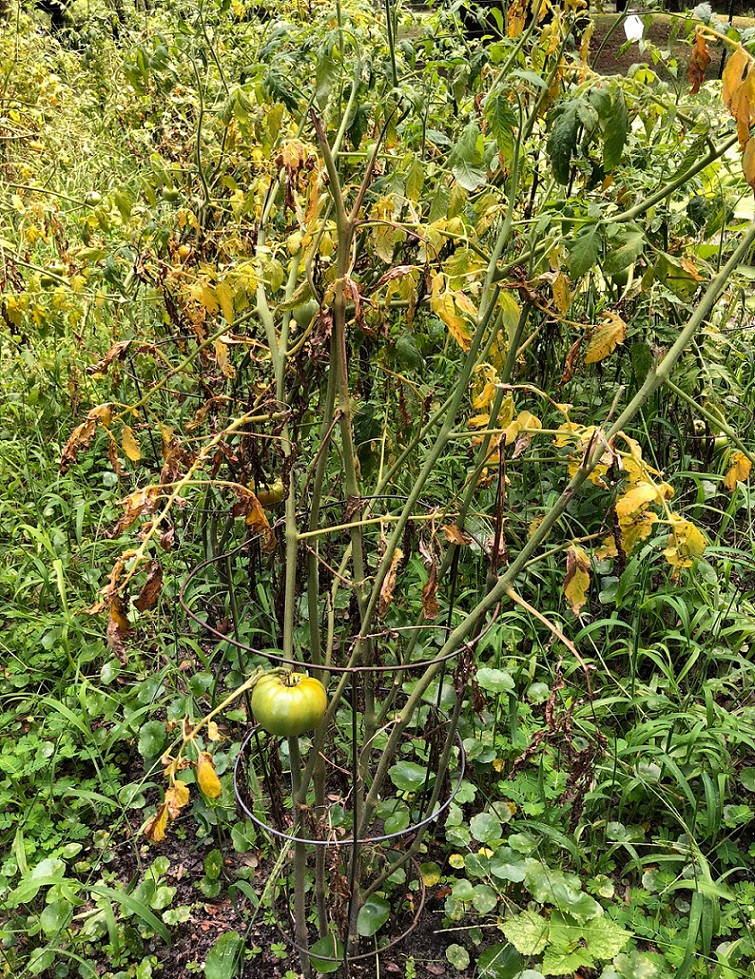
Tomato plant showing signs of nematode damage – yellowing and wilting.
Sanitation
If you suspect you may have a nematode problem, be sure not to move soil or infected plant roots from an infected area to a clean area. Nematodes can easily be spread by garden tillers, hand tools, etc. so be sure to disinfect all equipment after use in problem areas.
Infected roots left in the soil can continue to harbor nematodes. After the crop is harvested, pull up the roots and get rid of them. Tilling the soil can kill nematodes by exposing them to sunlight.
Cover crops and Crop Rotation
Cover crops and crop rotation isn’t just a concept for farmers…gardeners need to implement the same practices! While this may take some planning, it is the most effective way to reduce pests and diseases.
Cover crops are crops that are not harvested and are typically planted between harvestable crops. They help improve soil quality, prevent soil erosion, and help control pests and diseases. Selecting cover crops that aren’t susceptible to root-knot nematode attack is key. When growing a cover crop that nematodes can’t reproduce on, populations should decline or not build up to begin with. Grain sorghum and millet can be planted as a summer cover crop and rye in the winter. French marigolds have been shown to reduce nematode populations as well.
Another simple way to manage root-knot nematodes is by crop rotation. Crop rotation is the practice of not growing crops that are susceptible to nematode attack, in the same spot for more than one year. Crops that aren’t susceptible to attack are cool season crops in the cabbage family such as broccoli, cauliflower, Brussels sprouts, collards and kale.
Root-knot nematodes can wreck havoc on a garden so it’s important to take the necessary precautions to avoid them. It may require planning and patience but it will be worth it in the long run!
For more information on this topic, use the links to the following publications:
Nematode Management in the Vegetable Garden
Featured Creature: Nematodes

by Sheila Dunning | Aug 7, 2019
Damage caused by azalea lace bug, Stephanitis pyrioides (Scott), feeding. Photograph by James. L. Castner, University of Florida. Severely damaged leaves become heavily discolored and eventually dry or fall off. Symptoms may sometimes be confused with mite injury, but the presence of black varnish-like excrement, frequently with cast skins attached, suggest lace bug damage (Johnson and Lyon 1991).
You may be noticing the color disappearing from your azaleas right now. Do your azaleas look bleached out from a piercing-sucking insect. The culprit is probably azalea lace bug, Stephanitis pyrioides. This pest overwinters in eggs on the underside of infested leaves. Eggs hatch in late March and early April. The insect then passes through five nymphal instars before becoming an adult. It takes approximately one month for the insect to complete development from egg to adult and there are at least four generations per year. Valuable plants that are susceptible to lace bug damage should be inspected in the early spring for the presence of overwintering lace bug adults, eggs and newly-hatched nymphs. Inspect these plants every two weeks during the growing season for developing lace bug infestations.
Both adults and nymphs have piercing-sucking mouthparts and remove sap as they feed from the underside of the leaf. Lace bug damage to foliage detracts greatly from the plant’s beauty, reduces the plant’s ability to produce food, decreases plant vigor and causes the plant to be more susceptible to damage by other insects, diseases or unfavorable weather conditions. The azalea can become almost silver or bleached in appearance from the feeding lace bug damage.
However, lace bugs often go undetected until the infested plants show severe damage sometime into the summer. By then several generations of lace bugs have been weakening the plant. Inspecting early in the spring and simply washing them off the underside of the leaves can help to avoid damage later and the need for pesticides.
Adult lace bugs are flattened and rectangular in shape measuring 1/8 to 1/4 inch long. The area behind the head and the wing covers form a broadened, lace-like body covering. The wings are light amber to transparent in color. Lace bugs leave behind spiny black spots of frass (excrement).
Adult azalea lace bug, Stephanitis pyrioides (Scott), and excrement. Photograph by James. L. Castner, University of Florida.
Lace bug nymphs are flat and oval in shape with spines projecting from their bodies in all directions. A lace bug nymph goes through five growth stages (instars) before becoming an adult. At each stage the nymph sheds its skin (molts) and these old skins often remain attached to the lower surface of infested leaves.
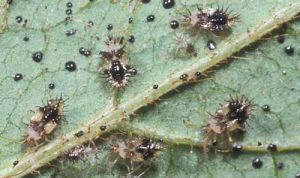
Nymphs of the azalea lace bug, Stephanitis pyrioides (Scott), with several cast skins and excrement. Photograph by James. L. Castner, University of Florida.
Azalea lace bug eggs are football-shaped and are transparent to cream colored. Lace bug eggs are found on the lower leaf surface, usually alongside or inserted into a leaf vein. Adult females secrete a varnish-like substance over the eggs that hardens into a scab-like protective covering.
Other plant species, such as lantana and sycamore, may have similar symptoms. But, realize that lace bugs are host specific. They feed on their favorite plant and won’t go to another plant species. However, the life cycle is similar. Be sure to clean up all the damaged leaves. That’s where the eggs will remain for the winter. Start next spring egg-free.
For more information go to: http://entomology.ifas.ufl.edu/creatures/orn/shrubs/azalea_lace_bug.htm
by Matt Lollar | Aug 1, 2019
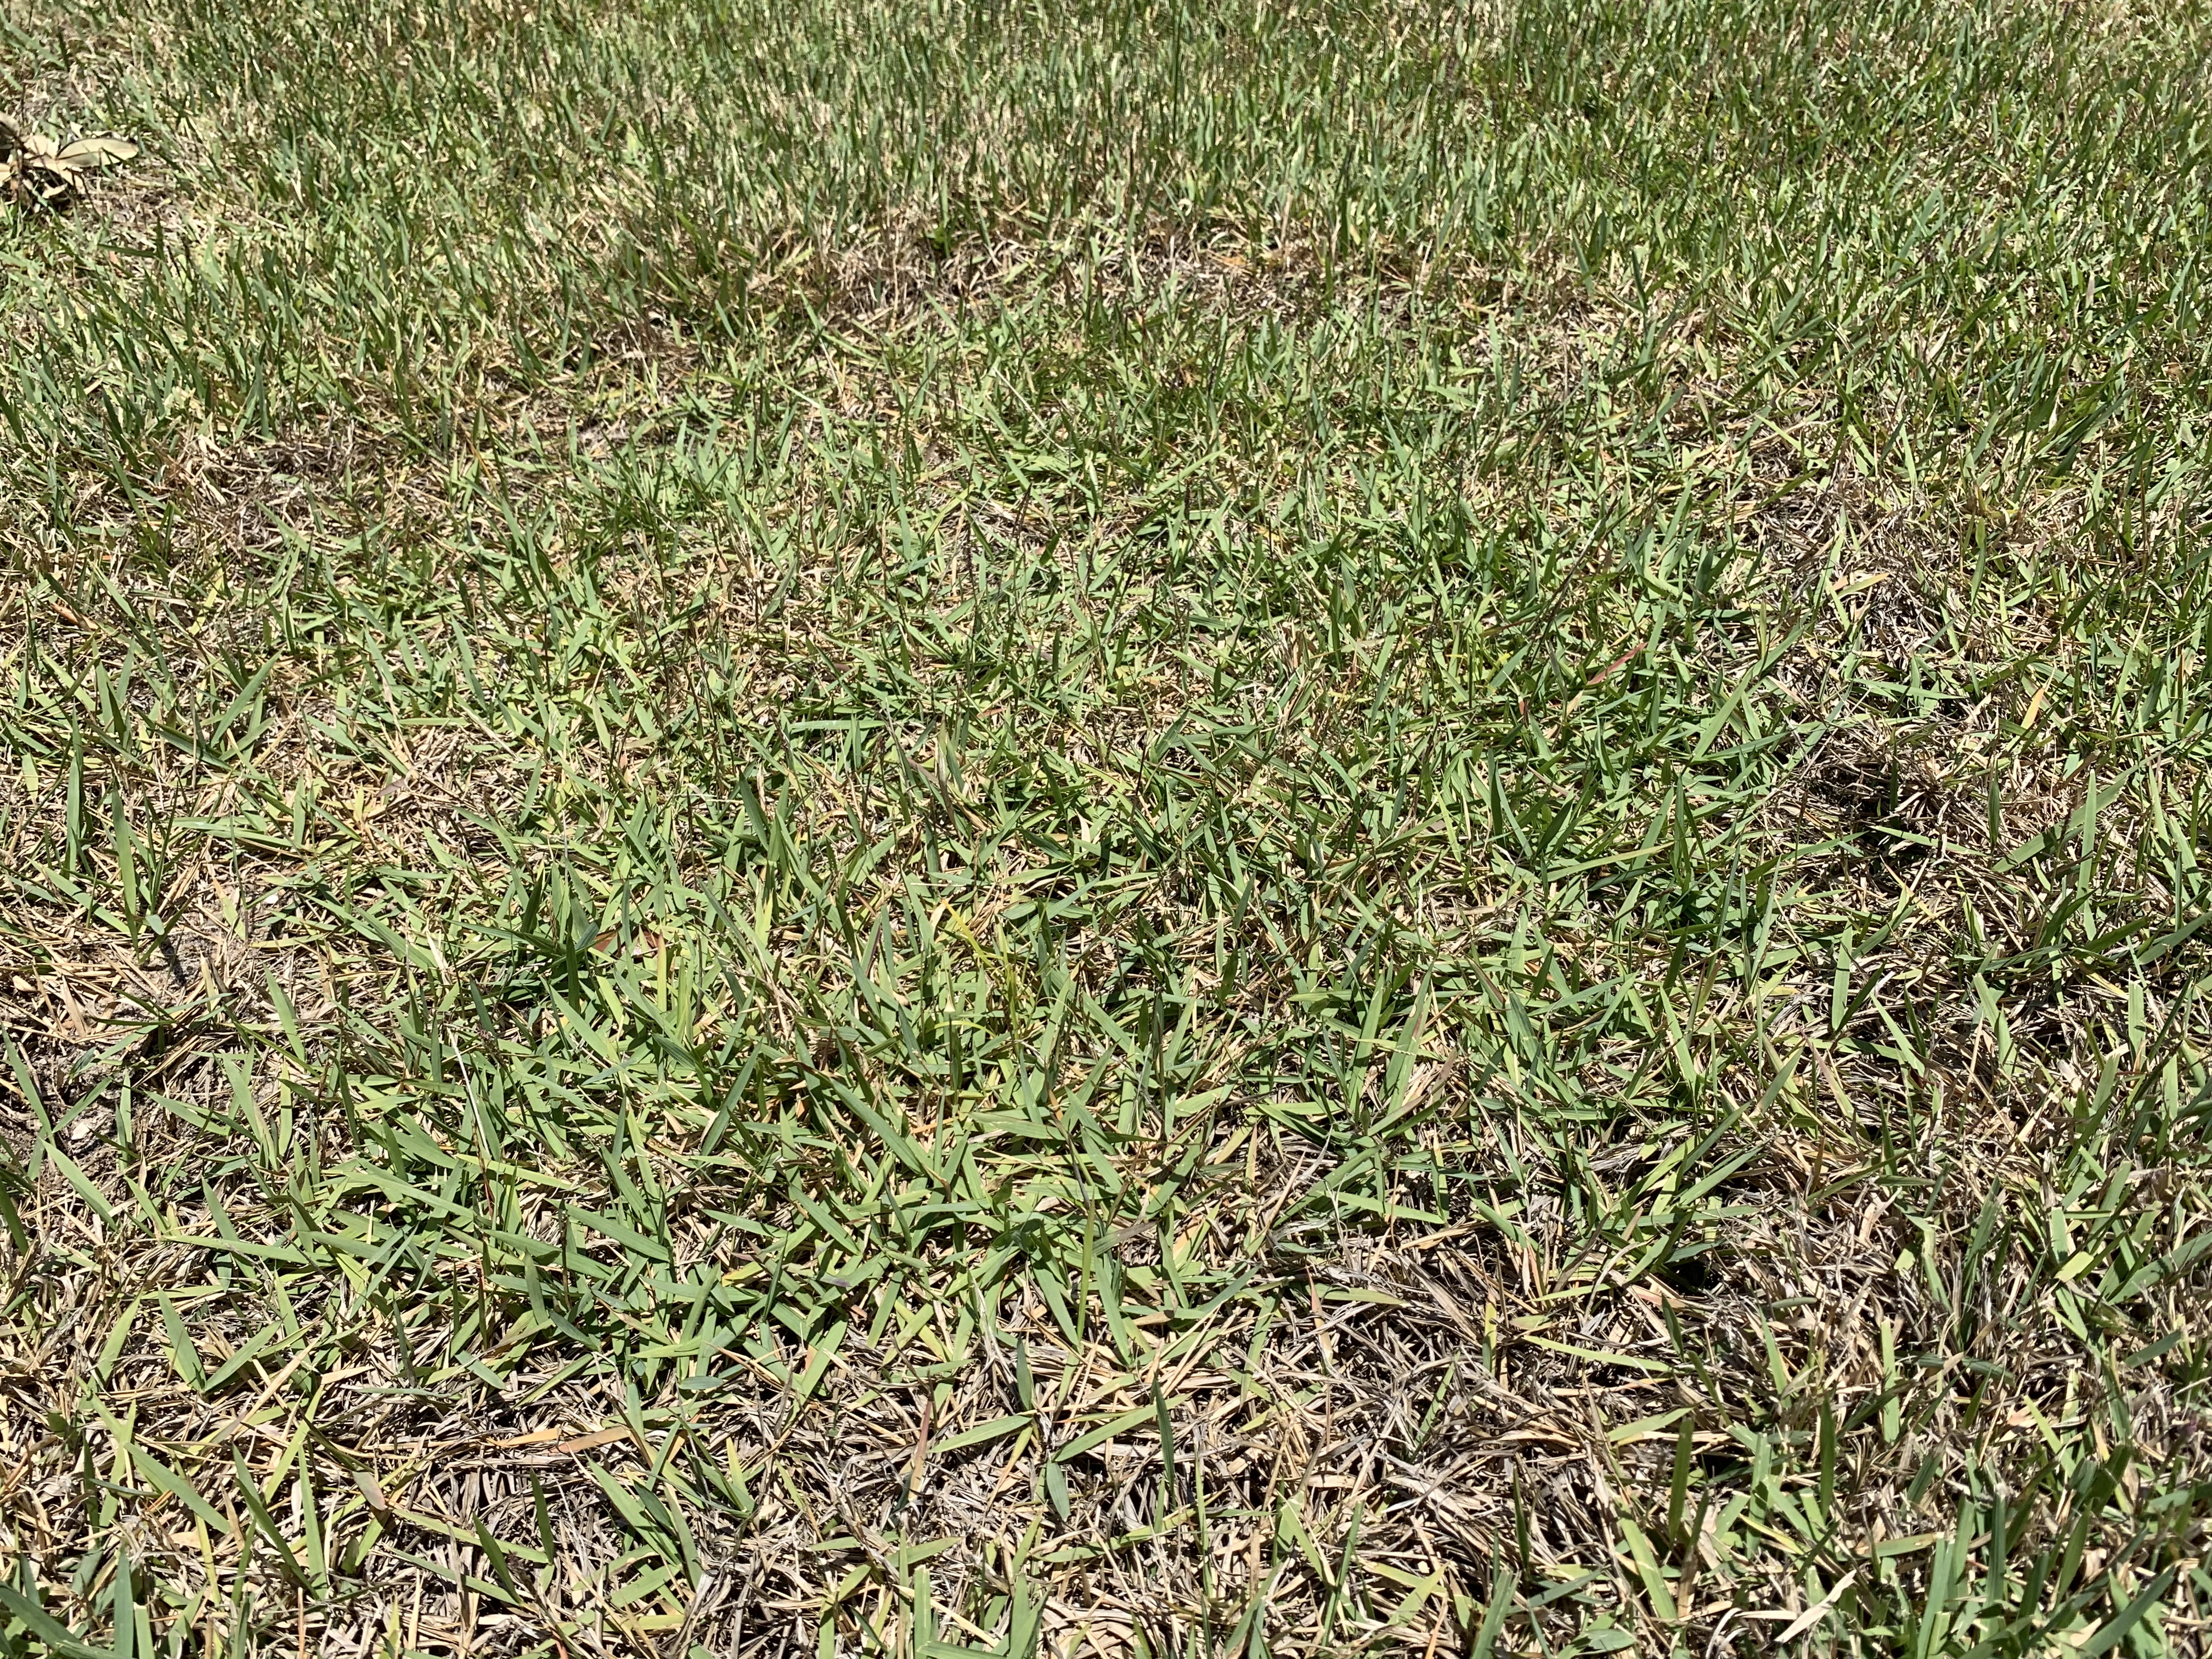
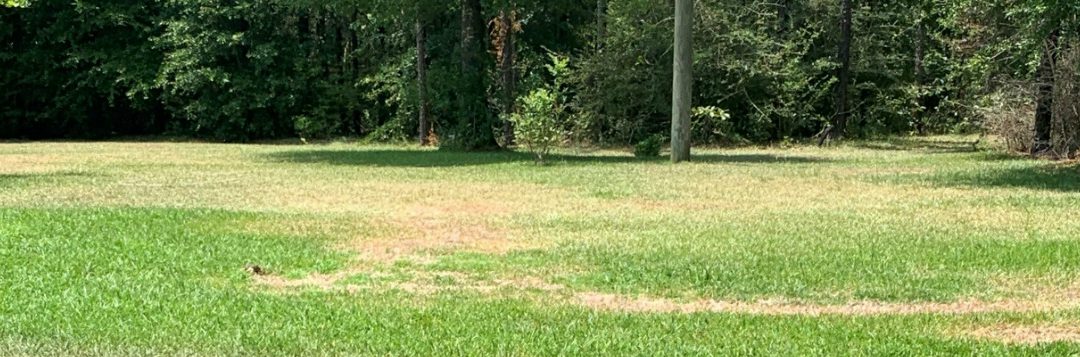
Large patch Rhizoctonia solani (known as brown patch in cool season grasses) is a common disease of many turfgrass species. It usually occurs during the cooler months from October through May when temperatures are below 80 degrees Fahrenheit. However, signs and symptoms of large patch and other Rhizoctonia diseases can be observed throughout the summer. Less common Rhizoctonia species that occur during the summer months are Rhizoctoni zeae and Rhizoctonia oryzae. Extended periods of turf wetness from excessive rainfall or overwatering provide ideal conditions for the disease to develop and spread.

Rhizoctonia in a zoysiagrass lawn. Photo Credit: Matt Lollar, University of Florida/IFAS Extension – Santa Rosa County
This summer in Santa Rosa County, Rhizoctonia has been positively diagnosed in both St. Augustinegrass and zoysiagrass lawns and suspected in a number of centipedegrass lawns. The disease usually starts as small, yellow patches (about a foot in diameter) that turn reddish brown, brown, or straw colored as the leaves start to die. Patches often expand to several feet in diameter. It is common to see rings of yellow or brown turf with otherwise healthy turf in the center. The fungus infects portions of the blades closest to the soil, eventually killing the entire leaf. Grass blades can easily be pulled off their stems, but roots are not affected by the disease.
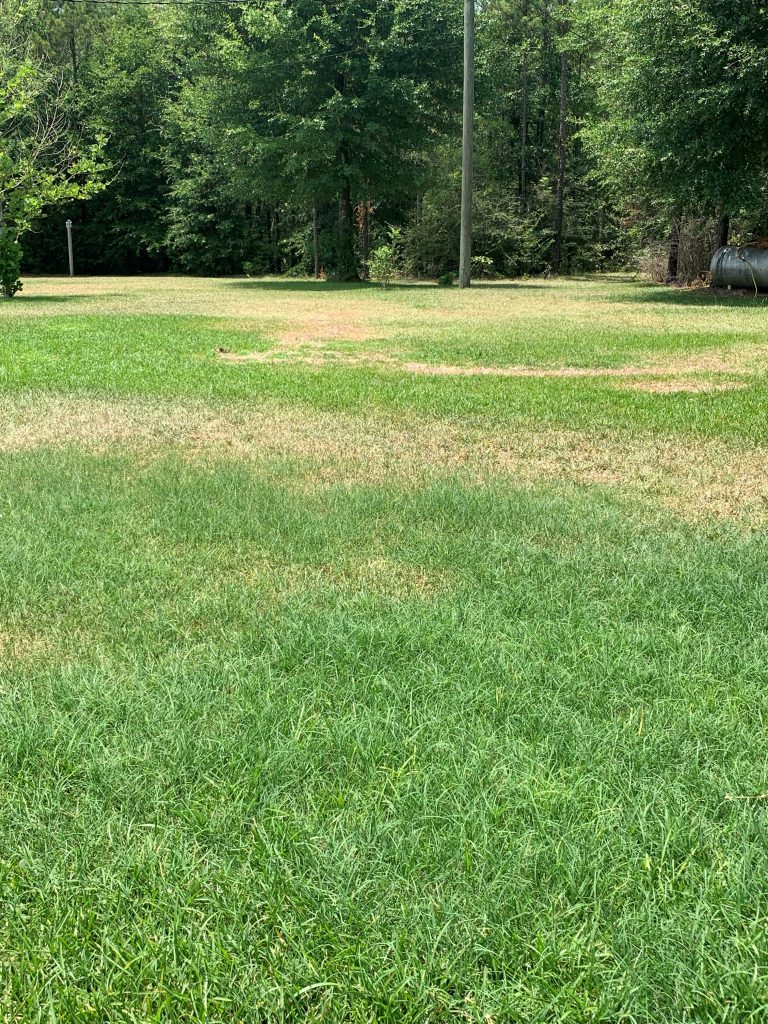
Rhizoctonia in a St. Augustinegrass lawn. Photo Credit: John Atkins, University of Florida/IFAS Extension – Santa Rosa County
Overwatering and excessive fertilization can both contribute to the development of Rhizoctonia disease. Improper timing of fertilizer application can also promote disease development. In the Florida Panhandle, turfgrass is actively growing from April to October. Slow-release fertilizers are recommended to allow for a more even distribution of nutrients over the course of multiple months. Recommended fertilizer rates are based on turfgrass species, geographical location, and fertilizer analysis. Please refer to the UF/IFAS Publication: “Urban Turf Fertilizer Rule for Home Lawn Fertilization” for rate recommendations.

Chart excerpted from Florida-Friendly Landscaping publication.
If large patch or another Rhizoctonia disease is confirmed in your lawn, then chemical controls are necessary to keep the disease from spreading. Fungicide products containing the active ingredients azoxystrobin, chlorothalonil, fludioxonil, flutolanil, iprodione, mancozeb, metconazole, myclobutanil, polyoxin D, propiconazole, thiophanate-methyl, thiram, triadimefon, trifloxystrobin, or triticonazole are viable options for keeping the disease from spreading. For best results, follow the fungicide label for application instructions. It’s important to not only treat the affected areas, but also the healthy turf surrounding these areas in order to keep the diseased spots from growing in size.
Unfortunately, turf diseases are often not noticed until large patches of declining and dead turf are noticed. In these cases when large dead patches exist in the lawn, it is usually necessary to resod these areas. As with most problems that arise in the landscape, good cultural practices are the most proactive way to mitigate the chances with turfgrass diseases. The UF/IFAS Florida Friendly Website provides up-to-date solutions and recommendations for caring for Florida landscapes.
by Daniel J. Leonard | May 20, 2019
Spring is a wonderful time of year. After months of dreariness and bare branches, bright, succulent green leaves and flowers of every kind and color have emerged. So too, have emerged gardeners and outdoor enthusiasts ready to tackle all their home and landscape improvement projects planned over the winter. However, this is also the time, when folks first start paying attention to their plants again, that strange, seemingly inexpiable plant problems crop up!
All plant problems can be divided into two categories: biotic problems, or issues caused by a living organism (think insects, fungus, and bacteria), and abiotic problems, issues that arise from things other than biotic pests. It’s the first category that people generally turn to when something goes wrong in their landscape or garden. It’s convenient to blame problems on pests and it’s very satisfying to go to the local home improvement store, buy a bottle of something and spray the problem into submission. But, in many of my consultations with clientele each spring, I find myself having to step back, consider holistically the circumstances causing the issue to arise, scout for pests and diseases, and if I find no evidence of either, encouraging the person to consider the possibility the problem is abiotic and to adopt patience and allow the problem to correct itself. Of course, this is never what anyone wants to hear. We always want a solvable problem with a simple cause and solution. But life isn’t always that easy and sometimes we must accept that we (nor a pest/disease) did anything wrong to cause the issue and, in some cases, that we ourselves actually caused the problem to happen in the first place! To illustrate, let’s consider two case studies from site visits I’ve had this spring.
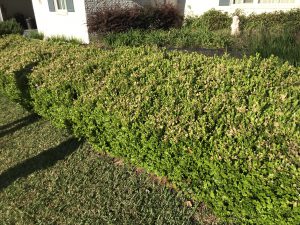
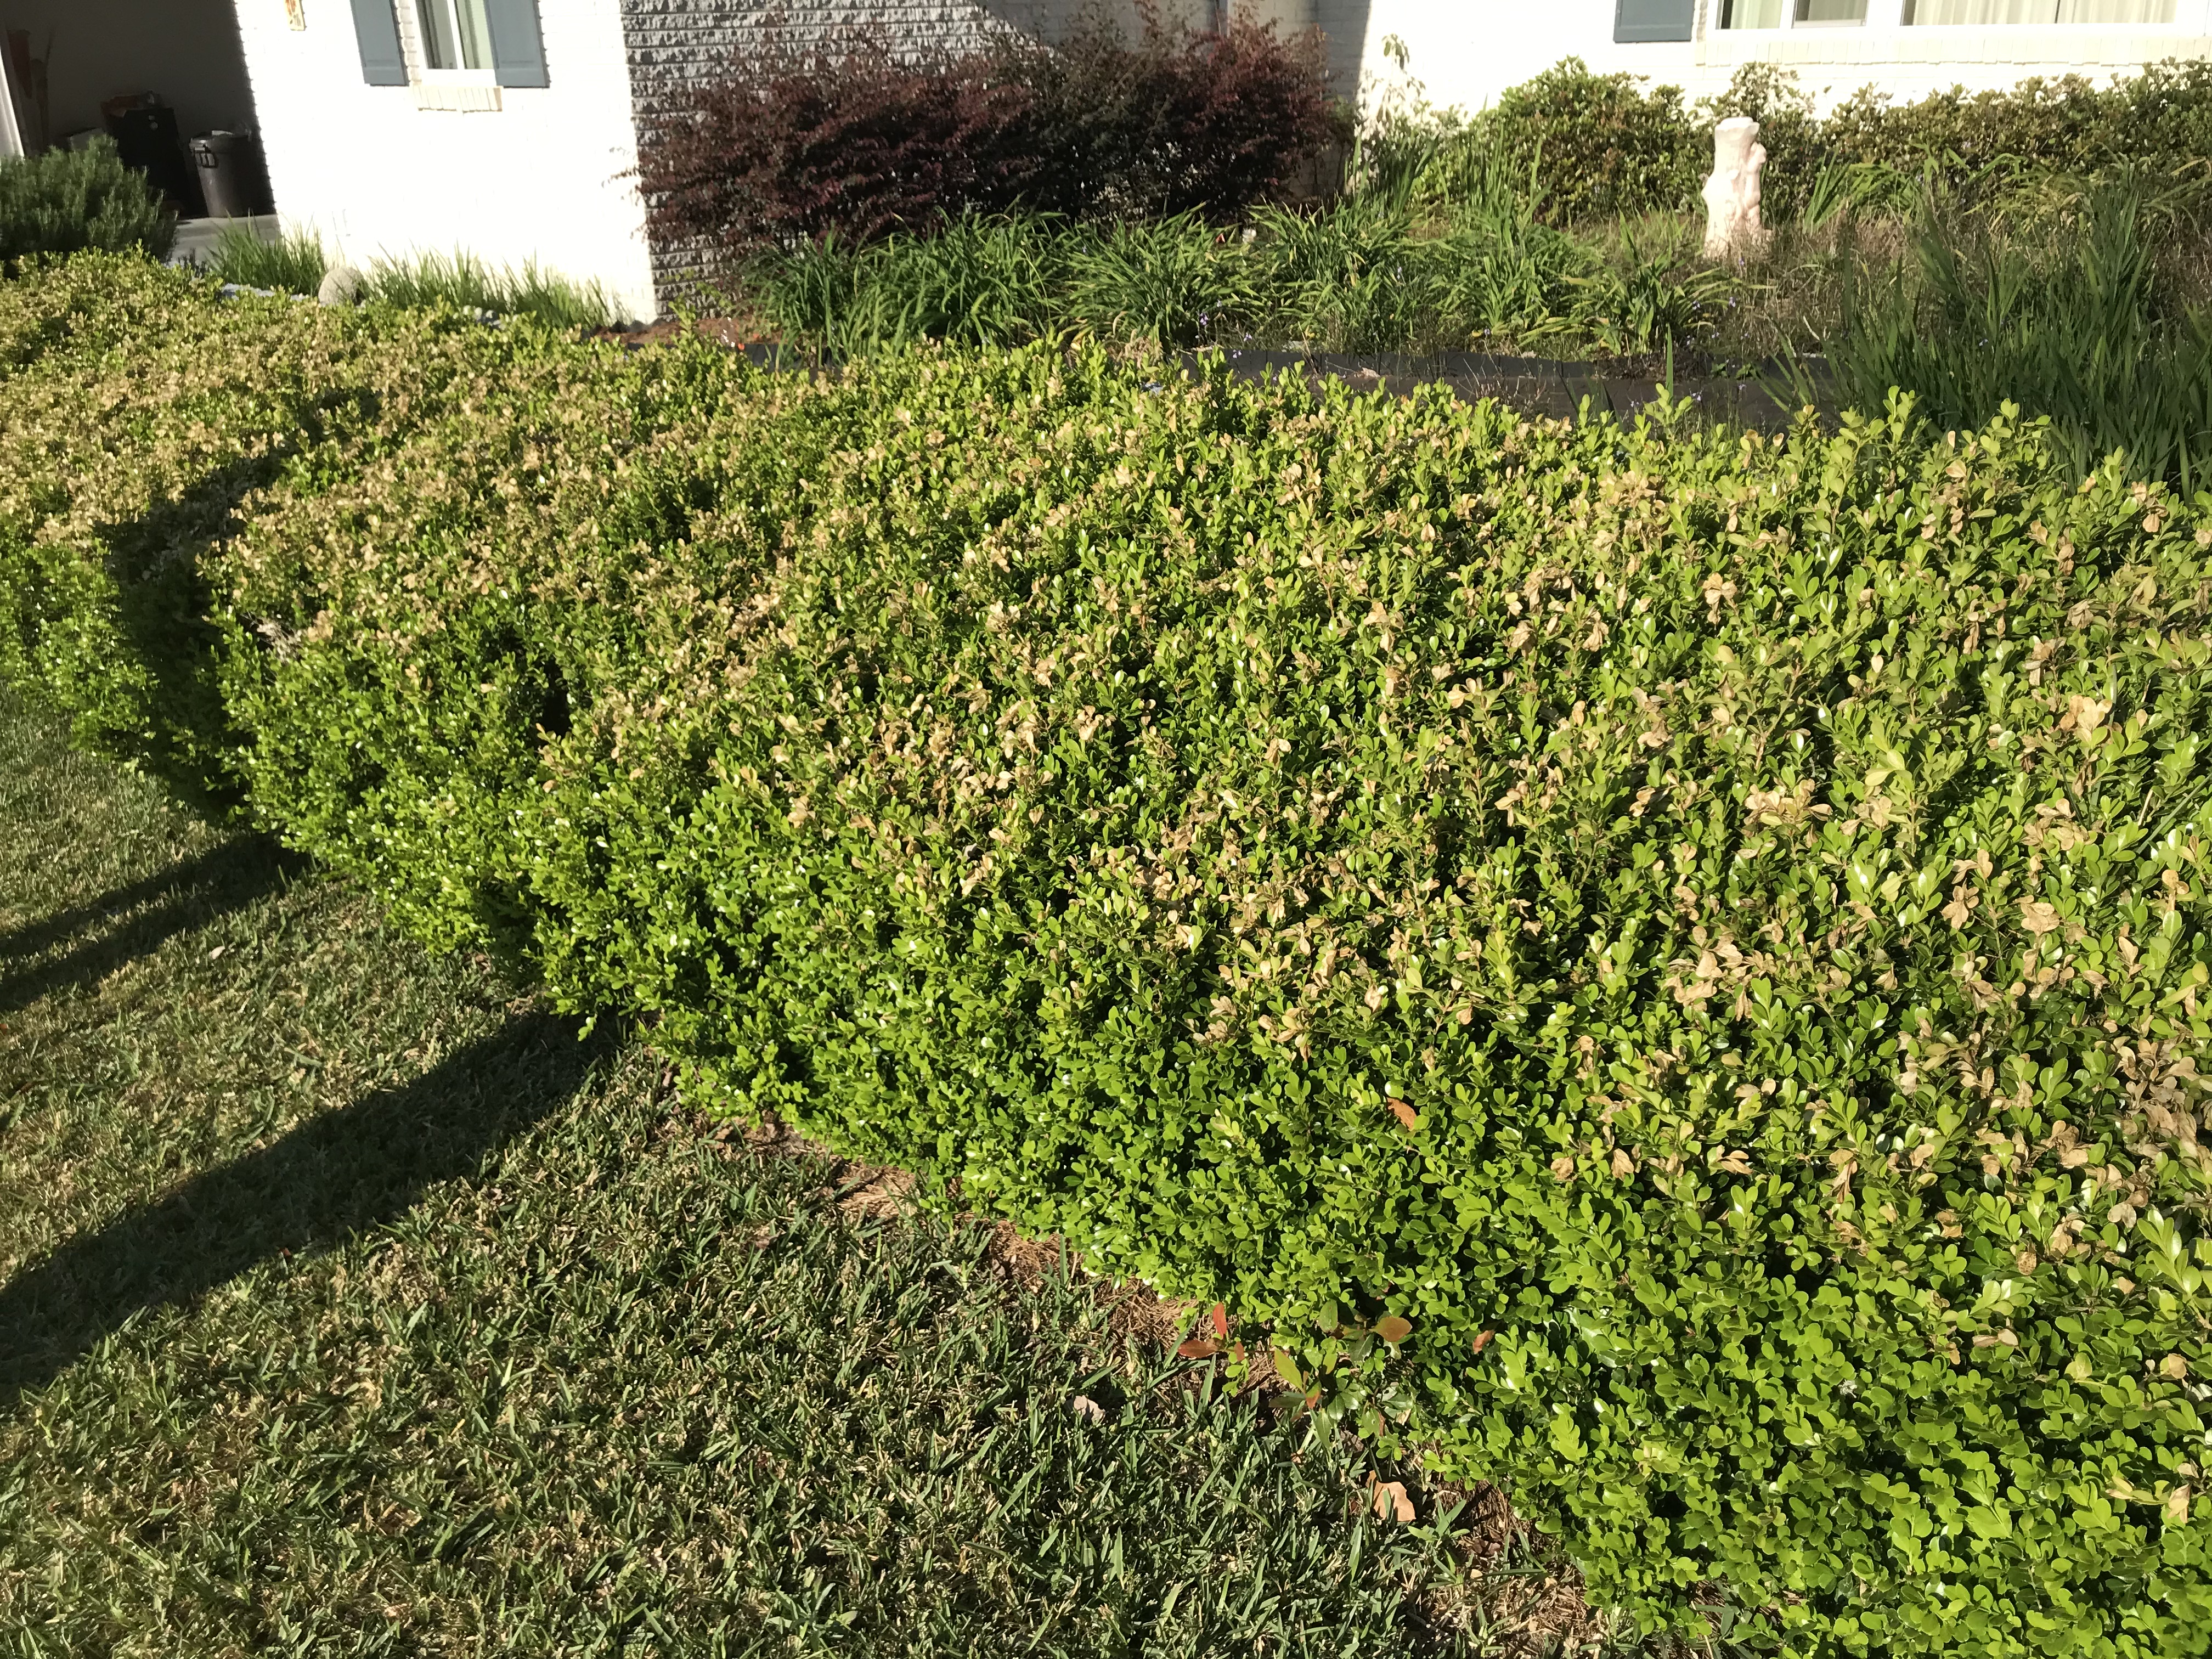
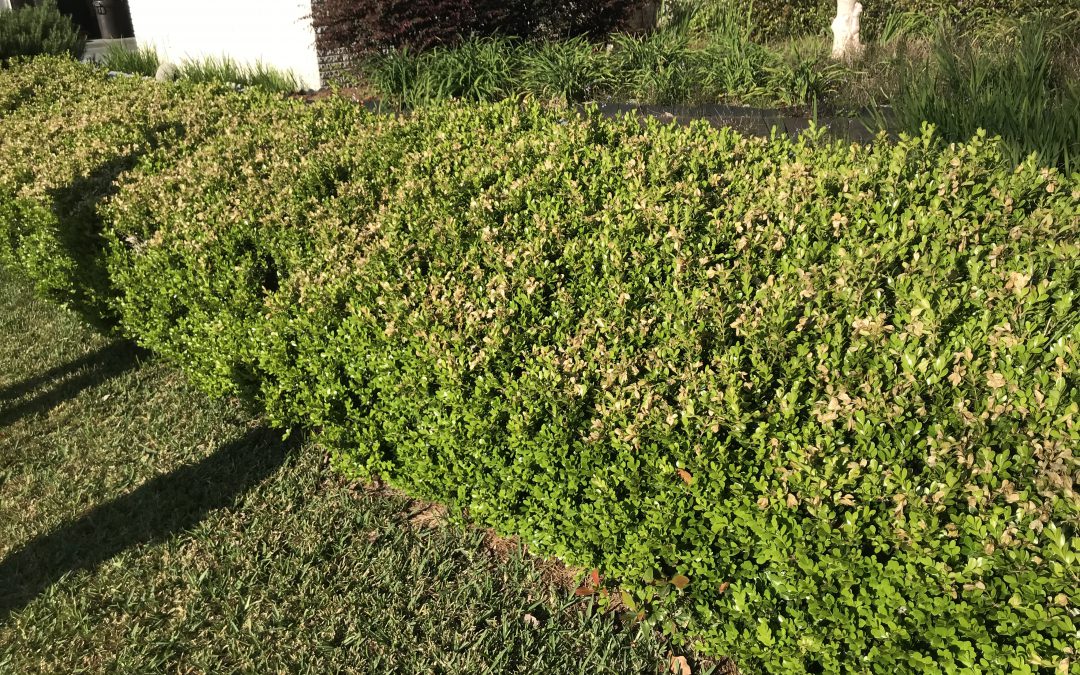
Cold damage on Boxwood hedge
Three weeks ago, I got a call from a very concerned client. She had gotten her March issue of a popular outdoor magazine in the mail, in which was a feature on an emerging pathogen, Boxwood Blight, a nasty fungus decimating Boxwood populations in states north of us. She had also noticed the Boxwoods in front of her house had recently developed browning of their new spring shoots across most the hedgerow. Having read the article and matching the symptoms she’d noticed to the ones described in the magazine article, she was convinced her shrub was infected with blight and wanted to know if there was a cure. Agreeing that the symptoms sounded similar and wanting to rule out an infection of an extremely serious pathogen, I decided to go take a look. Upon inspection, it was obvious that Boxwood Blight wasn’t to blame. Damage from disease generally isn’t quite as uniform as what I saw. The new growth on top of the hedge was indeed brown but only where the eaves of the house and a nearby tree didn’t provide overhead cover and, to boot, the sides of the hedge were a very normal bright green. Having gone through a recent cold snap that brought several mornings of heavy frost and knowing that the weeks before that the weather had been unseasonably warm, causing many plants to begin growing prematurely, all signs pointed toward an abiotic problem, cold/frost damage that would clear up as soon as the plant put on another flush of growth. The client was delighted to hear she didn’t have a hedge killing problem that would require either adopting a monthly fungicide regime or replacing the hedge with a different species.
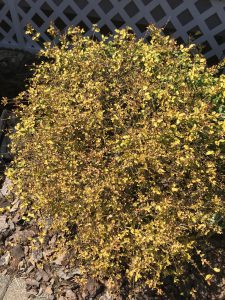
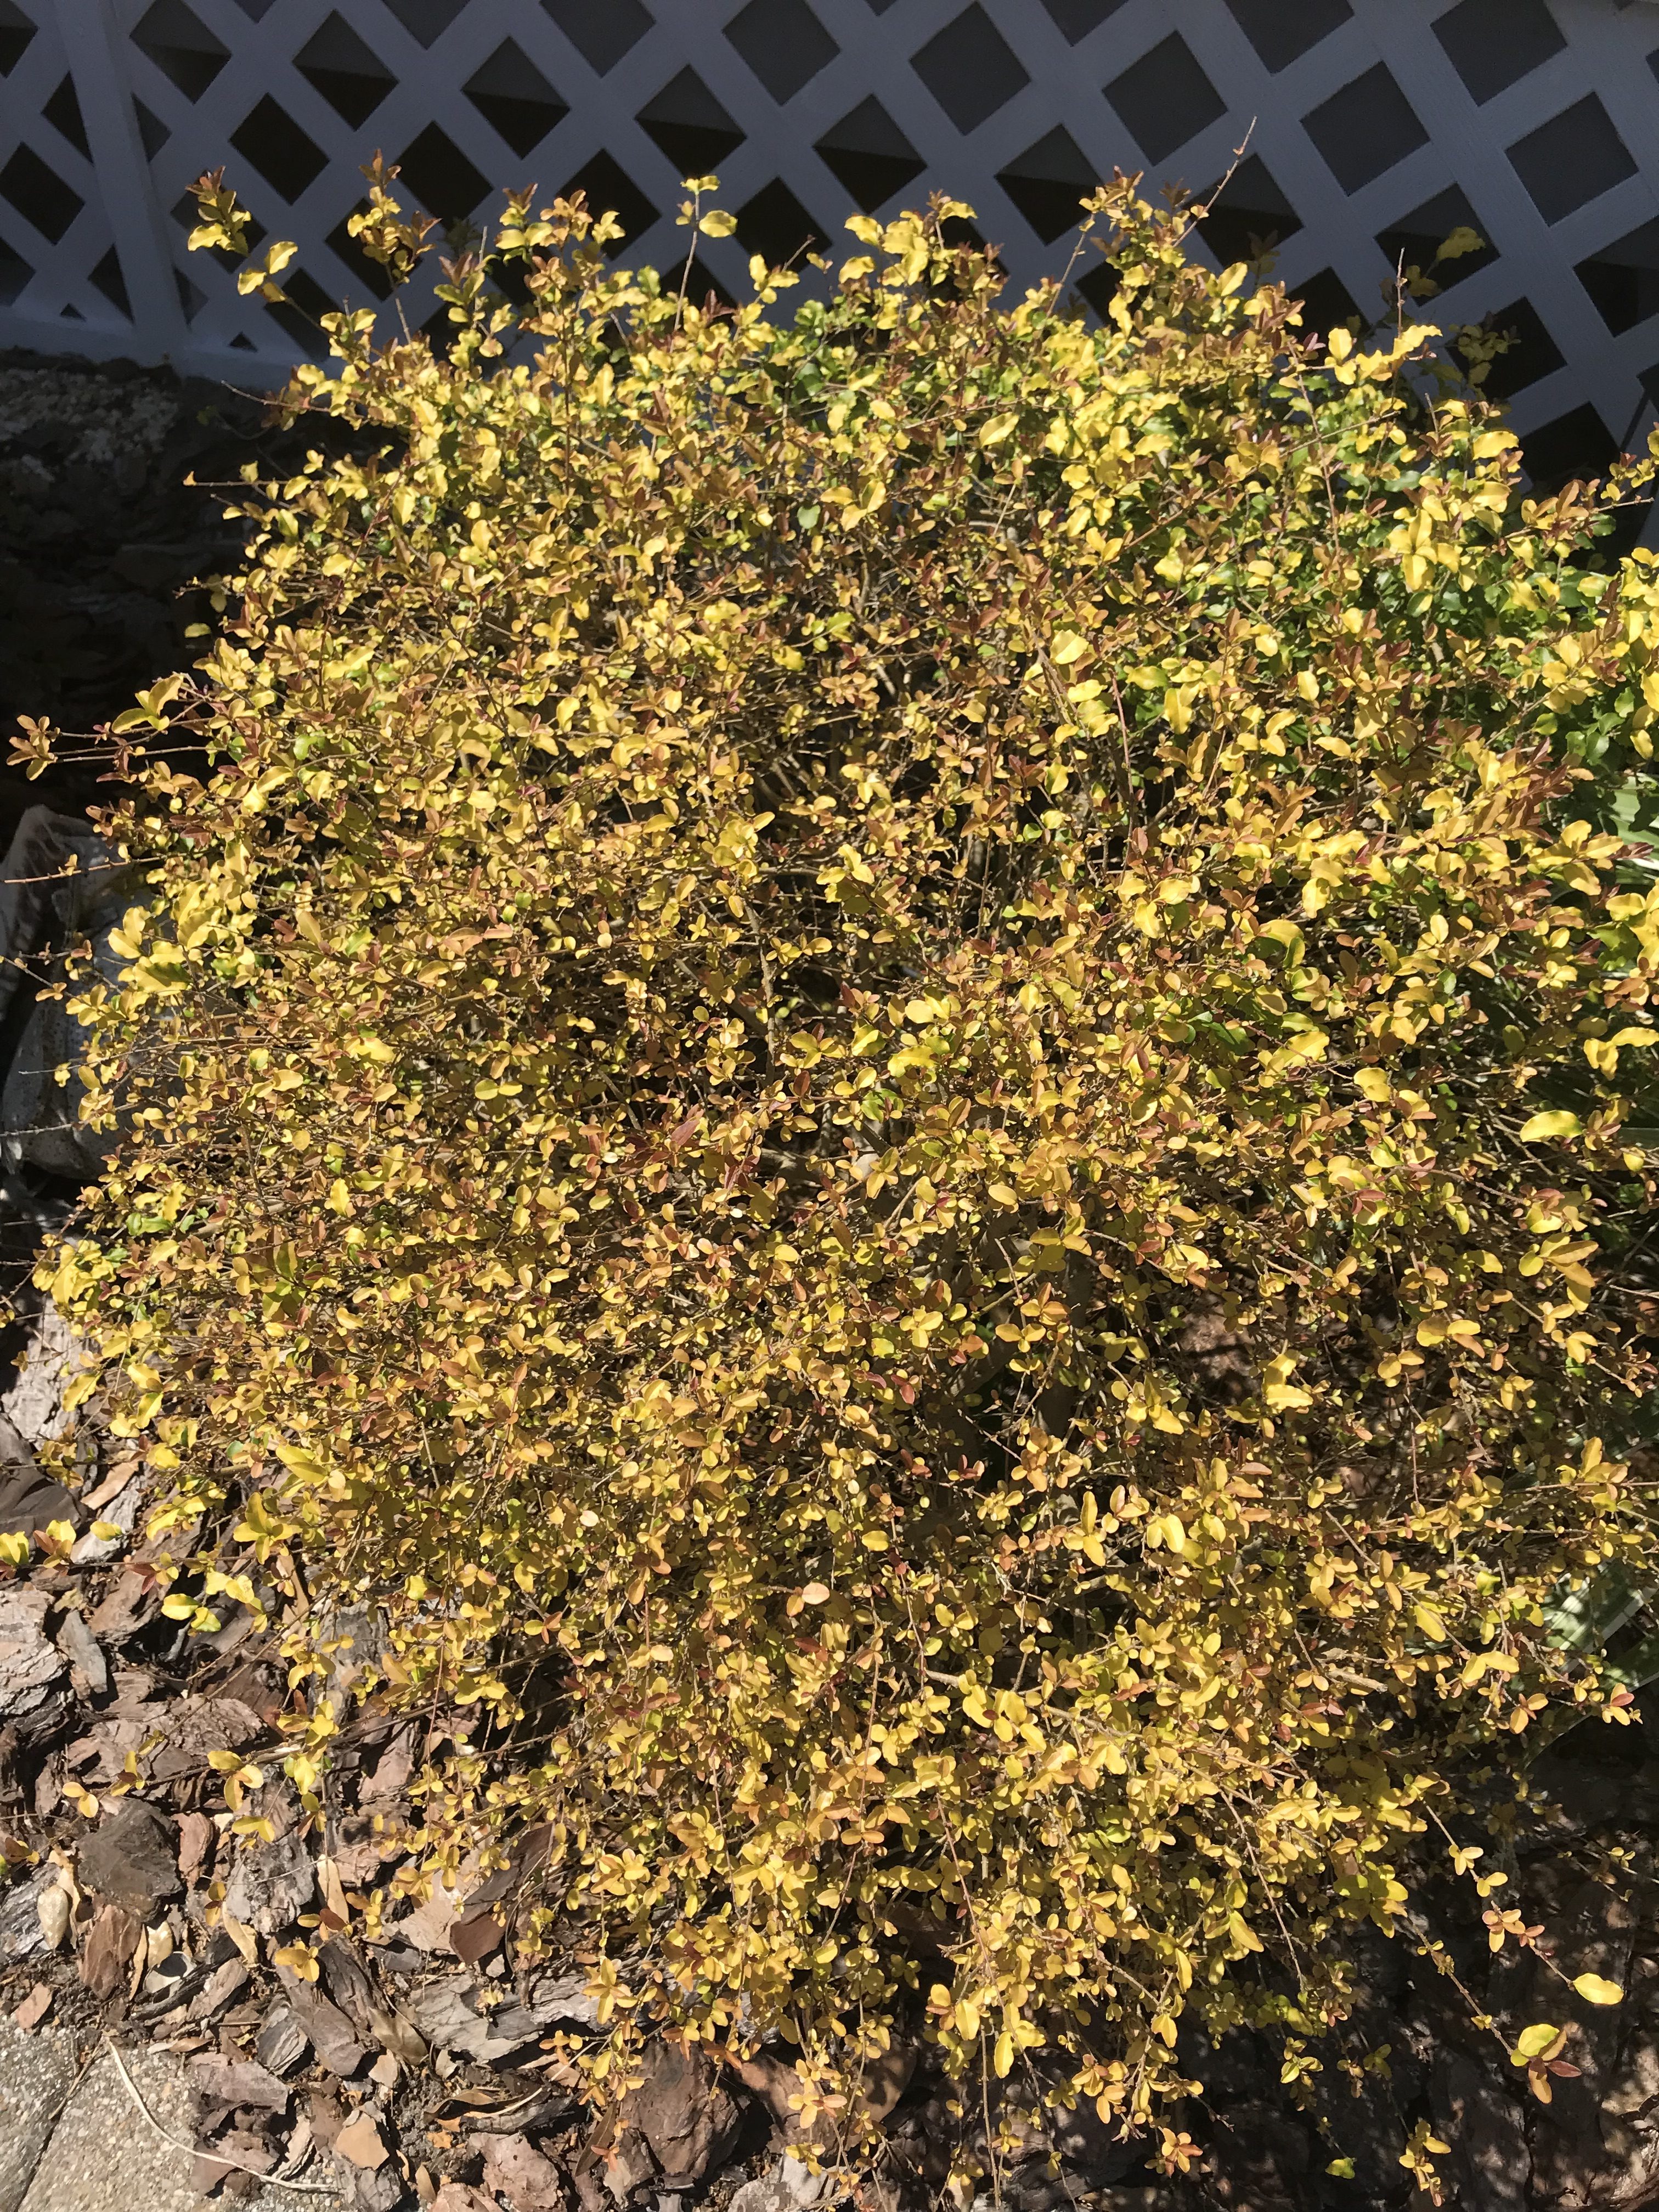
Damage to ‘Sunshine’ Ligustrum from pressure washing siding with bleach.
The very next week, another client asked if I would come by her house and take a look at a hedge of ‘Sunshine’ Ligustrum that lines her driveway, whose leaves had “bleached” out, turning from their normal chartreuse to a bronzy white color. This time, having seen similar issues with this particular plant that almost always involved an infestation of Spider or Broad Mites, I figured this was a cut and dry case that would end with a call to her pest control company to come spray the offending bugs. However, though the leaf damage looked similar, I was not able to locate any existing pests or find evidence any had been around recently, rather it appeared the leaves had been exposed to something that “bleached” and burned them. Puzzled, I began asking questions. What kind of maintenance occurs on the plants? Have you fertilized or applied any chemicals recently? Nothing. Then, near the end of our conversation, the client mentioned that her neighbor had pressure washed their house on a windy day and that she was irritated because some of the soap solution had gotten on her car. Bingo. Leaf burn from pressure washing solution chemicals. This time I was guilty of assuming the worst from a pest when the problem quite literally blew in on the wind from next door. Again, the client was relieved to know the plant would recover as soon as a new flush of growth emerged and hid the burned older leaves!
This spring, I’d encourage you to learn from the above situations and the next time you notice an issue on plants in your yard, before you reach for the pesticides, take a step back and think about what the damage looks like, thoroughly inspect the plants for possible insects or disease, and if you don’t find any, consider the possibility that the problem was abiotic in nature! And remember, if you need any assistance with identification of a landscape problem and want research-based recommendations on how to manage the problem, contact your local UF/IFAS Extension office.
by Matt Lollar | Oct 20, 2018
One of my favorite native plants is winged sumac. I like this plant not only for its ornamental beauty, but also for its fruit that can be dried and used as seasoning and to make tea. So you can understand my concern when one of my prized winged sumac plants had distorted leaves.

Eriophyid mite damage on winged sumac. Photo Credit: Matt Lollar, University of Florida/IFAS Extension – Santa Rosa County
After doing a little research and speaking with one of our UF/IFAS Specialists, I was able to determine that the leaf distortion was caused by eriophyid mites. Mites are not insects and are more closely related to spiders. They normally have four pairs of legs, however eriophyid mites only have two pairs of legs. They are microscopic, elongate, spindle-shaped, and translucent.

An eriophyid mite. Photo Credit: USDA, Agricultural Research Service.
Eriophyid mites cause galls (sometimes called witch’s broom) on various species of ornamental shrubs. Symptoms include early and late bud distortion, distorted leaves, and possibly plant death. In fact, the species Phyllocoptes fructiphilus is the vector for the viral disease of roses called Rose Rosette Disease. Sometimes the damage can be confused with herbicide damage.
Control options are currently being evaluated for eriophyid mites in the home landscape. Removing distorted plant material and removing it from the site can help prevent the spread of mites. If you suspect eriophyid mites are the cause of your distorted plants then samples should be collected. To collect samples: 1) Prune off symptomatic plant material and immediately place into a vial with rubbing alcohol; 2) label with collection date, plant species, and location; 3) mail to the Landscape Entomology Lab in Gainesville at P.O. Box 110620, Gainesville, FL 32611.
For more information on eriophyid mites and the sampling process, please see the fact sheet “Unusual Galls on Woody Ornamentals” from Erin Harlow and Dr. Adam Dale.
For more information on other mites that could be infesting your landscape, please go to this link from the Mid-Florida Research and Education Center in Apopka, FL.